
Installation Instructions
CertainTeed Vinyl Siding Installation Guide
86
Porch Ceilings
The procedures used to install a porch ceiling are in many ways
similar to those used to install soffit. These procedures vary slightly,
depending on whether you’re working on new construction or a
remodeling project.
New construction projects
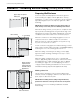
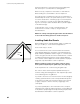
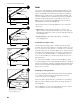
Begin by installing receiving channels on all four sides of the porch.
If you are using F-channel, nail it to existing walls. If you are using
J-channel, you will have to install a nailing base.
If you plan to use light blocks to attach external light fixtures, install
them to adequate backing.
Plan the layout of the ceiling panels to achieve an even balance
or to align with adjacent work. If the ceiling panels will run parallel
to the ceiling joists, you will have to install additional 1" x 3" wood
furring nailing strips. Install these nailing strips perpendicular to the
ceiling joists, nailing according to the schedule below.
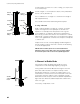
Invert J-channels and nail them to the underside of the wood strips
along the perimeter of the ceiling area.
Install the first panel into the channels at one end of the porch.
Be sure to leave room for expansion. Nail according to the
schedule below, positioning the nails in the centers of slots.
Do not nail tightly. Install remaining panels. When cutting the last
panel of the first course, be sure to allow room for expansion.
Nailing schedule for soffit
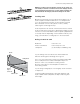
For areas where more than one panel length is needed, use a
double channel lineal.
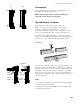
If necessary, rip cut the final panel and use a snap lock punch to
create tabs every 8" to 10" along the cut edge. Attach utility trim
and insert the panel into the receiving channel.
NOTE: For best results, ensure you have adequate ventilation.
Beaded T2 Fasten 8" to 12"
Ironmax Fasten every 16" to 24"
(as allowed by local building code)
T3-1/3 Fasten every 16" to 24"
(as allowed by local building code)
All other CertainTeed Fasten every 16"
soffit panels