
Installation Instructions

3) Fasten the panel to the wall by
first nailing through the round
center hole in the
nailing hem at the
t
op of the panel.
Continue nailing the
panel with 5 nails:
one in the right-end
nail slot and one at each of the
QuickReference
™
Nail Mark Indicators (figure 4). Leave
1/8" to 1/16" between the nail heads and the panel to
allow freedom of movement during normal expansion
and contraction.
4) Install the next panel by positioning it below the starter
strip and next to the first panel. Push in and up to lock
the panel into the starter strip and the side tabs of the
first panel, as shown in figure 5. Space the second
panel according to the panel temperature at the
corresponding temperature indicator lines (figure 1).
5) Nail the panel into
position starting with the
round center hole and
then placing the next nail
in the right-end nail slot
(which overlaps the
previous panel’s left-end
slot) so that the nail goes
through both panels’ nail
slots simultaneously. Continue nailing the rest of the
panel using the pr
ocedure in step 3.
6) Continue to install remaining panels of first course as
described in steps 3 through 5.
Second course
7) Cut 23-1/2" off of the right side of the D7 shingle at
indicator “B,” which is located above the nail slots,
cutting straight through the panel (figure 6).
Drill a
3/16" hole in
the center of
the nail hem
and nail the
siding thr
ough
this hole to
control the
dir
ection of
expansion
and contraction. Another option is to nail
each end of a nail slot located at the center of the panel.
8)
Set the spacing using the PanelThermometer and
temperature indicator lines and repeat steps 4-6.
9)
Continue to stagger panel courses accor
ding to steps
1 and 7, alter
nating each time to ensur
e a random
shingle patter
n up the wall.
I
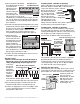
nstalling under a window or opening
I
nstall Cedar Impressions undersill trim (figure 7). Cut the
panel to fit under the window. Drill a 3/16" hole in the
center of the nail hem. Using a snap lock
punch, raise tab faces on
the outside of the panel
1/4" from the trimmed
edge, 6" apart. Lock the
panel into the previous
course, and center nail the
siding through the 3/16"
hole drilled earlier. (Center
nailing controls the direction of the panel’s expansion
and contraction.) Lock the panel into place.
Installing over a window or opening
Cut the panel to fit over the window by measuring from
the locking tab of the previous row to the bottom of the
receiving pocket (figure 8). Add 1/8" to this measurement.
Turn the panel over and, using this measurement,
measure from the bottom of the return leg (figure 9).
Cut the panel to this dimension. Install the cut panel by
positioning the panel over the window and into the
receiving pocket. Lock the cut panel into the previous
course by pushing in and up. The cut edge should be
1/4" below the top of the receiving pocket.
Finishing the top course
To finish the top course of siding, attach cornice receiver
to the top of the wall under the eave or sof
fit. Trim the top
panel to within 1/4" of the cor
nice r
eceiver
. Using a nail
slot punch, punch nail
slots 1/4" from the
trimmed edge, 16" apart.
Nail of
f the top course
and snap the cornice
molding into the cor
nice
r
eceiver (figur
e 10).
FIGURE 10
cedar
impressions panel
cornice
molding
cornice receiver
1/4"
1/4"
bottom of
receiving channel
back side of panel to be cut
measure from
the locking tab
to the bottom
of the receiving
channel and
add 1/8"
bottom of
locking tab
bottom of
return leg
FIGURE 8
FIGURE 9
window
cedar impressions
undersill trim
cedar impressions
family panel
FIGURE 7
New! D7" Straight Edge Perfection Shingles and Mitered Cornerpost Installation Instructions | 2 of 3
drill 3/16" dia. hole at midpoint
of remaining panel
23-1/2"
FIGURE 6
“B”
1/4"
FIGURE 5
QuickReference
Nail Mark Indicators
FIGURE 4