
Installation Instructions

Installing Mitered Cornerpost
Before applying siding and accessories, make certain
the substrate is watertight. To be properly protected from
precipitation, make sure you have properly flashed the
substrate so that it sheds water outside the siding. The
siding and accessories alone are not meant to be a
watertight barrier.
For the best appearance and easier installation, we
suggest you install Mitered Cornerposts as you move up
the wall. If you prefer, you can install Mitered
Cornerposts after the siding has been installed.
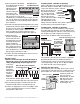
1. Install the first Cedar Impressions panel 3" from the
edge of the outside wall.
2. Once the panel has been fastened, hook the corner
piece over the siding, making sure the corner piece is
locked into the starter strip.
3. Nail thr
ough the top two holes of the cor
nerpost.
4. Continue installing the cor
ner pieces as you move up
the wall.
5. When you reach the top panel, cut the corner piece to
length and nail it with a color matched finish nail.
L
eave 1/4" between the top corner piece and the
cornice receiver.
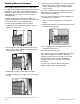
If a course of siding ends at an outside corner that has a
Mitered Cornerpost installed, you will have to cut the
Cedar Impressions panel to fit.
6. Measure from the edge of the last installed panel to
the edge of the Cornerpost.
7. Add 1-1/2" to this dimension and cut the panel to
length.
8. Angle the panel into the Cornerpost and slide it to the
left until the side tabs clear.
9. Then, slide the panel to the right until the correct
temperature marks line up.
10. Fasten the panel to the wall.
If you finish the top course of Cedar Impressions siding
with cornice molding, you should also install Vinyl
Carpentry Cornice Cap. Cornice Cap covers the gap
between the two pieces of cornice molding and
seamlessly finishes the installation of the Mitered
Cornerpost.
If you have any questions about installing these
pr
oducts, please call us at 800-233-8990.
© CertainTeed Corporation 12/07
New! D7" Straight Edge Perfection Shingles and Mitered Cornerpost Installation Instructions | 3 of 3
CTS125