
User manual


© CES Wireless Technologies Corp – 2010 Page 8 of 12
3.0 Installation
The instructions in this section describe the hardware installation of the GPS-201/202. To install the GPS-
201/202 in a vehicle follow these steps:
• Choose a convenient location in the vehicle – either in the trunk or interior of a vehicle. Avoid
locations that might expose the GPS-201/202 to excessive heat or moisture.
• Hold the GPS-201/202 in place and mark the location for mounting screw holes
• Using the markings as a guide, drill mounting holes in those positions
• Align the GPS-201/202 in the drilled holes and secure it with mounting screws
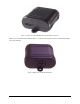
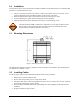
3.1 Mounting Dimensions
Figure 3: Mounting dimensions of a GPS-201/202
The GPS-201/202 should be used as a template to mark screw holes for installation. The mounting holes
are designed for a number 8 screw.
3.2 Installing Cables
To ensure proper operation of the GPS-201/202 please follow these precautions:
• Remove power from the GPS-201/202.
• Do not create sharp bends, loops or crimps in the cables.
• Attach all cables to the vehicle and equipment in such a way as to reduce stress or wear caused by
the vibration generated by moving vehicles.
• No more than a combined total of ten (10) pounds force can be applied to the
GPS-201/202
connector.
• Properly terminate all power cables.
The GPS-201/202 is
NOT
a waterproof or sealed device. Care must be taken to ensure
that the device is kept away from water and other liquids. The GPS-201/202 can be
mounted inside a weather proofed box if necessary.