
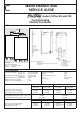
Technical data


14. Flow switch
Drain boiler as in step 12. Disconnect the
electrical plug, turn the top cover anti-
clockwise, remove the O-ring and the
brass piston. Reassemble in reverse
order.
15.
3-Way valve
Drain boiler as in step 12. Remove the 3
clips on the 3 way valve. Remove the clip
on the exchanger fl
ow pipe. Pull the pipe
down then pull it out of the 3 way valve.
Disconnect the plug from the motor.
Unscrew the nut on the pipe between the
connecting bracket and the 3 way valve
and pull it toward you. Rotate the 3 way
valve body anti-clockwise to unclip it from
the left hydraulic assembly.
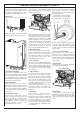
17. Main heat exchanger
Carry out steps 1 and 2 as above. Drain
boiler as in step 12. Remove the 2 clips
E
located on return and flow pipes and pull
them downwards. Pull the main exchang-
er toward you to remove. Reassemble in
reverse order.
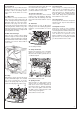
18. Pump
Drain boiler as in step 12. Pivot the electi
-
cal box downwards. Open the electrical
box cover removing the 2 screws.
Remove the pump plug from the power
board and earth plug from earth socket.
Unscrew the nut
F of the return pipe from
the volute. Remove the clip G on
the pump volute and pull pump toward
you. Reassemble in reverse order.
19. Pressure relief valve
The pressure relief valve can be serviced
from the front of the appliance. Drain the
boiler first, undo the retaining screw and
pull out the valve.Reassemble in reverse
order.
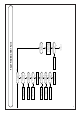
20. Thermistor
Drain the boiler as step 12. Disconnect
the plug, remove the retaining clip pull the
thermistor out. Reassemble in reverse
order.
37 = Heating thermistor
21. Safety thermostat
Remove the casing as step 1 and hinge
down the electrical box as step 5.
Disconnect the 2 cables, pull out the sen-
sor with the clip
13.
Reassemble in reverse order.
22. Spark generator
Carry out steps 1, 2, and open the electri-
cal box cover as mentionned in step 5.
Undo the 4 screws of the electrical rear
panel and remove it. Unplug electrodes
wires, remove the ignitor connector from
the PCB, remove earth plug from earth
socket. Hang out the ignitor.
Reassemble in reverse order.
23. Power board
Carry out steps 1, 2, and open the electri
-
cal box cover as mentionned in step 5.
Undo the 4 screws of the electrical rear
panel and remove it. Unplug all cables
from the PCB, remove earth plug from
earth socket. Hang out the power board.
Reassemble in reverse order.
24. Control board
Pull out plastic knob from the front panel
and proceed as step 23. Reassemble in
reverse order.
25. Expansion vessel
Remove the casing as step 1 and drain
the boiler as step 12 above. Unscrew the
connecting tails nuts and lift out the boiler
from the wall. Place it on a side on the
floor. Remove the expansion vessel
bracket retaining screws, disconnect the
pipe from the vessel and pull ti toward
you. Reassemble in reverse order.
37
7
E
FG
13