
User Manual

MiniGAP2
System Features:
•
Easy to mount on any surface or in any
location
• Weather Resistant Design
• Use Ou
tside the Front door or for a side
door
• Wireless Gate Access Control
• Up to Two Year battery life
• Secure digital connection
• Unlimited number of units can operate
on a property, without interfering with
other Intercom networks.
Made With Pride In the USA
. This product is covered by a
manufacturer’s full One Year Warranty.
FCC STATEMENT
This device complies with FCC part 15 rules. It may not cause harmful interference with other devices, and must accept interference from other devices.
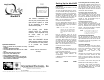
Thank you for purchasing
the Oracle MiniGAP2. This
product has been designed
and manufactured in the
USA, utilizing the highest
quality standards available.
Model OMG2
102406
Patents pending
The Or
acle™ MiniGAP2 unit
can be your primary door and
gate access system or used
as an accessory to a Gate
Access Panel (GAP).
For privacy, your Oracle
system forms an exclusive
network, and responds only
to other units in your
network.
(Patent Pending)
Since
this MiniGAP2 Access
and Intercom system requires
no connection to wall power,
it is perfect for remote
locations.
Please read the instructions
carefully.
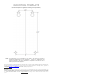
Setting Up the MiniGAP2
Installation
Make sure that the CALL button is in easy
reach of a visitor.
To mount the MiniGAP2 with four screws,
use the included mounting template (see
Back Page) as a guide for screw placement.
Tighten the top two screws halfway. Place
the back of the MiniGAP2 on the two top
screws and tighten. Put the other two
screws in the bottom holes and tighten.
Note: Do not assemble the front of the
unit until it has been activated.
Use the double-sided mounting tape to
mount the MiniGAP2 on a metal, glass, or
other smooth surface where you wouldn’t
want to use screws.
Note:
For best results, clean both
surfaces that the double-sided
mounting tape will be in contact
with, using the included alcohol
wipe.
Peel the protective paper off of the
mounting tape and firmly press it onto the
back of the MiniGAP2. Press firmly on the
back of the tape to push out any trapped
air bubbles. When ready to do so, peel the
red protective paper from the mounting
tape and firmly press the MiniGAP2 on to
the surface that you wish to mount it on.
Note: Do not assemble the front of the
unit until it has been activated.
Batteries
Place four AA Alkaline batteries in the
battery pack. The batteries should last up
to two years with average use.
Note: If used in location that will be below
-10
°
C (20
°
F) Lithium batteries are
recommended.
A Double-beep every ten minutes indicates
low batteries.
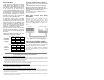
Add PHOTO HERE
Activating Oracle Accessory Units
The MiniGAP2 is shipped with Dip Switch #1 in
the UP position making it an “Active” unit. If
the MiniGAP2 is going to be the “Passive”
unit, Dip Switch #2 will need to be in the
DOWN position and then follow the directions
listed under “Multi-GAP Mode”.
Activating a Gate Control Unit (GCU)
(only if this MiniGAP2 is the “Active” unit)
Press and hold down the GCU learn button
for 1 second. Within 20 seconds press and
hold down the MiniGAP2 learn button for 10
seconds or until the MiniGAP2 beeps in
response as it activates the GCU.
Activating Oracle Intercoms
(only if this MiniGAP2 is the “Active” unit)
Press and release the LEARN button on the
Intercom. Within 20 seconds, press and hold
down the MiniGAP2 learn button for one
second . The Intercom will beep in response
when it joins the system network.
NOTE:
For a Wall Flush mount Intercom, hold
down both buttons of the Intercom for 3
seconds (until the channel lights start
fast-flashing) then release them.
Assembling the MiniGAP2
Put the two halves of the Intercom body
together and place the 4 black screws in the
top and bottom holes on the front of the unit
and tighten with the hex key provided. The
Intercom is ready to use.
Using the MiniGAP
When a visitor presses the CALL button,
Intercom units will give an attention-getting
beep and if unanswered, continue to beep
for 40 seconds. During this time,
Intercoms will ONLY connect to the
MiniGAP2.
Hold down the TALK button on an Intercom
to speak to the visitor. Release the TALK
button to hear the response. This will be a
secure conversation and other Intercoms will
not interfere.
To activate a Gate Control Unit press the
REMOTE button while talking to a visitor.
To activate a Gate Control Unit without a
visitor pressing the CALL button, hold the
Intercom’s REMOTE button for 10 seconds
(not available in Multi-GAP mode).