
Installation Instructions
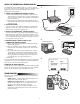
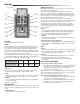
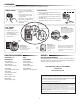

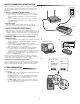
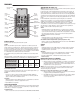
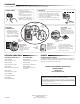
Table Of Contents

1
INTERNET CONNECTIVITY KIT
MODEL CIGCWC
To prevent possible SERIOUS INJURY or DEATH from electrocution:
• Be sure power is NOT connected BEFORE installing door control.
• Connect ONLY to 7-28 VOLT low voltage wires.
To prevent possible SERIOUS INJURY or DEATH from a closing
garage door:
• Install door control within sight of garage door, out of reach of
children at a minimum height of 5 feet (1.5 m), and away from ALL
moving parts of door.
• NEVER permit children to operate or play with door control push
buttons or remote control transmitters.
• Activate door ONLY when it can be seen clearly, is properly
adjusted, and there are no obstructions to door travel.
• ALWAYS keep garage door in sight until completely closed. NEVER
permit anyone to cross path of closing garage door.
• DO NOT install this door control on garage door opener systems
controlling one-piece or swing doors.
To provide an adequate visual alert, the garage door opener light
bulb(s) MUST be a minimum of 40 Watt (or equivalent).
This kit includes the MyQ
®
Control Panel model 41A7928-3 and the
Chamberlain
®
Internet Gateway model CIGBU. The MyQ
®
Control Panel is
intended to be installed with Security✚™ Garage Door Openers
manufactured between 1998 and present. The MyQ
®
Control Panel is NOT
compatible with Security✚ 2.0™ Garage Door Openers. DO NOT install
this door control on garage door opener systems controlling one-piece or
swing doors.
APPLICATION
The MyQ
®
Control Panel offers a quick and convenient way to add
Security✚ 2.0™ and MyQ
®
technology to your existing garage door
opener. MyQ
®
technology uses a 900MHz signal to provide two-way
communication between the garage door opener and MyQ
®
enabled
accessories. When programmed to the Chamberlain
®
Internet Gateway
you can monitor and control your garage door from any internet enabled
computer or smartphone. You may program up to 12 Security✚ 2.0™
remote controls, 2 Security✚ 2.0™ keyless entries and a combination of
16 MyQ
®
accessories to the MyQ
®
control panel. For full compatibility,
see page 4.
OVERVIEW
Install the control panel in place of the existing door control. Due to
power consumption the control panel cannot be used in conjunction with
another wired door control connected to your garage door opener. If an
additional door control is needed, the wireless door control model
41A7773-1 can be programmed to the control panel. To program the
41A7773-1 to the control panel, follow the remote control programming
steps. When in battery back-up mode, any feature using unattended
operation such as Timer-to-Close, closure from a garage door and gate
monitor or remote operation utilizing the Chamberlain
®
Internet Gateway
will be disabled.
1. Disconnect all electrical and battery power (if applicable) to the
garage door opener.
2. Remove the existing door control from the wall.
3. Note the polarity of the wires connected to the existing door
control.
• Label the wire connected to the RED terminal.
• Label the wire connected to the WHITE terminal.
Disconnect the wires from the existing door control.
4. Connect the wires to the new MyQ
®
Control Panel. Make sure the
polarity is correct.
• Red wire to the R terminal.
• White wire to the W terminal.
5. Mount the control panel to the wall.
6. Reconnect power. The yellow command LED and the red learn LED
will blink quickly for up to 5 minutes as the control panel
recharges. When the control panel is operational, the yellow
command LED will glow steadily.
7. To test the control panel, press the push bar to activate the garage
door opener.
INSTALL THE MyQ
®
CONTROL PANEL
Existing Door Control
Discard, donate
or recycle
Wire from
RED terminal
Connect
RED wire to
R terminal
Wire from
WHITE
terminal
Connect
WHITE
wire to W
terminal
MyQ
®
Control Panel
• If the yellow command LED does not turn on, reverse the wires
connected to the R and W terminals of the control panel. Replace
wire if necessary.
• If yellow and red LEDs are blinking slowly, the control panel is not
compatible with your garage door opener.
• If the yellow and red LEDs are blinking quickly, the control panel is
charging, and may take up to 5 minutes to become operational.
TROUBLESHOOTING