
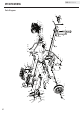
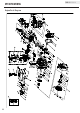
Replacement Part List


18
100326 ENGLISH
The owner/operator is responsible for all periodic
maintenance.
Complete all scheduled maintenance in a timely manner.
Correct any issue before operating the log splitter.
Improper maintenance will void your warranty.
For service or parts assistance, contact our help line
at 1-877-33 8-099 9.
NOTE
Never operate a damaged or defective log splitter.
WARNING
WARNING
Log Splitter Maintenance
Make certain that the log splitter is kept clean and stored
properly. Only operate the unit on a flat, level surface in
a clean, dry operating environment. DO NOT expose the
unit to extreme conditions, excessive dust, dirt, moisture
or corrosive vapors.
Inspect all air vents and cooling slots to ensure that they
are clean and unobstructed.
Check and tighten all bolts and nuts before operating the
log splitter.
Be sure to confirm all hose connections and hose clamps
are tight before each use. It is possible for connections
to vibrate loose over time.
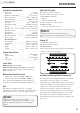
0.7 - 0.8 mm
0.028 - 0.031 in.
Once oil has been added, a visual check should show
oil about 1-2 threads from running out of the fill hole.
If using the dipstick to check oil level, DO NOT screw
in the dipstick while checking.
NOTE
MAINTENANCE AND STORAGE
Engine Maintenance
To prevent accidental starting, remove and ground spark
plug wire before performing any service.
Oil
Change oil when the engine is warm. Refer to the oil
specification to select the proper grade of oil for your
operating environment.
1. Remove the oil drain plug with a 12 mm socket and
extension. (not included)
2. Allow the oil to drain completely.
3. Replace the drain plug.
4. Remove oil fill cap/dipstick to add oil.
5. Using a funnel, add up to 0.6 qt. (0.6 L) of oil and
replace oil fill cap/dipstick. Do NOT overfill.
6. Dispose of used oil at an approved waste
management facility.
Spark Plugs
1. Remove the spark plug cable from the spark plug.
2. Use a spark plug socket tool (not included) or a
13/16 in. or 21 mm socket (not included) to remove
the plug.
3. Inspect the electrode on the plug. It must be clean
and not worn to produce the spark required for
ignition.
4. Make certain the spark plug gap is 0.7 - 0.8 mm or
(0.028 - 0.031 in.).
5. Refer to the spark plug recommendation chart when
replacing the plug.
6. Carefully thread the plug into the engine.
7. Use a spark plug socket tool (not included) or a
13/16 in. or 21 mm socket (not included) to firmly
install the plug.
8. Attach the spark plug wire to the plug.
Air Filter
1. Using your fingers, unscrew the thumb screws of
the top holes of the air filter cover.
2. Remove the plastic outer casing.
3. Remove the foam element.
4. Wash in liquid detergent and water. Squeeze
thoroughly dry in a clean cloth.
5. Saturate in clean engine oil.
6. Squeeze in a clean, absorbent cloth to remove all
excess oil.
7. Place the filter in the assembly.
8. Reattach the air filter cover and using your fingers,
insert the thumb screws into the top and bottom
holes of the air filter cover. Screw until tight. Be sure
not to over tighten.