
Operating Guide


100382 - 2600 PSI PRESSURE WASHER
ASSEMBLY
11
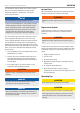
Add Fuel
1. Use clean, fresh, regular unleaded fuel with a minimum
octane rating of 85 and an ethanol content of less than
10% by volume.
2. DO NOT mix oil with fuel.
3. Clean the area around the fuel cap.
4. Remove the fuel cap.
5. Slowly add fuel to the tank. DO NOT OVERFILL. Fuel can
expand after filling. A minimum of ¼ in. (6.4 mm) of space
left in the tank is required for fuel expansion, more than
¼ in. (6.4 mm) is recommended. Fuel can be forced out of
the tank as a result of expansion if it is overfilled, and can
affect the stable running condition of the product. When
filling the tank, it is recommended to leave enough space
for the fuel to expand.
6. Screw on the fuel cap and wipe away any spilled fuel.
WARNING
Pouring fuel too fast through the fuel screen may result in
blow back of fuel at the operator while filling.
CAUTION
Use regular unleaded gasoline with a minimum octane
rating of 85.
Do not mix oil and gasoline.
Fill tank to approximately ¼ in. (6.4 mm) below the top of
the tank to allow for fuel expansion.
DO NOT pump gas directly into the pressure washer at the
gas station. Use an approved container to transfer the fuel
to the pressure washer.
DO NOT fill fuel tank indoors.
DO NOT fill fuel tank when the engine is running or hot.
DO NOT overfill the fuel tank.
DO NOT light cigarettes or smoke when filling the fuel tank.
NOTICE
Our engines work well with 10% or less ethanol blend fuels.
When using blended fuels there are some issues worth
noting:
– Ethanol-gasoline blends can absorb more water than
gasoline alone.
– These blends can eventually separate, leaving water or a
watery goo in the tank, fuel valve and carburetor.
– With gravity-fed fuel supplies, this compromised fuel
can be drawn into the carburetor and cause damage to
the engine and/or potential hazards.
– There are only a few suppliers of fuel stabilizer that are
formulated to work with ethanol blend fuels.
– Any damages or hazards caused by using improper fuel,
improperly stored fuel, and/or improperly formulated
stabilizers, are not covered by manufacturer's warranty.
It is advisable to always shut off the fuel supply, run the
engine to fuel starvation and drain the tank when the
equipment is not in use for more than 30 days.
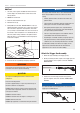
Attach the Trigger Gun Assembly
1. Attach the spray wand (A) to the trigger gun (B).
2. Rotate (clockwise) the M22 coupler on the trigger gun until
the spray wand is secure. Tighten connection. DO NOT
OVER-TIGHTEN.
3. Connect the end of the high pressure hose (C) to the
gun inlet. Tighten connection clockwise. DO NOT OVER-
TIGHTEN.
NOTICE
Be careful to avoid cross-threading, which can cause the
trigger gun to leak during use.
A B
C