
Use and Care Guide


100778 - 2800 PSI PRESSURE WASHER
ASSEMBLY
12
ASSEMBLY
Your pressure washer requires some assembly. This unit ships
from our factory without oil. It must be properly serviced with
fuel and oil before operation. If you have any questions regarding
the assembly of your pressure washer, call our help line at
1-877-338-0999. Please have your serial number and model
number available.
Remove the Pressure Washer from the
Shipping Carton
1. Set the shipping carton on a solid, flat surface.
2. Remove everything from the carton except the pressure
washer.
3. Carefully cut each corner of the box from top to bottom.
Install Wheels, Support Legs, Detergent Tank,
Trigger Gun Holder, Handle, and Nozzles
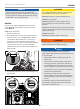
Wheels
1. Before adding fuel and oil, carefully pivot the pressure washer
up and forward so that it rests on the front bumper housing.
Place a piece of cardboard from the packaging or moving
blanket on the ground before tipping forward.
2. Slide the roll pin through the wheel from the outside.
3. Slide the roll pin through the mount point on the frame.
4. Secure with the R-clip.
5. Repeat to attach the second wheel.
6. Add wheel caps to protect the roll pins.
Support Legs
1. Attach the supports legs to the pressure washer frame with
2 M8 x 45 flange bolts and 2 M8 flange lock nuts per leg.
Tighten to 8.8 ft-lb − 10.3 ft-lb (12-14 Nm).
2. Repeat to attach the second leg.
3. Slowly tip the pressure washer back down so that it rests on
the support legs.
Detergent Tank
1. Slide detergent tank from the back of the frame between the
support legs. It will only align one way. If for some reason,
you’re unable to align the tank holes to the brackets, reverse
out the tank and try the other way.
2. Attach to the frame with 2 M6 x 12 flange bolts on each side.
Tighten to 4.4 ft-lb − 5.9 ft-lb (6-8 Nm). Do not overtighten
and risk cracking the detergent tank.