
User manual


Assembly
6
Assembly
Your welder requires some assembly.
If you have any questions regarding the
assembly of your welder, call our help line at
1-877-338-0999. Please have your serial
number and model number available.
This unit can be used for MIG/MAG (CO2
gas-protected) welding or Flux wire (non-
gas) welding. This unit does not include
equipment for gas-protected uses (CO2 gas
cylinder, pressure gauges, hoses, etc.)
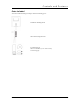
Installing Wire Feed
This unit supports wire sizes of .6mm,
.8mm, .9mm Flux Core or Solid Wire. Make
sure the correct Wire Feed Roller is being
used. We have provided one in the
packaging.
1. Lift tab on side panel to access wire feed
mechanisms
2. Unscrew the wing nut and remove the
reel locking knob
3. Place the wire reel over the shaft. The
wire reel should unwind clockwise
4. Replace the reel locking knob and the
wing nut; tighten well
5. Lift the Wire Feed Adjusting Spring to
remove tension
6. Guide at least 12 inches of wire into the
Torch Sheath. If the end of the wire is
crimped or bent, cut it off and remove
any burrs.
7. Replace tension to the Wire Feed
Adjusting Spring
8. Turn the Torch Handle Nozzle
counterclockwise and pull to remove
9. Turn the Contact Tip counterclockwise
and remove
10. Lay the Torch Sheath out in a straight
line so that the wire moves through it
easily
WARNING
The following steps require applying power to the
welder. Do not touch anything with the Torch
Handle or an arc may be ignited
11. Plug the Power Cord into its electrical
outlet, turn the Amperage control to D,
and turn the welder ON.
12. Lift the Torch Handle and continue
pressing the trigger until the wire feeds
through two inches