
Owner`s manual


2 110496
COOLER INSTALLATION
MOUNTING COOLER
CAUTION: Make sure that the mounting surface is
strong enough to support the operating weight of the
cooler when in use. (For operating weight, see
Specification Table.)
CAUTION: Never plug in cooler until installation is
complete and unit has been tested for rigidity.
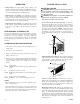
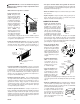
• Lift out all removable louvered sides.
• Screw chain hooks into window facing. Position the
two chain hooks above the neck of the cooler a distance
equal to the width of the cooler apart (A-Fig. 1). Hook
one hanger chain in each hook and then one “S” hook in
the other end of each chain. NOTE: Chain hooks sup-
plied with this mounting kit have wood screw threads for
wood walls. Concrete, brick walls or concrete blocks re-
quire sufficiently strong wing nuts or anchors with mating
hooks.
OPEN WINDOWS TO EXHAUST AIR
An often misunderstood concept of evaporative cooling is
the amount of air that should be exhausted. How much
should you open your windows? The fact is that most
people do not open their windows enough. The following
method will help you determine the amount to open your
windows.
CHAMPION AIR BALANCING METHOD
1. Take a piece of tissue paper and cut it lengthwise into 3
equal strips.
2. Turn your cooler on High Cool.
3. Open one window at least six inches wide in each room
that you want to cool.
4. Take the piece of tissue paper and put it up against the
screen of the open window furthest from the cooler dis-
charge opening. Let go of it. It will do one of three
things.
IF It falls down.
THEN CLOSE all of the windows one inch and try step 4
again.
IF It plasters itself to the screen.
THEN OPEN all of the windows one inch and try step 4
again.
IF It stays on the screen lightly.
THEN PERFECT. You are done. Enjoy your cooler.
NOTES:
• When switching to Low Cool, you must rebalance your
home. Repeat step 4.
• Once you balance your home you can cool some areas
more than others by opening those windows more and
closing the others by the same amount. Repeat step 4 to
make sure your home is still air balanced.
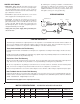
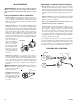
FIG. 2
WINDOW FILL-
IN PANELS
TOP PANEL
RETAINER
BOTTOM PANEL
RETAINER
OPERATION
• Pump setting. The rotary switch has 6 settings. The
“Pump” setting will operate the pump without the blower.
For best results turn the switch to “Pump” for a few min-
utes to wet the pads before operating the fan.
• High and low cool settings. The “High Cool” and “Low
Cool” settings operate both the pump and the blower.
Turn the unit to “Low Cool” when possible. This lower
speed allows the air to stay longer in the wet pads and
therefore increases it’s cooling efficiency.
• High and low vent settings. The “High Vent” and “Low
Vent” settings operate the blower without the pump. This
is useful on cool nights or at times when just a fan is
desired.
• Install window panel retainers. Place two panel retainer
strips onto bottom of neck flange and position to the width
of the window. Cut the strips to fit if necessary. These
strips hold the window fill-in panels (Fig. 2).
• Position cooler in window. Position neck of cooler so
that bottom of neck flange rests on window sill and flange
(E-Fig. 1) is snug against edge of sill (H-Fig. 1). With cooler
in position, hook the “S” hooks into the holes of the top pan
near the back of the cooler (B-Fig. 1).
• Break fill-in panels to fit. With cooler installed, as de-
scribed above, measure for each window fill-in panel and
score with sharp knife and straight edge guide to desired
width. To break window fill-in panels, the panel should
be laid over the edge of a straight flat surface at the point
to be broken off. Apply pressure on the edge of the panel
that extends over the edge of the surface and break off
unwanted piece.
A
B
C
D
E
F
G
H
WINDOW
NECK
“S” HOOK
FIG. 1