
Owner`s manual


3
110496
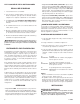
CONNECTING WATER
• Install overflow assembly. Remove nut and place nipple
through the hole in the pan, with the rubber washer be-
tween the pan and the head of the drain nipple (Fig. 3).
Screw on nut and draw up tight
against bottom of pan. Insert
overflow pipe in nipple to retain
water. Overflow pipe may be re-
moved to drain pan when
necessary. A garden hose may
be screwed on the drain nipple
to drain water away from your
unit.
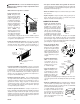
• Connect water supply line. Install a sillcock and water
valve on faucet as shown by figure 4. Place the nut and
ferrule on the tubing and tighten the nut until water tight.
MAINTENANCE
WARNING: Before doing any maintenance be sure
power is off and unit is unplugged. This is for your
safety.
SPRING START-UP
• Oil bearings. The blower bearings and cooler motor in
this unit should be oiled with a few drops of non-deter-
gent 20/30 weight oil once each year. The motor does
not need oil if it has no oil lines for oiling. Motors that
have no oil lines are lifetime oiled at the factory and re-
quire no further oiling for the life of the unit.
CAUTION: Do not over oil. Over oiling can cause
motor burn out, due to ex-
cessive oil getting into
motor winding.
• Check belt tension. A 3
lb. force should deflect the
belt 3/4 inches (see Fig.
7). Readjust belt if
needed.
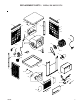
• Clean pump. Cleaning the pump is necessary once a
year at start-up. For your safety, turn unit off and unplug
from power receptacle. Remove the pump from the mount
slot. Remove the base of the pump as shown in Fig. 8.
Clean the pump and turn the impeller to ensure free op-
eration. Remove the pump spout and check for any
blockage. After cleaning, reinstall the base onto the
pump. Reattach the pump to the mount in the cooler
using the plastic retainer to ensure that the pump will not
overturn. Do not forget to replace the spout and water
delivery tube onto the pump outlet.
DEPRESS HERE
TO REMOVE
FIG. 8
• Install float valve. Install valve in the provided hole in
corner post (Fig. 5) and attach water supply line.
FAUCET
WATER SUPPLY
VALVE
SILLCOCK
FERRULE
NUT
FIG. 4
FLOAT ROD
WATER
SUPPLY LINE
WASHER
NUT
FERRULE
NUT
FIG. 5
CORNER POST
• Adjust water amount. Your cooler is equipped with a
unique water metering valve (Fig. 6). The amount of water
delivered to the pads may be de-
creased by pressing the plastic
valve as the arrows indicate. If
water is splashing out of water
troughs, you may need to de-
crease the amount of water
delivery. Check to see that all
pads are saturated with water and
that there are no dry spots or
openings in the pads.
INCREASE
DECREASE
FIG. 6
FIG. 7
3 LB.
3/4 INCHES
• Install fill-in panels. Place one window fill-in panel on
each side of grill and into panel retainer strip at bottom of
grill. Place the other panel retainer strips onto top of neck
flange and fill-in panels. Be sure the panels are snug up
against cooler neck.
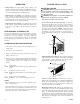
• Place window behind retainer strip. Raise back of
cooler so that the window (D-Fig. 1) may be brought down
behind top of panel retainer strip (C-Fig. 1).
• Level Cooler. Adjust the chains to level the cooler.
• Adjust house legs. Pull out house legs so that the rub-
ber bumpers rest against house siding (F-Fig. 1). Tighten
screw in retaining collar. (G-Fig. 1).
RUBBER WASHER
OVERFLOW PIPE
NIPPLE
BOTTOM PAN
NUT
FIG. 3
• Change Pads. Aspen pads should be replaced once or
twice a season, depending upon the length of the sea-
son. At the beginning and at mid season a clean pad is
more absorbent and efficient and will deliver substan-
tially more cool air.
• Fill pan. Allow water to fill to within 1” of top of pan and
adjust float to maintain this water level. This can be ac-
complished by bending the float rod (Fig. 5).