
User's Manual


3
For more information, visit www.chandlerlimited.com. © 2020 Chandler Limited, Inc. All Rights Reserved. REDD-MIC_UM_010820
Abbey Road Studios, EMI, REDD and their associated logos are trademarks of EMI (IP) Limited.
IMPORTANT
QUICK START & POWER CYCLE PROCEEDURE
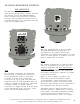
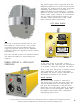
1. Mount the microphone to a suitable microphone stand using the supplied
shock mount suspension apparatus.
2. PRIOR TO POWER-UP - CONNECTIONS
a. Connect the microphone to power supply using the supplied 7-pin
microphone cable.
b. Connect the user supplied standard 3-pin XLR microphone cable to the
audio interface or tape machine.
c. Connect the power supply to an AC outlet.
3. POWER-UP
a. Once all connections to and from the power supply to the microphone
have been made, turn on the power supply, by means of the power switch
located at the rear of the PSU.
b. If power has been achieved, the microphone’s on-board LED, located
inside the head-basket, will illuminate red to signify the microphone
is active. The LED is also used to help align the capsule to the sound
source.
c. WARNING- Do not disconnect the 7-Pin microphone cable while AC power
is applied to the microphone. If disconnection is to be made, power
down the microphone, and allow 5-10 minutes of cool-down time prior
to disconnection of the 7-pin microphone cable from the power supply.
NOTE- 3-pin XLR audio output connection may be patched or unpatched as
necessary, without powering down.
4. WARM-UP TIME
a. Prior to sound incident or usage, allow the microphone’s tubes to
warm-up for a minimum of 10 minutes.
5. POWER DOWN
a. Prior to disconnecting the 7-pin cable, power down the PSU, and allow
5-10 minutes for the microphone’s internal tubes to cool down and the
capsule adequate time to discharge. NOTE- It is recommended to power
down the REDD Microphone when not in use.