
Specifications


16
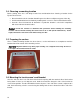
3.4 Choosing a mounting location
Before starting, there are a few things to take into consideration when choosing a location for the
EyeOn Touch Screen:
• Do not install the unit in a location that will expose it to direct sunlight at any part of the day.
• Avoid contamination from insulation by installing touch screens in non-insulated interior walls.
• Consult a licensed electrician to determine if a particular location is safe and in compliance
with state and local electrical codes.
Caution!
Consult the end-user to determine their preference before finalizing the mounting
locations. We recommend centering the touch screen at 56 ¾” AFF (above finished floor). At this
height, the bottom of the touch screen will be exactly 53” AFF.
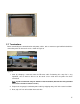
3.5 Preparing the surface
Once a suitable mounting location has been chosen, use the wall mount as a template to mark the
location that will be cut out of the mounting surface.
Important!
Drywall retainers may affect proper leveling, use a magnetic level along the front or
back edge of the bracket and not the center.
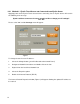
Figure 4
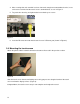
3.6 Mounting the touch screen’s wall bracket
Once the hole has been cut, slide the bracket into the opening with the notched side of the bracket
facing down. If there are no adjacent studs, bend the metal tabs along the sides of the bracket to
secure it into position. The tabs will hold the bracket in place. If one side of the cut-out is adjacent to a
stud, the bracket may also be secured using the oblong holes that are located on either side of the
bracket.