
Specifications


26
4.2 AUDIO: Russound System (010003)
The Russound audio system does not requires internal programming for the system to work with the
EyeOn Server. You will have to know which rooms in the house have speakers to program the EyeOn
administration screen. If you have one set of speakers that will be installed in close proximity to
another, it is better to group these four speakers into one zone. This grouping can be achieved by
connecting two of the speakers to the left channel and the other two to the right channel, limited to a
maximum of four speakers per zone to avoid overheating of the amplifier. Also, the manufacturer
recommends that no more than three zones should have two sets of speakers attached to their output
(Check Russound Specs for exact detail on grouping). In order to ease final termination of the
amplifier outputs, it is best that all wires are labeled for each room.
If you have more then one Russound controller you will need to setup the controller ID. By default
they are all set to 1. You will need to adjust each controller in order; 1,2,3,4,5,&,6.
Before attempting to communicate with the EyeOn server, check that the dip switch next to the RS232
port is in the middle position (RUN). In addition, any other compatible Russound controllers will need
to be connected to the RNET RJ45 port.
If the CAV model is installed, be aware that it does not have a built-in tuner so just disregard this
setting in the Source setup on the Admin screen. When configuring the tuners make sure the tuner
number refers to the source number. For example if you setup the FM/AM on Source #1 you must
also setup the tuner for Tuner #1. This method is Russound’s standard setup. Also on the CAV, make
sure the switch in the front of the unit is in the front or rear position for the RS232 port, depending on
what port you are using.
If the doorbell or whole-house paging option is desired, take note that these options are not available
with the CAM6.6, given that the CAM6.6 does not include a paging port.
If the announcement option is configured, make sure each zone is tested for sufficient loudness. A
good starting point is 40% volume.
If using the CAV model and the doorbell feature is desired, the paging control input needs to be
excited with a 12VDC trigger. This voltage will need to be controlled through an isolated relay on the
ELK security system or PLC output. To setup this EyeOn option, locate the output under the Security
Admin Screen and the Announcement option in the drop down. This setting will cause the relay to
activate when the doorbell is pressed and deactivate once the doorbell tone finishes playing (duration
depends on length of WAV file chosen for custom doorbell sound).
Be aware that for the All commands to work you must have Party Mood enabled. This is enabled by
default.
There are a total of six source inputs available on the Russound unit. In order to take advantage of
the EyeOn doorbell and voice feedback system, connect the speaker output of the EyeOn server to a
source on the Russound (Source 6 is recommended). To make this connection, use a stereo mini
(1/8") Male to two RCA male connectors. Another Y-cable, female RCA to two male RCA, will be
needed to feed this audio source to the Paging Audio In input. To achieve this purpose, connect the
right side of the incoming audio cable on Source #6 to the female input of the Y-cable, connect one of
the male ends to the Source #6 Audio In, and connect the other male end to Paging Audio In. This
procedure results in Source #6 being used for room feedback while the Paging Audio In will be used
for doorbell and whole-house feedback.
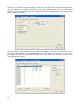
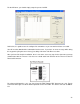
To change the follow these steps: