
Specifications


6
2.0 EyeOn Server: Quick Start Guide
Before configuring the EyeOn Server, we recommend connecting all subsystem (audio, video, climate,
etc.) hardware first. Please read the specific sections of this manual which apply to the devices that are
being configured. Some devices require special configuration and will require additional setup
2.1 Accessing the EyeOn Home Administrator Screen
Before getting started with the EyeOn Server setup, temporarily reconfigure the TCP/IP settings on
your laptop to be able to communicate directly with the EyeOn Server.
1. Go to Control Panel.
2. Double-click the Network Connections icon.
3. Right click on Local Area Connection icon.
4. Select Properties.
5. Highlight Internet Protocol (TCP/IP) and click Properties button.
6. Write down the current IP settings.
7. Change IP Address to 192.168.130.1.
Note: The default gateway may need to be changed to the router’s setting.
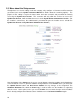
Now that the laptop has been configured correctly, let’s get started by accessing the EyeOn Home
Administrator page.
1. Connect a laptop or desktop computer to the router or switch that is connected to the EyeOn
Server.
2. Open Internet Explorer. (To avoid compatibility issues, we strongly recommend using Internet
Explorer instead of FireFox).
3. Type in the EyeOn Server’s default address in the browser’s address bar:
http://192.168.130.90/website/admin/
or https://192.168.130.90/admin
4. Wait for the following screen to appear and enter the following username and password: