
DVR User Manual


MENU SETUP
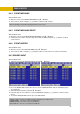
< PROGRAM DEFAULT>
These are 10 kinds of program and you can change the program setting.
6.3
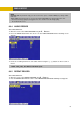
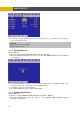
ENTER button when the cursor is on the IMAGE QUALITY and the following screen
③ Select the desired RECORD QUALITY using the (-), (+) buttons or wheel scroll of mouse.
④ And you can see the size of each image quality and how long you can record in the installed
HDDs by the image quality.
⑤ To exit this IMAGE QUALITY menu, press the ESC button.
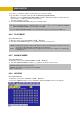
PROGRAM 0 1 2 3 4 5 6 7 8 9
RECORD
TYPE
COM
SIN SIN COM SINGLE COMPLEX
PLE
X
SINGLE GLE COMPLEX GLE SINGLE PLEX SINGLE
RECORDING
INTERVAL
1 1 1 1 1 1 1 1 1 1
IMAGE
SIZE
720
720
360
360x 720 720x 720x
x480
x240
360x24
x240
0
240 360x240 x240 720x240 240 720x480 480 720x480
NORMAL Max 4 7 7 2 3 3 1 1 1
EVENT
SINGLE
0 15 30 0 15 30 0 15 30 0
EVENT
COMPLEX
Max 0 0 7 0 0 3 0 0 1
QUALITY
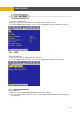
.3 IMAGE QUALITY
At the RECORD menu,
© , ª buttons. ① Move the cursor to the IMAGE QUALITY using
Press the②
appears.
NOTE: This function is only operative, when the recording condition is OFF.
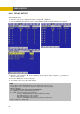
NORMAL
F L F S L F S L F S
QUALITY
EVENT
F L F S L F S L F S
PRE-ALARM
RECORDING
5 5 5 5 5 5 5 5 5 5
POST-
ALARM
RECORDING
10 10 10 10 10 10 10 10 10 10
EVENT
ON/OFF
V-Loss
ON
V-Loss
ON
V-Loss
ON ON
V-Loss V-Loss V-Loss V-Loss V-Loss V-Loss V-
ON ON ON ON ON
Loss
ON
50