
DVR User Manual


MENU SETUP
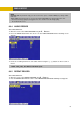
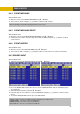
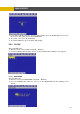
6.4.1.1 CHANNEL 6.4.1.1 CHANNEL
At the MOTION DETECTION menu,
Move the cursor t
At the MOTION DETECTION menu,
Move the cursor t① o CHANNEL using © , ª buttons.
or wheel scroll of mouse.
Under Event option, move the cursor to the EVENT MESSAGE using © , ª buttons.
Select “ON” or “OFF” using the (-), (+) buttons or wheel scroll of mouse.
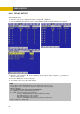
.4.1.2 SENSITIVITY
menu,
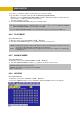
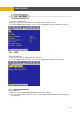
6.4.1.3 AREA SETUP
At the MOTION DETECTION menu,
① Move the cursor to AREA SETUP using © , ª buttons.
② Press the ENTER button to set the motion detection area.
③ Select the motion detection area using the © , ª , , ¨ buttons and then press the ENTER
button to save the area.
④ Turn the shuttle ring to the right to select all cells for motion detection and turn the shuttle ring to
the left to reset all area.
⑤ To exit this AREA SETUP, press the ESC button.
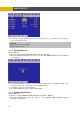
② button to test the motion detecti n.
③ To exit this TEST MOTION, press the ESC button
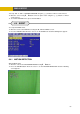
6.4.2 EVENT SCREEN MODE
At the EVENT menu,
① Move the cursor to the EVENT SCREEN MODE u ing © , ª buttons.
② Select the EVENT SCREEN MODE using the (-), (+) buttons or wheel scroll of mouse.
6.4.3 EVENT CHECK
t the EVENT menu,
Move the cursor to the EVENT CHECK using © , ª buttons.
Select “ON” or “OFF” using the (-), (+) buttons or wheel scroll of mouse
54
MENU SETUP
① o CHANNEL using © , ª buttons.
or wheel scroll of mouse.
Under Event option, move the cursor to the EVENT MESSAGE using © , ª buttons.
Select “ON” or “OFF” using the (-), (+) buttons or wheel scroll of mouse.
.4.1.2 SENSITIVITY
menu,
6.4.1.3 AREA SETUP
At the MOTION DETECTION menu,
① Move the cursor to AREA SETUP using © , ª buttons.
② Press the ENTER button to set the motion detection area.
③ Select the motion detection area using the © , ª , , ¨ buttons and then press the ENTER
button to save the area.
④ Turn the shuttle ring to the right to select all cells for motion detection and turn the shuttle ring to
the left to reset all area.
⑤ To exit this AREA SETUP, press the ESC button.
② button to test the motion detecti n.
③ To exit this TEST MOTION, press the ESC button
6.4.2 EVENT SCREEN MODE
At the EVENT menu,
① Move the cursor to the EVENT SCREEN MODE u ing © , ª buttons.
② Select the EVENT SCREEN MODE using the (-), (+) buttons or wheel scroll of mouse.
6.4.3 EVENT CHECK
t the EVENT menu,
Move the cursor to the EVENT CHECK using © , ª buttons.
Select “ON” or “OFF” using the (-), (+) buttons or wheel scroll of mouse
② Select the desired channel using the (-), (+) buttons ② Select the desired channel using the (-), (+) buttons
③
④
③
④
6
6
AAt the MOTION DETECTION
① Move the cursor to SENSI
t the MOTION DETECTION
① Move the cursor to SENSITIVITY using © , ª buttons.
② Select the sensitivity level using the (-), (+) buttons or wheel scroll of mous
TIVITY using © , ª buttons.
② Select the sensitivity level using the (-), (+) buttons or wheel scroll of mouse.
e.
§§
6.4.1.4 TEST MOTIO6.4.1.4 TEST MOTION
At the MOTION DETECTION menu,
N
At the MOTION DETECTION menu,
① Move the cursor to TEST MOTION using the © , ª buttons.
Press the ENTER
① Move the cursor to TEST MOTION using the © , ª buttons.
Press the ENTER oo
. .
ss
SENSITIVITY: The higher the number is, the more sensitive. 1(lowest) ~ 5(highest)
SCREEN HOLD: Keeping the current screen even if the event occurs.
EVENT FULL : Display the full screen of the channel wh h the event occurs.
EVENT MULTI : Display the multi-screen when the event occurs.
Mouse operation:
Enable Cell Setup by Mouse: Left button click (without releasing the button) and drag from the left
top to the right bottom cell.
utton click (without releasing the button) and drag from the
ETUP GRID: 30 x 24
Disable Cell Setup by Mouse: Right b
left top to the right bottom cell. AREA S
ic
AA
①
②
①
②
54