DO NOT RETURN TO STORE Call: 1-800-950-4458 www.chapinmfg.com SALT & ICE MELT SPREADER FULL BAFFLE SALT SPREADER ASSEMBLY INSTRUCTIONS INSTRUCCIONES DE ARMADO DEL ESPARCIDOR DE SAL CON DEFLECTOR COMPLETO DIRECTIVES D’ASSEMBLAGE DE L’ÉPANDEUR DE SEL À DÉFLECTEUR COMPLET Model 82108B 100 lb. Spreader See website for warranty details Model 82088B 80 lb. Spreader Chapin International, Inc P.O. Box 549 700 Ellicott St. Batavia, NY 14021-0549 U.S.A. 1-800-950-4458 www.chapinmfg.
WARNING Carefully Read These Instructions Before Use IMPROPER USE OR FAILURE TO FOLLOW INSTRUCTIONS CAN RESULT IN PRODUCT FAILURE OR INJURIES. FOR SAFE USE OF THIS PRODUCT YOU MUST READ AND FOLLOW ALL INSTRUCTIONS BEFORE USING. - Do not allow anyone to operate the broadcast spreader without proper instructions. - Do not permit children to operate the broadcast spreader. - Wear protective eyewear and gloves when handling and applying lawn and garden chemicals.
Contents: Contenido: Contenu: Spreader Hardware (Actual size) Accesorios para esparcidor (tamaño real) Quincaillerie de l’épandeur (taille réelle) H-20 POM Standoff H-3 M4 x 10mm Screw H-2a Cotter Pin H-1 (x4) Flat Washer H-2 Cotter Pin H-4 M5 x 35mm Hex Bolt and M5 Nylock Nut H-5 M6 x 45mm Hex Bolt and M6 Nylock Nut H-21 M5 x 30mm Screw and M5 Nylock Nut H-20a M8 Flat washer H-15 R-Pin H-10 Bushing H-18 M6 x 55mm Hex Bolt with M6 x 1mm Nylock Nut H-19 End Cap H-11 (x2) Hand Grip Note: Not all
TOOLS NEEDED: HERRAMIENTAS REQUERIDAS: OUTILS REQUIS: 8 mm 10 mm 8 mm 10 mm Spreader Components (Not Actual size) Componentes de la esparcidor (no en tamaño real) Composants de l’épandeur (taille non réelle) C-8 Handle (Right) e C-2 Impeller C-9 Handle (Left) e C-3 C-11 Gear Box Gate Control C-1 Wheels C-12 Frame leg C-5 C-17 Handle Tube Rear Baffle C-7 Linkage Arm C-13 Frame leg C-16 Grate C-14 Gear Box Shaft C-15 C-4 Rain Cover Hopper Assembly 3 C-10 Auger Kit
1 Handle Bar and Gate Control Assembly (1.1 - 1.10) Barre de ma ija y conjunto del control de la compuerta (1.1 - 1.10) Guide et vanne de dégagement (1.1 à 1.10) C-8 C-11 C-9 H-11 H-11 H-18 H-18 H-2a C-5 H-20a H-20 C-7 1.1 1.2 C-11 C-11 C-7 H-20 C-7 1.3 H-2a 1.
1.5 1.6 C-11 C-11 H-18 H-18 C-7 C-9 C-7 1.7 1.8 H-18 C-11 H-18 C-5 1.9 C-5 1.10 H-11 H-11 Completed Assembly Ensamblaje completo Assemblage terminé Note: When installing Gate control assembly (1.8), Tighten both screws enough to hold in place for adjustment of gate control later. (Step 4.7 - 4.10) Nota: Al instalar el conjunto de control de la compuerta (1.8), apriete ambos tornillos lo suficiente para sujetarlo en su sitio para ajustar posteriormente el control de la compuerta. (Paso 4.7 - 4.
2 Frame Legs to Hopper assembly (2.1 - 2.2) Unión de las patas de la estructura al ensamblaje de la tolva (2.1 - 2.2) Montage des pattes à l’ensemble de la trémie (2.1 – 2.2) IMPORTANT: When assembling frame components, do not fully tighten nuts and bolts. Snug them up enough to hold components loosely together during assembly. Once you have completed step 3.9 and spreader is sitting upright on a level surface, adjust components so that the spreader legs sit evenly and the spreader does not tip.
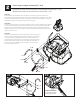
Impeller & Gearbox Assembly (2.3 - 2.8) Impulsor y conjunto de caja de velocidades (2.3-2.8) Assemblage impulseur & boîte d’engrenages (2.3-2.8) 2.3 2.5 2.4 H-19 Top Hole (used) Orificio de la parte superior Trou supérieur H-19 C-12 2.6 C-13 2.7 Bottom Hole (not used) Orificio de la parte inferior Trou inférieur Steps 2.6 and 2.7 Assembly shown using top hole. Pasos 2.6 y 2.7 Montaje mostrado usando el orificio de la parte superior. Étapes 2.6 et 2.
Wheels to Frame Assembly (3.1 - 3.9) 3 Llantas al conjunto del chasis (3.1 - 3.9) Installation des roues à l’armature (3.1 à 3.9) H-5 H-2 H-4 H-10 C-14 H-5 H-1 H-10 H-4 C-1 C-1 3.1 3.2 3.3 H-10 H-5 H-4 C-14 H-5 3.4 3.5 3.6 H-10 H-11 H-4 H-4 3.7 3.8 Completed Assembly Ensamblaje completo Assemblage terminé H-2 e H-1 3.
4 Handlebar Assembly to Hopper Frame / Auger Attachment For Salt Spreaders (4.1 - 4.10) Conjunto de la barra de manija al chasis de tolvilla / accesorio de tornillo sin fin para esparcidores de sal (4.1 - 4.10) Installation du guidon à l’armature de la trémie / Vrille pour épandeurs de sel (de 4.1 à 4.10) C-10 H-18 H-18 H-18 H-18 H-21 4.1 C-5 4.2 Remove nut and bolt (H-21) for use in steps 4.5 - 4.6 Retire el perno y tuerca (H-21)para usarlos en el paso 4.5 - 4.
Gate Adjustment and Auger Installation (Inside Hopper) Instalación de ajuste de compuerta y tornillo sin fin (interior de la tolvilla) Ajustement de la vanne et installation de la vrille (à l’intérieur de la trémie) Note: Complete steps 4.7 - 4.10 only if gate isn’t completely closed when lever is in forward position (as shown in 4.7). Once gate is adjusted, tighten both nuts on Gate Control Assembly (C-11). Nota: Realice los pasos 4.7 - 4.
STORAGE AND MAINTENANCE • Use garden hose to wash down the spreader after each use. Some ice melt products, such as magnesium chloride will cause rusting to any stainless steel in wet conditions. • Be careful not to direct the spray directly onto the gear box. • It is recommended that you DO NOT use a power washer on your spreader. • On models with a grease fitting, it’s recommended that you apply a general purpose grease at least once a month.
ENTREPOSAGE ET ENTRETIEN • Utiliser un boyau de jardin pour laver l’épandeur après chaque utilisation. Certains produits de fonte de glace, tels que le chlorure de magnésium, provoquent la rouille sur n’importe quel acier inoxydable dans des conditions humides. • Faites attention à ne pas diriger le jet directement sur le boîtier d’engrenage • Il est recommandé de NE PAS utiliser une laveuse à pression sur votre épandeur.
REPLACEMENT PARTS / PARTES DE REPUESTO / PIÈCES DE RECHANGE 9 10 4 7 1 11 5 8 13 12 2 3 6 REF NO. QTY PART NO.
APPLICATION CHART / TABLA DE APLICACIÓN / TABLEAU D’APPLICATION All Season Residential & Professional Push Spreader Application Conversion Chart Table de conversión para la aplicación profesional y residencial del distribuidor de empuje para toda temporada Tableau de conversion d’application pour épandeur à pousser résidentiel et professionnel toute saison SCOTTS 2 2.5 3 3.25 3.5 4 4.75 5 5.
P.O. Box 549 700 Ellicott St. Batavia, NY 14021-0549 U.S.A. 1-800-950-4458 www.chapinmfg.com © 2021 Chapin International, Inc. Due to our ongoing product improvement process, product specifications may change without notice. Como resultado de nuestro continuo desarrollo de mejoras del producto, las especifcaciones de los mismos pueden cambiar sin previo aviso. En raison de notre programme d’amélioration des produits, leurs caractéristiques peuvent être modifiées sans préavis.