32 in. Barrel Charcoal Smoker with Offset Chamber. Product Guide Model 12201777 Tools needed for assembly: Phillips Screwdriver Pliers FOR OUTDOOR USE ONLY WARNING: CAUTION: Read and follow all safety statements, assembly instructions, and use and care directions before attempting to assemble and cook. Failure to follow all manufacturer’s instructions could result in serious personal injury and/or property damage. INSTALLER/ASSEMBLER: Leave this manual with consumer.
TABLE OF CONTENTS WARNING Product Record Information . . . . . . . . . . . . . . . . . . . . . . . . . . . . 1 For Your Safety . . . . . . . . . . . . . . . . . . . . . . . . . . . . . . . . . . . . . . 2 Safety Symbols. . . . . . . . . . . . . . . . . . . . . . . . . . . . . . . . . . . . . . 2 FAILURE TO READ AND FOLLOW INSTRUCTIONS FOR LIGHTING CHARCOAL MAY RESULT IN SERIOUS PERSONAL INJURY AND OR PROPERTY DAMAGE. WARNING Preparing to use your Smoker . . . . . . . . . . . . . . . . . . . . . . . . .
Preparing and Using Your Smoker Before cooking with your Smoker, the following steps should be closely followed to both cure the finish and season the interior steel. Failure to properly follow these steps may damage the finish and/or impart metallic flavors to your first foods. 1. Brush all interior surfaces including grills and grates with vegetable cooking oil. 2. Build a small fire on the fire grate, being sure not to lay coals against the walls. 3. Close door.
USDA Recommended Internal Cooking Temperatures Ground Meat Beef, Pork, Veal, Lamb......................................160°F Turkey, Chicken.................................................165°F Fresh Beef, Veal, Lamb Medium Rare.......................................................145°F (let stand 3 minutes before cutting) Medium................................................................160°F Well Done............................................................170°F Poultry Chicken & Turkey, whole...
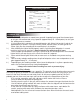
THE HEAT OF THE COALS seconds you can hold the palm of your hand 4 inches above the coals temperature range (Fº) visual cues HOT COALS 2 MODERATELY HOT TO HOT COALS 3 MODERATELY HOT COALS 4 325 to 375 significant coating of gray ash; red glow MODERATELY COOL COALS 5 300 to 325 thick coating of gray ash; dull red glow 400 to 450 375 to 450 barely covered with gray ash; deep red glow thin coating of gray ash; deep red glow GRILL MAINTENANCE Frequency of cleanup is determined by how much your
LIMITED WARRANTY This warranty only applies to units purchased from an authorized retailer. Manufacturer warrants to the original consumer-purchaser only that this product shall be free from defects in workmanship and materials after correct assembly and under normal and reasonable home use for the periods indicated below beginning on the date of purchase*.
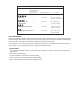
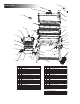
G PARTS LIST C M F B E A I H Q J K N D M L HH FF II R EE S FF AA P GG W Y T DD X Z AA V O U BB Key A Qty 1 B 1 C 1 D Description SMOKER CHAMBER LID ASSEMBLY Key S Qty 1 LOGO PLATE KIT T 1 LATCH, F/ FIREBOX DOOR TEMPERATURE GAUGE WITH WINGNUT U 1 DAMPER, F/ FIREBOX 1 SMOKER CHAMBER BOTTOM V 1 FIREBOX SUPPORT E 1 SMOKE STACK ASSEMBLY W 1 LEG, RIGHT REAR LEG, RIGHT FRONT Description CHARCOAL GRATE, FIREBOX F 1 SPRING, F/ SMOKESTACK DAMPER X 1 G 1 DAMPER, F
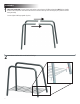
ASSEMBLY 1 FIRST, GET A HELPER! This unit is heavy and requires a second person for lifting and moving. NEXT, pick a suitable location to work. Open the carton and slit the corners so that the carton lays flat. This will give you a protective surface during assembly. Connect right and left legs together (2 pairs). 2 8 Insert bottom shelf into holes on the inside of the legs.
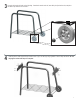
3 4 Put axle rod through the holes on the right legs. Put wheels onto the axle rod, insert hitch pin clips into the axle, and place the wheel caps over the axle rod ends. Install leg braces, with support flange towards center of grill, onto the legs using eight M6 x 12mm Phillips head bolts. Do not fully tighten screws until Step 6 is complete.
5 Install firebox support bracket onto the holes on the left legs using two M6 x 12mm Phillips head bolts. Do not tighten bolts until Step 6 is completed. 6 Install grill base, with firebox opening towards left side, on top of the legs using four M6 x 12mm Phillips head bolts. Install two M6 x 12mm Phillips head bolts and M6 hex nuts (per side) through grill base and flange on leg braces. 10 FULLY TIGHTEN ALL SCREWS AND NUTS AT THIS TIME.
7 8 Attach front shelf to front of grill base using two M6 x 12mm Phillips head bolts and two M6 nuts per side. Attach shelf supports with slotted holes towards front shelf using two M6 x 12mm Phillips head bolts. Attach side handle onto the firebox lid using two M6 x 12mm Phillips head bolts and two M6 nuts.
9 Attach handle to the firebox lid using two M6 hex nuts. 10 12 Attach firebox lid stop using one M6 x 12mm Phillips head bolt and M6 hex nut.
11 Attach damper wheel onto the firebox door using one M6 x 12mm Phillips head bolt and M6 locking nut. Do not overtighten the damper wheel, the damper wheel should move freely. Next - Attach door latch using one M6 x 11mm Phillips head shoulder bolt and M6 hex nut as illustrated. Install one M6x15 shoulder screw into end of firebox as shown Finally, slip the firebox door into position by inserting the hinge rods into the bushings as shown.
13 14 14 Connect firebox and grill base together using six M6 x 12mm Phillips head bolts. Connect firebox support with firebox base using two M6 x 12mm Phillips head bolts and two M6 hex nuts.
Install smokestack into grill lid using two M6 x 12mm Phillips head bolts and M6 hex nuts. 16 To install the temperature gauge, insert into center hole on grill lid, attach using clip from inside the lid, then turn it clockwise to upright position. Attach grill lid handle using two M6 nuts.
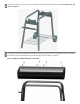
17 18 16 Install grill lid on grill base using two M6 x 15mm shoulder bolts. Install Towel hooks onto the towel bar as shown. First remove the two M6 nuts that are pre-assembled to the towel bar, then install the towel bar to the smoker chamber and secure with two M6 nuts.
19 20 Use charcoal grate adjusters to lower charcoal grate assembly into grill base. Rest charcoal grate adjusters on supports in grill base. Install the swing away rack inside the grill lid. Insert the cotter pins through the holes from the outside of grill lid. Align the swing away rack support arm holes with the holes on the side panel of grill base, using two M6 nuts and two M6 x 20mm Phillips head bolts. DO NOT OVER TIGHTEN THE M6 NUTS, THE SUPPORT ARM MUST MOVE FREELY.
21 22 18 Place cooking grates on support lips of grill base. Place firebox charcoal grate inside the bottom of firebox.
23 24 Place firebox cooking grates inside the top of the firebox base. Insert grease cup holder into holes on right side of the smoker chamber. Place a tin can (not included) on the grease cup holder. A tin can must be placed under the grease drain hole at all times.
25 20 Congratulations. Enjoy your smoker.
NOTES HARDWARE Hitch Pin Clip Qty. 4 M6 x 12mm M6 x 20mm Machine screw, QTY. 44 Machine screw, QTY. 2 Wheel Cap QTY. 2 M6 Flange Nut QTY. 22 M6 x 15mm M6 x 11mm Shoulder screw QTY. 3 Shoulder screw, QTY. 1 M6 Locking Nut, QTY.
NOTES: 22
Please register your product online at: Registre su producto en línea en: Veuillez enregistrer votre produit à l'adresse: www.charbroil.com/register (If you register online, you do not need to send in this registration card.) (Si registra en línea, no es necesario enviar esta tarjeta de registro.) (Si vous enregistrez votre produit en ligne, il n'est pas nécessaire d'envoyer la carte d'enregistrement.) PLEASE FILL OUT THIS CARD AND ATTACH A COPY OF YOUR SALES RECEIPT. RETURN IT WITHIN 10 DAYS OF PURCHASE.