
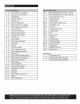
Product guide
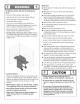


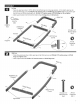


Upper and lower Front Panel and Top brace
[ Lay front legs down on the floor. Fit upper front panel between legs. Attach with 2" hinge pins and hitch pins through the
3rd hole down from the top of the leg, and the bottom hole of the top front panel.
_Attach lower front panel with #10-24x2" machine screws and #10-24 flange nuts through the 2 lowest holes on the legs.
} Attach top brace with #10-24x2" machine screws and #10-24 flange nuts through the 2 bottom holes of the upper leg.
#10-24
Flange Nut
Qty. 8
Right leg Upper Leg
assem._ 1
Hitch Pin Upper Leg Left leg
Qty. 2 assembly
#10-24x2"
Machine Screw 2" Hinge Pin
Qty.8 Qty.2
#10-24x2"
Machine Screw
/
Hitch Pin
f
Lower Front Panel
Top brace
Pin
2" Hinge Pin
#10-24x2"
Machine Screw
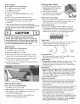
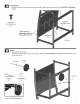
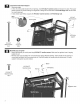
Back Brace to Cart
Removepreviouslyattachedscrewandnutsecuringthe upperlegandside braceas notedbelow.Attachupperandlowerbackbraces
with#10-24x1-1/4"machinescrews and#10-24flange nuts.
BackBrace
#10-24x1-1/4"
Machine Screw
Qty.7
(One re-used)
Note:
Removepreviously installed
screw and nut from location
shown to attach upper back brace.
#10-24
Flange Nut
Qty. 7
(One re-used)
BackBrace
#10-24x1-1t4"
MachineScrew