OWNER’S MANUAL SMOKIN’ CHAMP ™ Model #1733, E1733 Keep your receipt with this manual for Warranty. CUSTOMER SERVICE 1-912-638-4724 Service@CharGriller.com Contents of this manual are Trademarked and Copyrighted by Char-Griller® | A&J Manufacturing Using the information contained in this manual without consent of Char-Griller® and/or A&J Manufacturing is strictly prohibited. OM 1733, E1733 E A.
TABLE OF CONTENTS Safety Warnings & Warranty ............................ A-1 Assembly Instructions ..................................... B-1 Product Usage .................................................. C-1 Recipes .............................................................. D-1 Accessories .......................................................
IMPORTANT SAFETY WARNINGS READ ALL SAFETY WARNINGS AND INSTRUCTIONS CAREFULLY BEFORE ASSEMBLING AND OPERATING YOUR GRILL Read the following instructions carefully and be sure your grill is properly assembled, installed, and maintained. Failure to follow these instructions may result in serious bodily injury and/or property damage. If you have any questions concerning assembly or operation, call 912-638-4724. • Grill is for use outdoors and in well-ventilated areas, only.
IMPORTANT SAFETY WARNINGS (Continued) • Do not lean over an open grill and be mindful of hands/fingers near the edge of the cooking area. • When opening the lid, keep hands, face, and body safe from hot steam and flame flare-ups. • WARNING: To avoid injuries, gloves or other protective articles should be used when operating the grill. • Do not exceed a temperature of 500°F. • Do not allow charcoal and/ or wood to rest on the walls of grill. Doing so will greatly reduce the life of the grill.
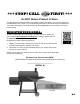
*** STOP! CALL FIRST! *** Do NOT Return Product to Store. This grill has been made according to the highest of quality standards. If you have any questions not addressed in this manual or if you need parts please call our Customer Service Department at 1-912-638-4724 (USA) or email Char-Griller® at: Service@CharGriller.com and have your serial number handy. REGISTER YOUR GRILL: To take full advantage of the Char-Griller® warranty be sure to register your grill by visiting www.CharGriller.
WARRANTY INFORMATION A COPY OF THE DATED PROOF OF PURCHASE (RECEIPT) IS REQUIRED WHEN REGISTERING OR SUBMITTING A WARRANTY* CLAIM. PLEASE RETAIN A COPY OF THE RECEIPT FOR YOUR RECORDS. Char-Griller® will replace any defective part of its grillers/smokers, under warranty, as outlined below. PLEASE READ THIS INFORMATION IN DETAIL AND IF YOU HAVE ANY QUESTIONS CONTACT CUSTOMER SERVICE AT 912-638-4724 OR SERVICE@CHARGRILLER.COM.
ASSEMBLY INSTRUCTIONS 34 35 36 1 2 3 33 32 4 6 7 31 5 29 30 31 6 7 29 6 28 8 27 9 25 23 K 24 10 L 11 M 19 12 10 16 23 22 L 20 18 17 sold under license from w.c. bradley co.
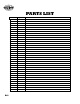
PARTS LIST B-2 Item QTY Part Name 1 2 3 4 5 6 7 8 9 10 11 12 13 14 M 1 1 1 1 1 4 2 1 1 2 1 1 1 1 2 SMOKESTACK GRILL HOOD LOGO PLATE WARMING RACK GRILL BODY HOOD HANDLE BEZEL HOOD HANDLE (INCLUDED IN HARDWARE PACK) SIDE FIRE BOX SIDE HANDLE SIDE FIRE BOX COOKING GRATE SIDE FIRE BOX CHARCOAL GRATE DRAWER HANDLE DRAWER DAMPER CIRCLE DRAWER SIDE FIRE BOX SPACER TUBE 16 17 18 19 20 1 2 1 1 1 REAR LONG LEG LONG LEG CAP FRONT LONG LEG GREASE CUP HOLDER BOTTOM SHELF L 22 23 24 25 K 27 28 29 30 31 32 33 3
HARDWARE NEEDED Assembly: Requires 2 people. Tools Needed: Hammer, Phillips Head Screwdriver, Pliers, and a 7/16” Nut Driver. NOTE: DO NOT tighten any bolts unless instructed to do so. Tightening too soon may prohibit parts from fitting together. All hex nuts should be on the inside of the grill unless stated otherwise. Unpack all contents in a well cleared and padded area. Estimated Time: 45 minutes Part No.
STEP 1 B F x6 x6 B F B 25 17 F 16 B-4 5
STEP 2 B F x6 x6 B F B 24 F 17 18 B-5
STEP 3 B x4 B B 20 B B B-6
STEP 4 J H x2 x2 23 J L L x2 H 22 J J 23 H 23 L L H 22 ALTERNATIVE VIEW B-7
STEP 5 A I x2 x2 I A I I A B-8 A
STEP 6 33 32 B-9
STEP 7 7 6 B-10
STEP 8 B E x2 x2 B 34 1 E 34 36 1 REVERSE VIEW B-11
STEP 9 B x4 B B 27 B B B-12
STEP 10A C D x2 E x2 D x4 E E E C D E C D 4 E C ALTERNATIVE VIEW B-13
STEP 10A 9 4 4 4 B-14
STEP 11 B E x6 N x6 M x2 x2 E B E M 8 B M N N B-15
STEP 12 B x2 E x2 7 6 6 9 E B B B-16
STEP 13 C x1 E x3 G F x2 x3 13 F E G G C 14 E F 12 E F B-17
STEP 14 11 10 14 B-18
STEP 15 29 29 29 28 B-19
STEP 15 K x3 31 K 19 19 Installed view of the Grease Cup Holder.
FULLY ASSEMBLED GET STARTED WITH THIS GRILLING GUIDE! B-21
OPERATING INSTRUCTIONS Setting Up This grill is designed for use outdoors, away from any flammable materials. When in use, it is important that there are no overhead obstructions and that the grill is at least 12 ft. (~4 m) from any wall or surface. It is important that the ventilation openings of the grill are not obstructed. The grill must be used on a level, stable surface. The grill should be protected from direct wind drafts and protected from any trickling water (i.e. rain or water from gutters).
Lighting Instructions There are a few methods to light your charcoal grill, depending on the materials you prefer to use. Using a charcoal chimney is the Char-Griller® preferred method for speed and convenience but igniting your lump charcoal or briquettes directly in the grill is a great way to get cooking as well. Charcoal Chimney 1. Remove your grill grates and set them to side 2. Fill your charcoal chimney ¾ of the way full with briquettes or lump charcoal 3.
Controlling Temperature Controlling the temperature of your grill is all about controlling the air flow to the fire. MORE AIR = MORE HEAT. LESS AIR = LESS HEAT. By opening and closing the top and side dampers, you can easily control the temperature of your grill. The amount of charcoal used when grilling can also greatly impact your ability to control temperature. Dampers may need to be adjusted during the cook to account for changes in weather like wind or to accommodate for more or less fuel.
Seasoning Your Grill Seasoning is an important first step before you start cooking on your new grill. This process will help protect the interior and exterior grill finish, reduce food sticking to the grates, reduce unnatural flavors, and help prevent the grates from rusting. Char-Griller® recommends using flaxseed oil for seasoning your grill but most food grade oils (canola, grapeseed, vegetable, safflower, etc) will work as well.
Grilling Styles Your Char-Griller® grill can be used to smoke, grill or sear your food. By using temperature zones, charcoal and wood flavor, you can customize your culinary experience as desired. The following descriptions provide four of the most common ways you can cook with your Char-Griller® charcoal grill. Grill Cook with direct and indirect heat at medium temperatures (300°-450°F). Utilize a two zone set up to cook at different speeds and temperatures. GRILL (Direct Heat) - 300°-450°F Up to 2 lbs.
Smoke SMOKE (INDIRECT HEAT) Up to 2 lbs. Charcoal (30-40 Briquettes) Charcoal Grate adjusted to lowest setting or farthest from the cooking grates Cook with indirect heat at low temperatures (150°-250° F). Use wood chips, chunks, split logs or pellets to add smoke flavor 1. Set charcoal grate to low setting (farthest from grill grates) using adjustable charcoal tray hangers Cool Zone 2.
Care & Maintenance In order to keep your grill in the best shape, it’s important to keep it clean and maintained. Continued cleaning and care are key to ensuring a long life for your Char-Griller® grill.
General Grilling Tips & Warnings Control heat with amount and type of fuel, dual dampers, and adjustable fire grate. Adjust fire grate one end at a time. Wood burns hotter than charcoal. More airflow helps generate more heat. Additional charcoal and/or smoking woods may be added while cook is in progress. Wear gloves and apron when operating your grill. Only use natural hardwoods intend for cooking. Appropriate selections can typically be found in grocery stores and outdoor grilling retailers.
Cooking Guidelines BEEF HEAT KEY HEAT TYPE HEAT LEVEL AVG. COOKING TIME DIRECT HEAT SKIRT STEAK, MEDIUM 1-INCH THICK 4-6 MIN. INDIRECT HEAT HOT DOG 5-7 MIN. SMOKE 6-8 MIN. LOW HEAT 150°-250°F 4 OUNCES STEAK, MEDIUM 1-INCH THICK - FILET MIGNON, RIBEYE, NEW YORK STRIP & PORTERHOUSE BURGER 3/4 - INCH THICK 8-10 MIN. MEDIUM HEAT 300°-450°F HANGER STEAK, MEDIUM 8-10 MIN. HIGH HEAT 450°-550°F+ 1-INCH THICK PORK HEAT TYPE HEAT LEVEL AVG.
ENHANCE FLAVOR Wood Pairing Guide Different wood varieties possess different flavors and Char-Griller® recommends pairing your woods with the meats you intend to cook.
GRILLING RECIPES • • • Cooking with a MEAT THERMOMETER ensures food is fully cooked. Insert thermometer into the thickest part of the meat, not touching bone, and allow 1 to 1 1/2 minutes to register temperature. USDA Safe Minimal Temperature is 165°F for chicken / poultry. USDA Safe Minimal Temperature is 145°F for Beef, Pork, Veal & Lamb (Steaks, chops, roasts).
QUICK AND EASY GRILLED PORK TENDERLOIN Need dinner in a hurry? This quick and easy pork tenderloin recipe is a crowd pleaser. Pair with grilled red potatoes and asparagus for a simple but flavorful dinner! Ingredients: 2 Pork Tenderloins 2 tsp Paprika 1 tsp Garlic Powder 1 tsp Cilantro 1 tsp Oregano Salt and Pepper to Taste Olive Oil Instructions: 1. 2. 3. 4. Blend spices together in a bowl. Rub pork with olive oil and then season liberally on both sides with spice blend.
JALAPEÑO BACON BLANKET POPPERS Need and easy to make snack for this big game? These Jalapeno Bacon Blanket Poppers are a crowd pleaser and are super easy to whip up on the grill. The bacon gets crispy quickly and doesn’t burn easily since it’s just sitting on top of the cream cheese filling.
GARLIC PARMESAN CHICKEN WINGS Replicate the signature flavors of your favorite wing spot with this marinated Garlic Parmesan Recipe. Ingredients: 4 lbs. of Chicken Wings 16 oz. Bottle Italian dressing 1 Cup of Shredded Parmesan Cheese 1/2 Tbsp. Onion Salt 1/2 Tbsp. Black Pepper 1 Cup of Butter 1 Tbsp. Oregano 2 Tbsp. Garlic Powder A pinch of rosemary 5. 6. 7. 8. 9. Once charcoal is lit, turn off gas burners and allow to fully ash over Rub salmon on both sides with olive oil.
Smoking Recipes “CERTIFIED” PORK BUTT A great pork butt recipe perfect for beginners and pitmasters alike. This slow smoked pork butt recipe is great shredded and piled high with coleslaw for a sandwich or eaten on it’s own straight out of the pan! Ingredients: 2 Pork Butts (6-10 lbs. each) Apple juice Your favorite rub/seasoning Mustard Preparing the Meat: 1. Remove the pork butt from the plastic wrap & pat dry using a paper towel. Tip: Choose a pork butt with a full fat cap.
3-2-1 RIBS The 3-2-1 rib method might be something you have seen thrown around on social media. It’s a popular technique for smoking ribs that are tender, juicy, and come clean off the bone. Simple and easy to follow, this is a surefire way to guarantee your ribs are finger lickin’ good. The 3-2-1 Method is a process that involves smoking the ribs for three hours, wrapping them in foil and braising for two hours, and the smoking unwrapped for one hour.
SMOKED MAC AND CHEESE An all-time family favorite, this Smoked Mac & Cheese recipe elevates stovetop or oven baked mac & cheese with flavors sure to keep your smoker fired up Ingredients: 1 Package of Elbow Macaroni ½ Stick of Butter ¼ Cup of All Purpose Flour 1 Cup of Heavy Cream 1 Cup of Milk 2 Cups of Cheddar Cheese (Shredded) 1 Cup of Gouda Cheese (Shredded) 1 Cup of Colby Jack Cheese (Shredded) ½ Cup of Cream Cheese 2 Tbsp of Black Pepper 1 Tsp of Cayenne Pepper 1 Large Cast Iron Skillet SMOKED CHICKE
SMOKED TURKEY Instructions: 1. 2. 3. 4. 5. Empty cavity rinse and pat dry with paper towel. Tuck wing tips under the back and tie legs together. Place in center of cooking grate directly above foil drip pan of water. Smoke for 12 minutes per pound. Allow several extra minutes per pound if stuffed to allow for expansion. Use a meat thermometer for best results (190°F internal).
SCAN FAVORITE ACCESSORIES FOR MORE FOR THE FULL LINE OF ACCESSORIES VISIT CHARGRILLER.COM Custom Fit Cover Weather Resistant Protects Grill Finish Check chargriller.
This Page Intentionally Left Blank
P.O. Box 30864 Sea Island, GA 31561 912-638-4724 www.CharGriller.com Service@CharGriller.
MANUAL DEL PROPIETARIO SMOKIN’ CHAMP ™ Modelo #1733, E1733 Mantenga su recibo junto con este manual para fines de la garantía. SERVICIO AL CLIENTE 1-912-638-4724 Service@CharGriller.com El contenido de este manual está registrado y los derechos de autor son propiedad de Char-Griller® | A&J Manufacturing. El uso de la información contenida en este manual sin el consentimiento de Char-Griller® y/o A&J Manufacturing está estrictamente prohibido. OM 1733, E1733 S A.
TABLA DE CONTENIDO Advertencias de Seguridad y Garantía ............ A-1 Instrucciones de Montaje .................................. B-1 Uso del Producto ............................................... C-1 Recetas ............................................................... D-1 Accesorios .........................................................
ADVERTENCIAS IMPORTANTES DE SEGURIDAD LEA TODAS LAS INSTRUCCIONES Y ADVERTENCIAS DE SEGURIDAD CUIDADOSAMENTE ANTES DE ENSAMBLAR Y OPERAR SU PARRILLERA Lea todas las instrucciones cuidadosamente y asegúrese de que su parrillera esté ensamblada, instalada y reciba mantenimiento apropiadamente. El incumplimiento de estas instrucciones puede causar daños a la propiedad y/o lesiones severas. Si tiene alguna pregunta relacionada con la instalación u operación, llame al 912-638-4724.
ADVERTENCIAS IMPORTANTES DE SEGURIDAD (Continuación) • Sea precavido ya que las llamas pueden intensificarse y estallar cuando el aire fresco entra en contacto con el fuego. • NO se incline sobre una parrilla abierta y preste atención a donde pone las manos/dedos cerca del borde del área para cocinar. • Cuando abra la tapa, mantenga las manos, cara y cuerpo en resguardo del vapor caliente y las llamaradas.
***¡DETÉNGASE! ¡LLAME A PRIMERO!*** NO Devuelva El Producto A La Tienda. Esta parrilla se ha creado siguiendo las normas de calidad más altas. Si tiene preguntas que este manual no aborda o si necesita piezas, llame a nuestro Departamento de Atención al Cliente al 1-912-638-4724 (EE.UU.) o escríbale un correo electrónico a Char-Griller® al: Service@CharGriller.com y tenga su número de serie a mano.
INFORMACIÓN DE GARANTÍA SE NECESITA UNA COPIA DEL COMPROBANTE DE COMPRA CON FECHA (RECIBO) PARA REGISTRARSE O PRESENTAR UN RECLAMO DE GARANTÍA*. CONSERVE UNA COPIA DEL RECIBO PARA SUS REGISTROS. Char-Griller reemplazará cualquier pieza defectuosa de sus parrillas/ahumadores, bajo garantía, según se describe de abajo. LEA ESTA INFORMACIÓN DETENIDAMENTE Y COMUNÍQUESE CON EL DEPARTAMENTO DE SERVICIO AL CLIENTE MARCANDO 912-638-4724 O ESCRIBIENDO A SERVICE@CHARGRILLER.COM. SI TIENE ALGUNA PREGUNTA.
INSTRUCCIONES DE ENSAMBLAJE 34 35 36 1 2 3 33 32 4 6 7 31 5 29 30 31 6 7 29 6 28 8 27 9 25 23 K 24 10 L 11 M 19 12 10 16 23 22 L 20 18 17 vendido bajo licencia de w.c. bradley co.
LISTA DE PIEZAS Artículo Cantidad 1 2 3 4 5 6 7 8 9 10 11 12 13 14 M 1 1 1 1 1 4 2 1 1 2 1 1 1 1 2 CHIMENEA CAMPANA DE LA PARRILLA PLACA DE LOGOTIPO REJILLA PARA CALENTAR CUERPO DE PARRILLA BISEL DE MANGO CON CAPUCHA MANGO CON CAPUCHA (INCLUIDO EN EL PAQUETE DE HARDWARE) CAJA DE FUEGO LATERAL MANGO LATERAL REJILLA DE COCINA DE FUEGO LATERAL REJILLA DE CARBÓN LATERAL MANIJA DEL CAJÓN CAJON CIRCULO DE AMORTIGUADOR CAJÓN TUBO ESPACIADOR DE CAJA DE FUEGO LATERAL 16 17 18 19 20 1 2 1 1 1 PIERNA LARGA TRAS
HARDWARE NECESARIO Ensamblaje: Requiere 2 personas. Herramientas Necesarias: martillo, destornillador Phillips, alicates, y un destornillador de tuerca de 7/16 “. NOTA: No apriete ningún tornillo o perno a menos que se indique explícitamente. Apretar antes de tiempo puede impedir que las partes encajen. Todas las Tuercas Hexagonales deben ir en la parte interna de la parrillera a menos que se indique locontrario. Desempaque todo el contenido en un área despejada y acolchada.
PASO 1 B F x6 x6 B F B 25 17 F 16 B-4 5
PASO 2 B F x6 x6 B F B 24 F 17 18 B-5
PASO 3 B x4 B B 20 B B B-6
PASO 4 J H x2 L x2 x2 23 L H 22 J J 23 H 23 L L H 22 VISTA ALTERNATIVA B-7
PASO 5 A I x2 x2 I A I I A B-8 A
PASO 6 33 32 B-9
PASO 7 7 6 B-10
PASO 8 B E x2 x2 B 34 1 E 34 36 1 VISTA REVERSA B-11
PASO 9 B x4 B B 27 B B B-12
PASO 10A C D x2 E x2 D x4 E E E C D E C D 4 E C VISTA ALTERNATIVA B-13
PASO 10B 4 4 4 B-14
PASO 11 B E x6 N x6 M x2 x2 E B E M 8 B M N NO APRIETE TOTALMENTE LOS PERNOS HASTA DESPUÉS DE INSTALAR LOS TUBOS ESPACIADORES N B-15
PASO 12 B x2 E x2 7 6 6 9 E B B B-16
PASO 13 C x1 E x3 G F x2 x3 13 F E G G C 14 E F 12 E F B-17
PASO 14 11 10 14 B-18
PASO 15 29 29 29 28 B-19
PASO 15 K x3 31 K 19 19 Vista instalada del titular de la taza de grasa B-20
TOTALMENTE ENSAMBLADA EMPEZAR CON ESTA GUÍA DE PARRILLA! B-21
INSTRUCCIONES OPERATIVAS Instalación Del Equipo Esta parrillera está diseñada para el uso en exteriores, lejos de cualquier material inflamable. Es importante que no exista ninguna obstrucción arriba del equipo y que se mantenga una distancia mínima de 12 pies (~4 metros) desde la parte lateral o trasera de la parrillera. Es importante que las aperturas de ventilación de la parrillera no sean obstruidas. La parrillera debe ser usada en una superficie nivelada y estable.
Instrucciones De Encendido Existen varios métodos para encender su parrillera a carbón, dependiendo del tipo de material que prefiera usar. La chimenea de encendido a carbón es el método de encendido preferido de Char-Griller® debido a su rapidez y practicidad pero encender carbón en trozos o briquetas directamente en la parrillera también es un excelente método de encendido. Chimenea De Encendido A Carbón 1. Retire las rejillas de la parrillera y colóquelas a un lado 2.
Controlando La Temperatura El control de la temperatura de su parrillera se basa en el control del flujo del aire que llega al fuego. MÁS AIRE = MÁS FUEGO. MENOS AIRE = MENOS FUEGO. Al abrir y cerrar la compuerta superior y las compuertas laterales, puede controlar fácilmente la temperatura de su parrillera. La cantidad de carbón durante el asado también puede influir significativamente en su capacidad de control de temperatura.
Curando Su Parrillera Curar la parrilla es un paso importante que llevar a cabo antes de comenzar a cocinar en su nueva parrillera. Este proceso ayudará a proteger el acabado interior y exterior de la parrillera, reducirá la cantidad de alimentos pegados a las rejillas, reducirá los sabores poco naturales y ayudará a evitar la oxidación de las rejillas.
Estilos De Parrilla O Asado Su parrillera Char-Griller® puede ser usada para ahumar, asar o sellar su comida. Al usar las zonas de temperatura, carbón y sabor a madera, puede personalizar la experiencia culinaria a su gusto. Las siguientes descripción le explican las cuatro formas más comunes en que puede cocinar con su parrillera a carbón Char-Griller®. Asado A La Parrilla Cocine con fuego directo e indirecto a temperaturas medias (300 °F a 450 °F).
AHUMADO (FUEGO INDIRECTO) - 150°-250°F Ahumado Hasta 2 libras de carbón (30 a 40 briquetas) Rejilla de carbón ajustada a la posición baja o la posición más alejada de las rejillas de cocción Cocine con fuego indirecto a bajas temperaturas (150°F a 250°F). Use virutas, trozos, pellets de madera o troncos cortados para agregar el sabor ahumado 1. Ajuste la rejilla de carbón a la posición baja (posición más alejada de las rejillas de la parrillera) usando el soporte de bandejas de carbón ajustable.
Cuidado Y Mantenimiento Para mantener la parrillera en condiciones óptimas, es importante mantenerla limpia y cuidada.
Consejos Y Advertencias Generales Sobre La Parrillera Controle la temperatura mediante la cantidad y tipo de combustible, las compuertas duales y la rejilla ajustable para combustible. Ajuste un extremo de la rejilla a la vez. La madera calienta más que el carbón. Un mayor flujo de aire equivale a una mayor temperatura. Puede agregar carbón y/o leña para ahumar mientras cocine. Use guantes y delantal cuando opere su parrillera. Solo use leñas naturales destinadas para la cocina.
Guía De Cocción RES TIPO DE CALOR NIVEL DE CALOR TIEMPO DE COCCIÓN PROMEDIO LEYENDA DE FUEGO FUEGO DIRECTO BISTEC DE FALDA, MEDIANO 4 A 6 MINUTOS FUEGO INDIRECTO SALCHICHA 5 A 7 MINUTOS AHUMADO 6 A 8 MINUTOS FUEGO BAJO 150°- 250°F 8 A 10 MINUTOS FUEGO MEDIO 300°- 450°F 8 A 10 MINUTOS FUEGO ALTO 450°- 550°F+ 1 PULGADA DE GROSOR 4 ONZAS BISTEC, MEDIANO 1 PULGADA DE GROSOR - FILET MIGNON, RIBEYE, NEW YORK STRIP Y PORTERHOUSE HAMBURGUESA 3/4 DE PULGADA DE GROSOR BISTEC DE ARRACHERA GALLO
MEJORE EL SABOR Guía Para Combinar Leñas Las distintas variedades de leña poseen diferentes sabores y Char-Griller® recomienda combinar su leña con las carnes que desea cocinar.
RECETAS PARA LA PARRILLA • • • Usar un TERMÓMETRO DE CARNE al cocinar garantiza que las comidas estén completamente cocidas. Inserte el termómetro en la parte más gruesa de la carne, sin tocar el hueso, y espere de 1 a 1 minuto y ½ para que registre la temperatura. La temperatura mínima segura del USDA es de 165 ° F para pollos / aves de corral. La temperatura mínima segura del USDA es de 145 ° F para carne de res, cerdo, ternera y cordero (filetes, chuletas, asados).
SOLOMILLO DE CERDO A LA PARRILLA FÁCIL Y RÁPIDO HAMBURGUESAS JUGOSAS DE LUCY ¿Necesitas preparar una cena rápida? Esta receta de solomillo de cerdo a la parrilla es fácil y rápida, y hará las delicias de tus comensales. ¡Acompáñalo de patatas rojas a la parrilla y espárragos para una cena simple y sabrosa!\ Si crees que es imposible mejorar la hamburguesa clásica, espera a probar las jugosas hamburguesas a la parrilla de Lucy.
MILHOJAS DE JALAPEÑO Y BEICON ¿Necesitas una merienda fácil y fácil para este gran juego? Estos Jalapeno Bacon Blanket Poppers son un placer para la multitud y son súper fáciles de preparar en la parrilla. El tocino se pone crujiente rápidamente y no se quema fácilmente, ya que se encuentra encima del relleno de queso crema.
ALITAS DE POLLO CON PARMESANO Y AJO Reproduce los sabores de tu sitio favorito de alitas con esta receta de marinada de parmesano y ajo. Ingredientes: 1.8 Kg. de alitas de pollo ½ litro de adrezo italiano en bote 1 vaso de queso parmesano rallado 1/2 cucharada de sal de cebolla 1/2 cucharada de pimienta negra 1 vaso de mantequilla 1 cuchara de orégano 2 cucharada de ajo en polvo Una pizca de romero Instrucciones: 1. 2. 3. 4. 5. 6. 7.
Recetas De Ahumado TRASERO DE CERDO “CERTIFICADO” Nuestro veterano embajador Certified Creole BBQ, lo ha vuelto a hacer con su receta de trasero de cerdo certificado. Ahumado lentamente, condimentado generosamente y desmigado, esta receta de cerdo es perfecta para usarla en platos sin fin. Desde sándwich de cerdo desmigado, hasta acompañamiento para huevos o disfrutado con verduras, esta receta seguro hará las delicias de tus comensales.
3-2-1 COSTILLAS Puede que hayas oído hablar del método 3-2-1 costillas en las redes sociales. Es una técnica muy popular para ahumar costillas para que queden tiernas, jugosas y donde salen limpias del hueso. Fácil y simple de seguir, este es un método que garantiza que te quedaran unas costillas para chuparse los dedos. El método 3-2-1 es un proceso que implica ahumar las costillas durante 3 horas, envolverlas en papel de aluminio y brasear durante 2 horas, y el ahumado sin envoltura durante 1 hora.
PERRITOS CALIENTES RELLENOS AHUMADOS MACARRONES CON QUESO AHUMADOS 1. 2. 3. Un favorito de todas las familias desde siempre, esta receta de macarrones con queso ahumados suben el listón de los macarrones con queso al horno con sabores que harán que tu ahumador no pare de funcionar. Slit hot dogs lengthwise, within 1/4 inch of each end. Stuff hot dogs with cheese and relish and wrap in bacon. Place on cooking grate over drip pan and smoke 15-20 minutes or until bacon is crisp.
CARNE DE VENADO AHUMADA CON TOCINO ADOBO PARA CARNE Adobo Para Carne De Venado Ingredientes: 1 taza de vinagre balsámico o de vino tinto 1 taza de aceite de oliva 2 onzas de Worcestershire ½ onza de Tabasco 2 cucharadas de sal condimentada 1 a 2 jalapeños picados 3 onzas de salsa de soja ¼ taza de salsa de soja 2 cebollas grandes 2 dientes de ajo, triturados 2 cucharaditas de sal 2 cucharaditas de pimentón 1 cucharadita de pimienta molida fresca Adobo Para Tocino 1.
¡ESCANEE EL CÓDIGO ACCESORIOS FAVORITOS PARA VER MÁS! PARA LA VISITA COMPLETA DE ACCESORIOS CHARGRILLER.COM Cubierta a la Medida Resistente al Clima Protege el Acabado La Cubierta se Adapta al Estante Lateral o la Parrillera Lateral Visite chargriller.
Esta Página Ha Sido Intencionalmente Ha Dejado En Blanco
P.O. Box 30864 Sea Island, GA 31561 912-638-4724 www.CharGriller.com Service@CharGriller.