
Use and Care Manual


Hint: The paper label that is affixed to the hood is more easily removed when the hood is warm.
Any remaining glue residue can be cleaned off with a spray lubricant like WD-40.
Please Note, No Returns on Used Grills.
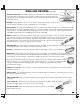
Attach SIDE SHELF to the four (4) holes on left
side of grill with 1/2" hex bolts and nuts. Fig. L.
ATTACHING WARMING RACK PIVOT BOLTS: On
each END of the HOOD just back of center, insert one (1) 2"
HEX BOLT (total 2) (from outside in) in holes (A) with HEX
NUTS on inside of HOOD. Fig. M.
On each END of the LOWER GRILL BODY 4" from the
back corner, insert one (1) 3/4" HEX BOLT (total 2) (from
outside in) in holes (B) and secure with HEX NUTS on
inside of GRILL BODY. Fig. M.
DO NOT install WARMING RACK until after tightning all
four WARMING RACK PIVOT BOLTS.
ATTACH THE WARMING RACK’S (4) WIRE LOOP
HOLES, located on the WARMING RACK’S SIDES and
WIRE LEGS, over the four (4) PIVOT BOLTS in the
HOOD and GRILL BODY. Attach left side first.
Hint: You may flex the WIRE LEG outwards for a
tighter fit and to center. Fig. M. You may then attach a
hex nut to the pivot bolts in the hood to keep the
Warming Rack from sliding off of the pivot bolts,
(not shown).
Tighten ALL nuts and bolts.
Place FIRE GRATE, with ADJUSTABLE HANGERS
attached, into BOTTOM HALF of grill body. (Note:
catch tabs may need to be bent out slightly to better
accommodate adjustable hangers). Fig. K & L
install the COOKING GRATES.
CONGRATULATIONS, ASSEMBLY COMPLETE!
14.
15.
16.
17.
2" Bolt
Pivot Leg Wire
3
/
4
Bolt
Hex Bolt
Side Shelf
Assembly
FIG. J
-5-