
Use and Care Manual


CLEANING AND CARE
CAUTION: All cleaning and maintenance should be done while grill is completely cool and with gas
cylinder valve completely closed.
DO NOT clean any grill part in a self-cleaning oven. The extreme heat will damage the fi nish.
Recommended Cleaning Materials
• Mild dishwashing liquid detergent
• Nylon cleaning pad
• Hot water
• Wire brush
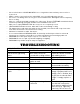
Cleaning
• Burning off the grill after every use (approximately 15 minutes) will keep excessive food residue
from building up.
• DO NOT use cleaners that contain acid, mineral spirits or xylene.
• Outside surfaces - Use a mild dishwashing detergent and hot water solution to clean, then rinse
with water.
• Inside surface of grill hood – If surface has appearance of peeling paint, baked on grease buildup
has turned to carbon and is fl aking off. Clean thoroughly with strong solution of detergent and hot
water. Rinse with water and allow to completely dry. To prevent rusting, re-season after cleaning.
• Interior of grill bottom – Remove residue using brush, scraper and/or cleaning pad, then wash
with dishwashing detergent and hot water solution. Rinse with water and let thoroughly dry.
• Cooking Grates – Porcelain grates have a glass-like composition that should be handled with care
not to chip. Use mild dishwashing detergent or baking soda and hot water solution. Non-abrasive
scouring powder can be used on stubborn stains, then rinse with water.
• Heat Shield – Clean residue with wire brush and wash with soapy water. Then rinse with water.
• Grease Collector – Periodically empty grease cup and clean with dishwashing soap and hot water
solution.
An uncoated interior will rust if not properly maintained with a regular coating of
cooking oil on all bare metal surfaces inside the grill. You can use either vegetable spray
or liquid vegetable oil applied using a paper towel on a cooled grill.
Cleaning the Burner Assembly
1. Turn gas off at control knobs and gas tank.
2. Remove cooking grates and heat shield.
3. Remove grease collector.
4. Remove burner by unscrewing self-taping screw using Phillips-head screwdriver.
5. Lift burner up and away from gas valve orifi ce.
6. Clean inlet (venture) of burner with small bottle brush or compressed air.
7. Remove all food residue and dirt on outside of burner surface.
8. Clean any clogged ports with stiff wire (such as a straightened paper clip).
9. Inspect burner for any damage (cracks or holes). If damage is found, replace with new burner. To re-
install burner, ensure that gas valve orifi ces are correctly position inside burner inlet (venturi). Also
check position of spark electrode.