
Operating Guide


C-3
Regulator and Hose
Regulator and Hose are supplied with the outdoor stove. If a replacement is necessary, please visit
CharGriller.com or call our Customer Service department at 1-912-638-4724. DO NOT use replacement
parts that are not intended for this outdoor stove. It is recommended that the regulator is changed within
10 years of the date of manufacture.
The use of the wrong regulator or hose is unsafe. Always check that you have the correct items before
operating the outdoor stove.
The hose used must conform to the relevant standard for the country of use. A worn or damaged hose
must be replaced immediately. Ensure the hose is properly connected to the gas grill and free of any
obstructions, kinks, and/or entanglements.
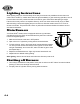
Connecting the Hose to the Outdoor Stove
Before connecting the hose, ensure that there is no debris caught in the head of the LP cylinder,
regulator, burner, and burner ports. Spiders and insects can nest within and clog the burner at the
orice. Clogged burner tubes can result in re and severely damage the outdoor stove.
Clean burner holes with a heavy-duty pipe cleaner.
If the hose is replaced it must be secured to the outdoor stove and regulator connections with hose
clips. Disconnect the regulator from the cylinder (according to the directions supplied with the regulator)
when the outdoor stove is not in use.
The outdoor stove must be used in a well-ventilated area. DO NOT obstruct the ow of combustion air
to the burner when in use. ONLY USE THIS APPLIANCE OUTDOORS.
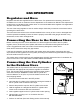
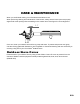
Connecting the Gas Cylinder
to the Outdoor Stove
This outdoor stove is only suited for use with low-pressure propane
gas tted with the appropriate low-pressure regulator via a exible
hose. The hose should be secured to the regulator and the outdoor
stove with hose clips. WARNING: Position the LP cylinder at a
minimum distance of 10” (25,4 cm) from the outdoor stove so as to
avoid a tipping hazard.
1. Ensure all control knobs are in the OFF position.
2. Verify that the LP cylinder valve is closed by turning the handle on
the LP cylinder valve clockwise until it stops.
3. Remove the protective cap from the LP cylinder valve nozzle.
4. Hold the regulator in a straight line with the LP cylinder valve
nozzle so the connection does not cross thread.
5. Insert regulator nipple into the LP cylinder valve nozzle opening.
6. Hand-tighten coupling nut in a clockwise direction.
Do not use tools!
7. Perform a Leak Test. (See Leak Testing section of this manual).
GAS OPERATION
10”
Tank Position