OWNER’S MANUAL AKORN® Model #E56520 Keep your receipt with this manual for Warranty. CUSTOMER SERVICE 1-912-638-4724 Service@CharGriller.com Contents of this manual are Trademarked and Copyrighted by Char-Griller | A&J Manufacturing. Using the information contained in this manual without consent of Char-Griller and/or A&J Manufacturing is strictly prohibited. OM_E56520_ED_ A.
TABLE OF CONTENTS Safety Warnings & Warranty............................... A-1 Assembly Instructions ..................................... B-1 Product Usage .................................................. C-1 Recipes .............................................................. D-1 Accessories .......................................................
This Page Intentionally Left Blank
IMPORTANT SAFETY WARNINGS READ ALL SAFETY WARNINGS AND INSTRUCTIONS CAREFULLY BEFORE ASSEMBLING AND OPERATING YOUR GRILL Read the following instructions carefully and be sure your appliance is properly assembled, installed, and maintained. Failure to follow these instructions may result in serious bodily injury and/or property damage. If you have any questions concerning assembly or operation, call 912-638-4724.
IMPORTANT SAFETY WARNINGS (Continued) • Do not exceed a temperature of 700˚ F. • Do not allow charcoal and/or wood to rest on the walls of grill. Doing so will greatly reduce the life of the grill • Always wear oven mitts to protect hands from burns, especially when adjusting dampers. Avoid touching hot surfaces. • When opening lid, make sure it is pushed all the way back so it rests against the lid support bracket.
STOP! CALL FIRST! Do NOT Return Product to Store. This grill has been made according to the highest of quality standards. If you have any questions that are not addressed in this manual or if you need parts please call our Customer Service Department at 1-912-638-4724 (USA) or email Char-Griller at: Service@CharGriller.com and have your serial number handy. Document Your Grill Model and Serial Numbers HERE: (Model and Serial number are located on the back of the grill body or on the leg.
WARRANTY INFORMATION A COPY OF THE DATED PROOF OF PURCHASE (RECEIPT) IS REQUIRED WHEN REGISTERING OR SUBMITTING A WARRANTY* CLAIM. PLEASE RETAIN A COPY OF THE RECEIPT FOR YOUR RECORDS. Char-Griller will replace any defective part of its grillers/smokers, under warranty, as outlined below. PLEASE READ THIS INFORMATION IN DETAIL AND IF YOU HAVE ANY QUESTIONS CONTACT CUSTOMER SERVICE AT 912-638-4724 OR SERVICE@CHARGRILLER.COM.
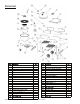
Parts List 1 Hood Assembly 2 Damper Assembly 3 Side Shelf 4 Right Back Panel 5 Right Front Panel 6 Right L-Shape Leg 7 Short Leg 8 Cart Side Frame 9 Leg Ext ender 10 Leg Brace 1 1 1 1 1 2 2 2 2 4 12 13 2 1 Axel Cap Axel Rod 17 Long Leg 2 19 Ash Pan Assembly 1 OM E56520 A.
WARNING: DO NOT OPERATE ABOVE 700°F / 371°C CAUTION: Do not attempt to move grill unless the lid is latched, failing to do so may lead to damage or injury. NOTICE: Read all operating and assembly instructions before attempting to use your grill. NOTICE: Always have a fire extinguisher near at all times. Maintain and check your fire extinguisher regularly.
Step 1: Assemble Legs Left L-Shape Legs (8) Hex Bolt --1/4”-20 x 1/2” Right L-Shape Legs Hex Bolt Long Legs Short Legs Step 2: Assemble Front and Back Panels Left Back Panel (4) #6 Machine Screw Right Back Panel Left Front Panel Right Front Panel Screws OM E56520 A.1 ™ & © Char-Griller / A&J Mfg.
Step 3: Assemble Bottom Shelf Hex Bolts Bottom Shelf Braces (2) Hex Bolt --1/4”-20 x 1/2” Right Side Bottom Shelf Left Side Bottom Shelf Step 4: Attach Bottom Shelf to Leg Assembly (8) Hex Bolt—1/4”-20 x 2” Hex Bolts Leg Assembly Bottom Shelf Assembly Cart Side Frame (8) Hex Nut—1/4”-20 NOTE: Insert hook at each corner of bottom shelf into hole on each Leg. Then attach cart side frames and leg braces. Leg brace with two cut slots side goes on the inside.
Step 5: Flip Cart Upside Down then install Wheels and Leg Extenders Leg Extender (2) Axel Cap (4) Flat Washer (2) Cotter Pin Wheel Flat Washer Flat Washer Axel Rod Axel Cap Cotter Pin Wheel Step 6: Turn Cart right side up then install Front and Back Panels (4) Hex Bolt --1/4”-20 x 1 3/4” Back Panel Assembly (4) Hex Nut --1/4”-20 Hex Nuts Cart Assembly Hex Bolts Hex Bolts Front Panel Assembly OM E56520 A.1 ™ & © Char-Griller / A&J Mfg.
Step 7: Install Hinge Assembly and Front Support Bracket to Fire Bowl Hinge Assembly (4) Hex Bolt --1/4”-20 x 3/4” With Blue Locking Compound Fire Bowl Front Support Bracket Hex Bolt --1/4”-20 x 3/4” With Blue Locking Compound (4) Hex Bolt --1/4”-20 x 1/2” Fire Bowl Hex Bolt—1/4”-20 x 1/2 Step 8: Install Fire Bowl to Cart Hex Bolts (4) Hex Bolt --1/4”-20 x 1/2” Cart Assembly Fire Bowl Assembly OM E56520 A.1 ™ & © Char-Griller / A&J Mfg.
Step 9: Install Hood to Fire Bowl Hood (4) Hex Bolt --1/4”-20 x 3/4” With Blue Locking Compound Coated Fire Bowl Hex Bolt Coated With Blue Locking Compound Step 10: Install Handle to Hood Right Handle End Cap (4) Hex Bolt -1/4”-20 x 1/2” Hood Hex Bolt Left Handle End Cap Handle OM E56520 A.1 ™ & © Char-Griller / A&J Mfg.
Step 11: Install Damper to Hood (2) Hex Bolt --1/4”-20 x 1/2” Hex Bolts Damper Assembly Hood Assembly Step 12: Install Ash Pan to Fire Bowl Ash Pan Hanger Tab Ash Pan Hanger Wire Ash Pan NOTE: ASH PAN HANGER TAB MUST BE ON TOP OF ASH PAN HANGER WIRE BEFORE PUSHING ASH PAN INWARD TO CENTER. OM E56520 A.1 ™ & © Char-Griller / A&J Mfg.
Step 13: Install Side Shelf to Cart Side Shelf (4) Hex Bolt—1/4”-20 x 1 1/4” Hex Bolts Step 14: Install Bezel, Thermometer, and Thermometer Gasket Thermometer Gasket Thermometer (1) Wing Nut Bezel Hood Wing Nut OM E56520 A.1 ™ & © Char-Griller / A&J Mfg.
Step 15: Install Fire Bowl, Fire Grate, Outer/Inner Cooking Grates, and Utensil Hooks Inner Cooking Grate Outer Cooking Grate Fire Grate Fire Bowl (3) Utensil, “S” Hook OM E56520 A.1 Utensil, “S” Hooks ™ & © Char-Griller / A&J Mfg.
OPERATING INSTRUCTIONS Setting Up Set grill up on solid, flat surface with adequate wind shelter. Do not move grill while hot, and do not leave unattended during operation. This appliance is designed for use outdoors, away from any flammable materials. It is important that there are no overhead obstructions and that there is a minimum distance of 12 feet (366 cm) from the side or rear of the appliance. It is important that the ventilation openings of the appliance are not obstructed.
Lighting Instructions We recommend using Lump Charcoal because it contains no additives or fillers. This makes for more efficient burning, less ash and better tasting food than charcoal briquettes. 1. To start a charcoal fire, stack 3 lbs of Lump Charcoal (50-60 briquettes) into a pyramid in the center of the fire grate. 2. Light coals in several places. Fire starters are helpful during this step. NOTE: Do not use gasoline, kerosene or alcohol for lighting charcoal.
For LOW, SLOW and LONG grilling & Smoking (200° to 350° F) Use approx one pound of computer mouse size or larger size pieces of LUMP CHARCOAL to build fire in center of fire grate. Start fire as described above. When coals ignite, CLOSE LID and begin to regulate temp with dampers to desired setting.
Cooking with INDIRECT Heat on a Kamado: Smokin’ Stone™ and Pizza Stones are sold separately at CharGriller.com. Both Stones can be used interchangeably. Smokin’ Stone, Grate, Drip Pan & Meat Rack This is ideal for ROASTING large cuts of meat (low and slow). The meat stays flavorful and juicy as it slowly roasts and is basted in it’s own juices. Add apple juice or beer to drip pan if desired.
Finishing Up When your are finished grilling you can shut down your grill by closing both dampers and allowing the fire to suffocate. Be patient. This make take an hour or more. Emptying the Ashes: ** ONLY EMPTY ASHES WHILE GRILL IS NOT IS USE ** After the fire is completely extinguished you should wait several hours before emptying the ashes to ensure they are not still hot and a burn hazard. 1. Knock any ashes that did not fall into the ash pan from the fire grate.
This Page Intentionally Left Blank
GRILLING RECIPES Know Your Cuts of Meat D-1
TIPS FOR AKORN GRILLING (Direct Heat Above Coals) • Leave grill Lid down while cooking to eliminate flare ups & to provide even cooking • Add wood chips for flavor. When smoking, soak chips in water for 40 mins. prior to placing in the grill • Meat Thermometers give internal temperatures for rare, medium or well done. When testing temperatures, insert the probe into thickest part of meat.
Dry Rub Seasoning: Steak Marinade: • • • • • In a glass pan mix: • ½ cup olive oil • 1/3 cup soy sauce • ¼ cup wine vinegar • 2 tsp. lemon juice • 1 tsp. dry mustard • 1 minced garlic clove • small minced onion • ¼ tsp. pepper Place the meat in the marinade and refrigerate for 3 hours. Mix 1/8 cup kosher salt ¼ tsp. white pepper 1/8 tsp. cayenne pepper 1 tsp. black pepper Apply to both sides. BURGERS: Grill ½ lb Burgers exactly the same as Steaks EXCEPT... grill for 2 minutes before each flip.
• Sear lamb quickly over hot fire at 500°F for 3 mins. per side then drop heat and/or move the rack to a cooler part of the grill to let center roast. This creates a perfect caramelized crust and keeps the center tender and juicy. • Close lid and let sit for another 5 minutes. • Test internal temperature as you go. Do not overcook. Lamb is rare at 120°F; medium 150°F • Remove from grill and tent under foil for 10 mins. before carving (this is called, “Resting”).
QUAIL OR DOVES: • • • • • Cover birds in Italian dressing and marinate overnight. Pour remaining dressing and cover with Texas Pete® Hot Sauce for 6 hours. Wrap birds in thick bacon secured by a toothpick. Place on grill. Keep turning until bacon is black. Grill for 20 minutes. Sear with lid open at HIGH temperature (500-700°F) for 1 minute on each side before closing lid and lowering temperature.
TIPS FOR AKORN® SMOKING (Indirect Heat) • • • • • • • • Smoke long and slow in the 200° to 350°F range Adjust the dampers for desired temperature. Remember, more air equals higher temperature. Lump charcoal is preferred over briquettes. Put several layers of charcoal in firebox with soaked hickory chips (soak 40 min to 3 hrs) mixed in or on top of coals for a wood smoke flavor to the meat. Use less lump charcoal than you would briquettes.
RACK OF BABY BACK RIBS: • • • • • • • • • Remove membrane by placing the tip of a meat thermometer between the membrane and a bone near the end of the rack of ribs. Work membrane loose and peel it off. Wash the ribs under cool water. Apply dry rub to all sides and let stand at room temperature for 30 minutes. Smoke for 1½ hr at 325°F. Remove meat from grill and brush all sides with honey BBQ sauce. Put meat into a rib rack in a foil pan with 1” apple juice.
• • • When cooking is done, remove roast and allow it to sit uncovered for 10 minutes Break shell of salt away from roast and remove. Salt will be brittle. You may have to scrape from meat surface. Let roast sit another 5 mins., slice and serve. Au Jus Sauce: • • • • • • In 10” skillet or shallow pan place 4 to 6 small chunks of roast along with 3 to 4 Tbsps. water. Stir and heat over med heat until water becomes dark & viscous from the chunks of roast.
SMOKED BAKED HAM: You can smoke fully cooked canned ham or smoked and cured whole ham or shank or butt portion. Glaze • 1 cup of light brown sugar, firmly packed • 1/2 cup orange juice • 1/2 cup honey • • • • • • • • Combine sugar, juice and honey. Let glaze sit for at least 4 hours. Place fire grate in the lowest position and a drip pan under the meat. Remove rind and score fat diagonally to give a diamond effect. Insert a whole clove into the center of every diamond.
Bacon Marinade for Venison: • • • 2 oz. wine vinegar 2 oz. Worcestershire 4 dashes Tabasco • Place leg of venison in a container or “hefty bag” and marinate for 2-4 days, turning daily. Marinate bacon overnight in its marinade. Remove roast from refrigerator at least an hour before cooking. Season generously with seasoned salt and coarse ground black pepper. Wrap 1 lb. Bacon over the top of the roast, and smoke 20/25 minutes per pound, or until tender. Do not overcook.
BAKING on the AKORN® Bake pizza, bread, cornbread, biscuits, cobblers, cookies and pies. We recommend purchasing the Smokin’ Stone™ and/or Pizza / Baking Stone accessory for best results. The stone allows moisture to be drawn from dough and provides crispy and light crusts. BAKED BREAKFAST PIZZA: • • • • • • • • Start by smoking center cut bacon on the AKORN®. Next scramble 4 or 5 eggs on the stove, or use Cast Iron skillet and make on the AKORN®.
ACCESSORIES AKORN Cover Custom-fit, weather-resistant cover to protect your grill from the elements Smokin’ Stone Circulates air around meat & protects meat from direct flame and heat. Enhances tastes and tenderness Adjustable Fire Grate For precise heat control (Hot, Medium, and Low) Charcoal Basket Confines Coals to One Side for Smoking Indirect Cooking Apron Machine Washable Two Front Pockets Adjustable Straps Pizza Stone Circulates air around dough.
For pricing or to order accessories visit: www.CharGriller.com OR CALL: 912-638-4724 P.O. Box 30864 Sea Island, GA 31561 912-638-4724 www.CharGriller.com Service@CharGriller.
MANUAL DEL USUARIO AKORN® Modelo #E56520 Para efectos de Garantía, guarda tu recibo con este manual. ATENCIÓN AL CLIENTE 1-912-638-4724 Service@CharGriller.com Lo contenido en este manual es Marca Registrada y Propiedad con Derechos de Autor de Char-Griller | A&J Manufacturing. Está terminantemente prohibido utilizar la información suministrada en este manual sin el consentimiento de Char-Griller y/o A&J Manufacturing OM_E56520_SPA_ A.
TABLA DE CONTENIDO Advertencias De Seguridad.............................. A-1 Instrucciones de Ensamblado.......................... B-1 Instrucciones Operativas ................................. C-1 Recetas Para La Parrilla .................................... D-1 Accesorios .........................................................
Esta Página Ha Sido Intencionalmente Ha Dejado En Blanco
ADVERTENCIAS DE SEGURIDAD LEA TODAS LAS INSTRUCCIONES Y ADVERTENCIAS DE SEGURIDAD CUIDADOSAMENTE ANTES DE ENSAMBLAR Y OPERAR SU PARRILLERA Lea todas las instrucciones cuidadosamente y asegúrese de que su parrillera esté ensamblada, instalada y reciba mantenimiento apropiadamente. El incumplimiento de estas instrucciones puede causar daños a la propiedad y/o lesiones severas. Si tiene alguna pregunta relacionada con la instalación u operación, llame al 912-638-4724.
ADVERTENCIAS DE SEGURIDAD (Continuación) • Remover el exceso de grasa antes de la cocción ayudará a prevenir las llamaradas. • Mantenga su parrillera limpia para prevenir llamaradas. • Siempre coloque el carbón en la parte superior de la rejilla para carbón, y no directamente en el fondo de la parrillera. • No exceda una temperatura de 700° F. • No permita que el carbón y/o leña repose en las paredes de la parrillera. Esto reduciría considerablemente la vida útil de la parrillera.
¡PARE! ¡LLAME PRIMERO A ! NO Devuelva el Producto a la Tienda. Este producto ha sido construido bajo los más altos estándares de calidad. Si tiene alguna pregunta que no ha sido respondida en estas instrucciones, o si necesita alguna pieza o repuesto, por favor llame a nuestro Departamento de Atención al Cliente al 1-912-638-4724 (EE.UU.), o envíenos un correo electrónico a: Service@Char-Griller.com; tenga el número de serial de su parrillera al alcance.
INFORMACIÓN DE GARANTÍA DURANTE EL REGISTRO O INTRODUCCIÓN DE UN RECLAMO DE GARANTÍA* DEBERÁ PRESENTAR COPIA DE LA PRUEBA DE COMPRA FECHADA (RECIBO). POR FAVOR, GUARDE UNA COPIA DEL RECIBO PARA SUS REGISTROS. Char-Griller reemplazará cualquier pieza defectuosa de sus parrilleras/ahumadores, sujetos a garantía, como se establece a continuación. POR FAVOR LEA ESTA INFORMACIÓN DETALLADAMENTE Y EN CASO DE TENER ALGUNA PREGUNTA, CONTACTE A SERVICIO AL CLIENTE A TRAVÉS DEL 912-638-4724.
Esta Página Ha Sido Intencionalmente Ha Dejado En Blanco
Lista de piezas Artículo 1 2 3 4 5 6 7 8 9 10 11 12 13 14 15 16 17 18 19 Descripción Conjunto de la campana Conjunto del regulador de tiro Estante lateral Panel trasero derecho Panel delantero derecho Pata en L derecha Pata corta Marco lateral del carro Extensor de pata Soporte de pata Rueda de 20cm, de plástico con neumático de caucho Tapabuje Varilla de eje Soporte de seguridad del estante inferior Estante inferior, mitad derecha Estante inferior, mitad izquierda Pata larga Pata en L izquierda Conjunto
ADVERTENCIA: NO UTILIZAR ARRIBA DE 371° C PRECAUCIÓN: no intente mover la parrilla a menos que esté bien cerrada; de lo contrario puede causar daños o lesiones. AVISO: lea todas las instrucciones de ensamblaje y funcionamiento antes de intentar usar la parrilla. AVISO: siempre tenga a la mano un extintor. Dé mantenimiento y revise su extintor con regularidad.
Paso 1: Arme las patas Patas en L izquierda (8) Perno de cabeza hexagonal --6,3 mm(1/4”)-20 x 1,27 cm (1/2”) Patas en L derechas Perno de cabeza hexagonal Patas largas Patas cortas Paso 2: Arme los paneles delantero y trasero Panel trasero izquierdo (4) Tornillo para metales n.º 6 Panel trasero derecho Panel delantero izquierdo Panel delantero derecho Tornillos OM E56520 A.1 ™ & © Char-Griller / A&J Mfg.
Paso 3: Arme el estante inferior Pernos de cabeza hexagonal (2) Perno de cabeza hexagonal --6,3 mm(1/4”)-20 x 1,27 cm (1/2”) Soportes del estante inferior Estante inferior del lado derecho Estante inferior del lado izquierdo Paso 4: Una el estante inferior al conjunto de las patas Pernos de cabeza hexagonal Conjunto del estante inferior (8) Perno de cabeza hexagonal --6,3 mm(1/4”)-20 x 5,08 cm (2”) (8) Perno de cabeza hexagonal—6,3 mm (1/4”) -20 NOTA: inserte el gancho de cada esquina del estante
Paso 5: Dé vuelta el carro de modo que quede patas para arriba y luego coloque las ruedas y las extensor de pata Arandela plana (2) Tapabuje Tapabuje Extensor de pata (4) Arandela plana (2) Pasador de chaveta Arandela plana Rueda Rueda Arandela plana Varilla de eje Verilla de eje Tapabuje Pasador de chaveta Rueda Paso 6: Dé vuelta el carro de modo que quede el lado derecho hacia arriba e Instale los paneles delantero y trasero Tuercas hexagonales (4) Perno de cabeza hexagonal --6.
Paso 7: Instale el conjunto de la bisagra y la ménsula delantera a la cámara de combustión Conjunto de bisagra (4) Perno de cabeza hexagonal --6,3mm (1/4”)-20 x 1,9 cm (3/4”) recubierto con compuesto bloqueador azul (4) Perno de cabeza hexagonal --6,3 mm (1/4”)20 x 1,27 cm (1/2”) Ménsula delantera de la cámara de combusión Perno de cabeza hexagonal -6,3 mm (1/4”)-20 x 1,9 cm (3/4”) recubierto con compuesto bloqueador azul Cámara de combustion Paso 8: Instale la cámara de combustión en el carro Pernos
Paso 9: Instale la campana en la cámara de combustión. Campana (4) Perno de cabeza hexagonal --6,3mm (1/4”)-20 x 1,9 cm (3/4”) Cámara de combustible Perno de cabeza hexagonal recubierto con compuesto bloqueador azul Paso 10: Coloque la manija en la campana. Tapa del exremo derecho de la manija (4) Perno de cabeza hexagonal 6,3 mm (1/4”)-20 x 1,27 cm (1/2”) Campana Perno de cabeza hexagonal Tapa del extremo izquierdo de la manija OM E56520 A.1 Manija ™ & © Char-Griller / A&J Mfg.
Paso 11: Instale el regulador de tiro en la campana (2) Perno de cabeza hexagonal --6,3 mm (1/4”)20 x 1,27 cm (1/2”) Pernos de cabeza hexagonal Conjunto del regulador de tiro Conjunto de la campana Paso 12: Instale el cenicero en la cámara de combustión Pestaña para colgar del cenicero Alambre para colgar del cenicero Cenicero NOTA: LA PESTAÑA PARA COLGAR DEL CENICERO DEBE ESTAR SOBRE EL CABLE PARA COLGAR DEL CENICERO ANTES DE EMPUJAR EL CENICERO HACIA LA PARTE CENTRAL INTERIOR OM E56520 A.
Paso 13: Instale el estante lateral en el carro Estante lateral (4) Perno de cabeza hexagonal —6,3 mm (1/4”)-20 x 3,17 cm (1 1/4”) Pernos de cabeza hexagonal Paso 14: Instale el aro de montaje, el termómetro y la junta del termómetro Junta del termómetro Termómetro (1) Tuerca mariposa Aro de montaje Campana Tuerca mariposa OM E56520 A.1 ™ & © Char-Griller / A&J Mfg.
Paso 15: Instale el brasero, el emparrillado, las parrillas de cocción interna y externa Parrilla de cocción interna Parrilla de cocción externa Emparrillado Brasero (3) Gancho Para Utensilios OM E56520 A.1 Gancho Para Utensilios ™ & © Char-Griller / A&J Mfg.
Esta Página Ha Sido Intencionalmente Ha Dejado En Blanco
INSTRUCCIONES OPERATIVAS Instalación del Equipo Coloque la parrillera en una superficie plana y sólida, resguardada del viento. No mueva la parrillera mientras esté caliente y no la deje sin supervisión durante su operación. Este equipo está diseñado para ser utilizado al aire libre, lejos de cualquier material inflamable. Es importante que no existan obstrucciones superiores y que haya una distancia mínima de 12 pies (366 cm) desde la parte lateral o trasera del equipo.
Instrucciones de Encendido Le recomendamos utilizar Carbón Vegetal porque no contiene aditivos ni rellenos, brindándole un encendido más eficiente, menos ceniza y comidas más sabrosas que con las briquetas de carbón. 1. Para encender un fuego con carbón, apila 3 libras de Carbón Vegetal (50-60 briquetas) en una pirámide en el centro de la rejilla de cocción. 2. Encienda los carbones en distintos lugares. Los iniciadores de fuego ayudan durante este paso.
Para asar y ahumar a BAJA TEMPERATURA, LENTA Y PROLONGADA COCCIÓN (200° a 350° F) Use aproximadamente 1 libra de CARBÓN VEGETAL del tamaño de un ratón de computadora o de mayor tamaño para generar un fuego en el centro de la rejilla de carbón. Comience el fuego según lo descrito anteriormente. Cuando el carbón encienda, CIERRE LA PUERTA comience a regular la temperatura con las compuertas hasta el ajuste deseado.
Finalizando Cuando termine de cocinar en la parrillera, podrá apagarla cerrando ambas compuertas y permitiendo que el fuego se sofoque. Sea paciente. Esto tomará un hora o más. Vaciado de Cenizas: **SÓLO VACÍE LAS CENIZAS MIENTRAS LA PARRILLERA NO ESTÉ EN USO** Luego de que el fuego esté completamente apagado, deberá esperar varias horas para vaciar las cenizas, asegurando que ya no están calientes y no existe peligro de quemaduras. 1.
RECETAS PARA COCINAR A LA PARRILLA Conozca sus Cortes de Carne COSTILLAS COSTILLA PARA ASAR, EXTREMO GRANDE COSTILLA PARA ASAR, EXTREMO PEQUEÑO FILETE DE COSTILLA, EXTREMO PEQUEÑO BISTEC DE COSTILLA BISTEC DE COSTILLA PARA ASAR COSTILLITAS CORTES DE RES LOMO SOLOMO BISTEC DE LOMITO BISTEC DE LOMO LOMO ENTERO PUNTA DE SOLOMO BISTEC DE SOLOMO ESPALDILLA REDONDO LOMO SOLOMO COSTILLAS ESPALDILLA BISTEC DE PLANCHUELA BITEC DE DIESMILLO ASADO DE ESPALDILLA ASADO TIERNO DE ESPALDILLA ASADO DE PALETA PAL
CONSEJOS PARA ASAR CON AKORN® (Calor Directo Sobre Carbones) • • • • • • • • • • • • • • Deje la tapa de la parrillera abajo mientras cocina para eliminar las llamaradas y para una cocción pareja. Agregue virutas de madera para mayor sabor. Cuando ahúme, remoje las virutas en agua por 40 minutos, antes de colocarlas en la parrilla. Los termómetros de carne indican la temperatura interna de cocción media, tres cuartos o bien cocida.
Condimento de hierbas secas: • • • • • Mezcle 1/8 taza de sal kosher ¼ cda pimienta blanca 1/8 cda pimienta de cayena 1 cda pimienta negra Aplique a ambos lados HAMBURGUESAS: Marinada para Bistecs: En un recipiente de vidrio, mezcle: • ½ taza de aceite vegetal o de oliva • 1/3 de taza de salsa de soya • ¼ de taza de vinagre de vino tinto • 2 cds de jugo de limón • 1 cda de mostaza seca • 1 diente de ajo picado • 1 cebolla pequeña picada • ¼ de cda de pimienta Coloque la carne en la marinada y refrigere
Preparación: • • • • • • • • Envuelva los largos huegos que salen de la costilla en papel de aluminio (para evitar la formación de una costra). No cocine en exceso o a muy altas temperaturas, ya que estos huesos pueden quemarse y desmenuzarse. Mantenga los huesos hacia arriba, lejos del fuego colocándolos en una rejilla en forma de “U”. Retire los pedazos sueltos de grasa. Seque con papel absorbente y condimente con mostaza, sal, pimienta y ajo.
• • • Prepare la AKORN® a 425°F Coloque la tabla en la parrillera. Una vez que comience a ‘agrietarse,’ coloque el salmón en la parrillera (por 5 minutos). Para filetes gruesos de salmón, calcule 10-13 minutos para que el pescado comience a ‘desmenuzarse’. MAZORCAS DULCES EN HOJAS: • • Elimine el exceso de barbas de las puntas y remoje en agua salada fría una hora antes de asarlas. Ase por 25 minutos, volteándolas varias veces.
• • • PAPAS AL HORNO: Frótelas con mantequilla y envuelva en papel de aluminio. Áselas con la tapa abajo por 50 minutos. Voltéelas luego de 25 minutos (no es necesario hacerlo si están ahumadas). Pinche para revisar su cocción. CONSEJOS PARA AHUMAR CON AKORN® (Calor Indirecto) • Ahúme por largos tiempos a temperaturas entre los 200° y 350°F. • Ajuste las compuertas a las temperaturas deseadas. Recuerde, mayor entrada de aire significa mayores temperaturas.
PALETA DE CERDO o VENADO (con hueso, 6/9 lb): • • • • • 1 taza de BBQ comercial y/o inyecte profundamente los condimentos de su elección a la carne. Frote el condimento dentro de la carne hasta que esté húmeda. Envuelva en film de cocina y coloque en el refrigerador de 3 a 5 horas. Cocine la paleta por 18 hrs a 235°F o hasta que la temperatura interna alcance los 200°F. Retire, envuelva dos veces en papel de aluminio y deje reposar por unos 30 minutos antes de separarlo.
Direcciones de Cocción: • • • • • • Sobre la bandeja de goteo y sin agua, coloque el asado dentro de una bandeja para asar. Cocine el asado por 15 min por libra a 500 - 525°F para un término de medio crudo Introduzca el termómetro de carne en el asado durante los últimos 30 minutos de cocción: 145°F para crudo, 160°F para término medio, 175°F para bien cocido. Cuando termine la cocción, retire el asado y permita que repose descubierto por 10 minutos. Rompa la costra de sal del asado y retire.
PAVO AHUMADO: • • • • • Vacíe la cavidad de enjuague y seque con toalla de papel. Pliegue las puntas de las alas dentro de la espalda y una los muslos de pierna entre sí. Colóquelos directamente en el centro de la parrilla de cocción directamente sobre papel de aluminio sobre la bandeja de goteo. Ahúme cada onza por doce minutos. Permita algunos minutos extra por onza si están rellenos para permitir se expanda. Use el termómetro de carne para mejores resultados (170°F en la parte interna).
VERSIÓN AHUMADA: Marinada para Venado: • • • • • • • Una taza de vinagre Balsámico o de vino 1 una taza de aceite de oliva 2 oz. de salsa inglesa (Worcestershire) 1/2 oz. de salsa Tabasco 2 cucharaditas de Sazonador 1-2 jalapeños cortados 3 oz. de salsa de soya Marinada de Tocineta • • • • • • • 2 onzas de vinagre de vino 2 onzas de Salsa Inglesa (Worcestershire) 4 toques de Tabasco Coloque muslos de venado en un contenedor o “bolsas grandes” y la marinada por 2 a 4 días, volteándolos a diario.
HORNEAR en la AKORN® Hornee pizza, pan, pan de maíz, galletas y tartaletas. Recomendamos que compre los accesorios de la Piedra para Ahumar Smokin’ Stone™ y/o la Piedra para Hornear/Pizza para mejores resultados. La piedra permite que se elimine la humedad desde la masa, lo que resulta en costras livianas y tostadas. PIZZA DE DESAYUNO HORNEADA: • • • • • • • • Comience ahumando tocino en la AKORN®. Revuelva 4 a 5 huevos en la cocina o utilice un sartén de hierro fundido y hágalos en la AKORN®.
ACCESORIOS Cubierta AKORN Cubierta a la medida y resistente al clima, para proteger su parrillera de los elementos Piedra para Ahumar Circula el aire alrededor de la carne y protege la carne de llama y calor directo.
Para obtener información de precios o para ordenar accesorios, visite: www.CharGriller.com o LLAME AL: 912-638-4724 P.O. Box 30864 Sea Island, GA 31561 912-638-4724 www.CharGriller.com Service@CharGriller.