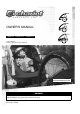
OWNER’S MANUAL Cabriolet, Corsaire XL, Captain XL Original Manual Keep in a safe place for later reference www.chariotcarriers.com DAN G E R You should not use the Chariot child carrier before you have read and understood the contents of this Owner’s Manual. Failure to follow this warning may result in serious or fatal injury.
„Zwei plus zwei“ Marketing GmbH Stolberger Straße 1 D-50933 Köln Telefon: +49 - 2 21 - 95 14 70 - 0 Telefax: +49 - 2 21 - 95 14 70 - 20 E-Mail: info@zweipluszwei.com „Zwei plus zwei“ Marketing GmbH retains all rights to this Owner’s Manual. No texts, details or illustrations from this Manual may be either reproduced or distributed, or indeed become the subject of unauthorised use for commercial purposes, nor may they be made available to others.
1. General Items Intended Use Congratulations on buying this child transporter! Use as intended You have decided to buy a product from the CTS-series (Child Transport System) of the Canadian manufacturer Chariot Carriers Inc. Your new child transporter stands out because of its excellent quality, user-friendliness, high safety standards and great versatility.
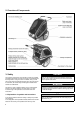
2. Overview of Components 3. Safety DAN G E R The purpose of this section is to acquaint you with the symbols and safety instructions and make you aware of general dangers that might arise in using the carrier. In addition, here you will get to know about the particular dangers when using the carrier in road traffic, as well as being warned against unauthorised rebuilds or modifications.
3.2 General safety instructions As regards the children in the carrier Basics • When converting with other CTS Conversion Kits, no child should be sitting in the carrier, nor when carrying out maintenance or repair work. • The permitted total cargo load of the carrier is limited to 45 kg. This must never be exceeded. The cargo load is the weight of the children together with any luggage there might be. • Please explain to your child that he/she must not bounce, fidget or lean out of the carrier.
3.4 Safety instructions for carrying infants 4. Description of the Ready Chassis • Children who cannot as yet sit up without support may only be carried using the Chariot infant Sling (accessory). • The Manufacturer accepts no liability for use of other sitting aids or baby seats. • Please make sure you follow the safety instructions in the Chariot Infant Sling Owner’s Manual 4.1 Supplied as standard 3.
Assembly of the carrier With one hand, lift the rear end of the top frame tube upwards, at the same time as holding the bottom part of the rear of the carrier with the other hand. DAN G E R Before each journey make sure that both auto-lock disks are engaged. If this does not happen, the passenger compartment may collapse unintentionally and injure your child or cause you to lose control of the carrier.
4.3 Wheel assembly Wheel assembly on the Captain XL and Corsaire XL Wheel assembly on the Cabriolet The wheels of the Captain XL and Corsaire XL are equipped with so-called push-button axles. Pressing on the rubber cap in the wheel centre will loosen the retaining balls which lock the axle in the axle socket. The wheels can only be assembled and removed with the plastic cap pushed in. TIP The easiest way to assemble the wheel is to lay the carrier on its side.
4.4 Fitting the handlebar Safety wrist strap Push the handlebar into the upper frame open tube ends. Depress both spring buttons simultaneously and push both ends of the handlebar at the same time into the tube ends until the spring buttons engage. On the rear left upper frame tube, as seen in the direction of travel, there is the safety wrist strap, which is required to secure the carrier to the wrist when using it as a Jogging Stroller or Stroller.
4.5 Seat and seatbelts With the tried and tested 5-point seatbelt system, your children are securely and comfortably strapped into the Chariot. The Captain XL and Corsaire XL have an additional cross brace in the frame, which is there to anchor the waist belts and brace the seat. 12. On each side of the buckle, the waist belt has a loose belt end for adjusting to fit correctly on the child. Adjust the waist belt until it is tight and the buckle is in the centre in front of the crotch belt. 13.
M: Sleeve through both webbing loops. This is the default setting. TIP Always sleeve or unsleeve the shoulder belts as described above equally on both sides of the padded shoulder harness, otherwise the shoulder harness will not sit properly, and correct fit of the seatbelts is not possible. TIP Depending on manufacturing tolerance, the above mentioned loops may turn out to be too narrow to pull the buckles through them.
If only one child is being carried, the manufacturer recommends that the child be placed in the centre of the seat. If you want to use the central sitting position, then strap the child in as follows: 1. Fasten one of the shoulder harnesses to the middle two vertical straps buckles on the backrest. 2. Use the two middle waist belts. 3. Use the additional crotch belt located in the middle of the seat. 4. The second shoulder harness, the two outer crotch belts, and the outer two waist belts are not used. 5.
The two-in-one weather cover (Cabriolet and Corsaire XL) is attached to the bottom of the front of the passenger compartment with two buckles. Rear flap The rear flap (Cabriolet and Corsaire XL) is attached at the bottom by two velcro fasteners The two-in-one weather cover of the Captain XL is attached at the front by two tabs to the relevant protrusions in the floor pan. The rear flap of the Captain XL is attached at the bottom to the floor pan by 3 tabs and to the sides by two velcro fasteners.
4.7 Parking brake The rear flap can also be used at the front as a sunscreen. For this, it has to be sleeved under the rolled up two-in-one weather cover towards the front. On the forward sides of the passenger compartment at this point there are velcro fasteners. Open these fasteners and connect them to the velcro fasteners on the rear flap. Installing the parking brake The two-in-one weather cover can also be closed with the sunscreen in place.
Screw the two self-locking nuts onto the two side bolts. Screw them on so that the end of the bolt protrudes through the nut, but not so tight that the brake cannot move. DAN G E R Always make sure that the self-locking nuts are only screwed onto the bolts until the end of the bolt protrudes through the nut. If this does not happen, the self-locking nuts cannot fulfil their self-locking function, and this may result in the brake working loose.
4.8 Adjusting the suspension (Captain XL and Corsaire XL only) The Captain XL and Corsaire XL are equipped with adjustable suspension. After loosening the knob, it is possible to move the clamp that surrounds both leaf springs. The more this clamp is moved in the direction of the wheel axle, the stiffer the suspension becomes (see the weight scale on the top spring). The weight indications on the scale are calculated from the weight of the child(ren) and cargo (ie.
5. The Cycling Kit As an alternative to the “Chariot” Cycling Kit, the Cycling Kit can be supplied with the Weber hitcharm and hitch. “Weber” Cycling Kit: Weber hitcharm without hitch, front, rear and spoke reflectors, safety flag. You can either choose the Weber hitch with adjustable kickstand (Weber B) or the Weber hitch for rear-axle attachment (Weber E).
As regards the children carried Performance characteristics when used as a Bicycle Trailer • For riders of bicycles and children being carried who can sit without support, we recommend wearing a suitable approved helmet. Top speed 25 km/h / 15 mph As regards the trailer Top speed on corners walking pace • When the trailer is towed behind a bicycle, the stroller wheels must never be fixed in their use position (wheels down). They may only be carried in their out-of-use position (wheels up).
Assembly For fastening the front and rear reflectors you need a Philips screwdriver. Assembling the reflectors and safety flag If you want to use your Chariot as a Bicycle Trailer, all reflectors and safety flags must be installed. Exception: If you use tires with reflective strips, the spoke reflectors can be left off. Position a spoke reflector between two outer spokes and an inner spoke in such a way that the inner spoke lies in the guide slot of the reflector.
Attaching the hitcharm to the CTS Ready Chassis The hitcharm should now protrude about 2 cm / 3/4 inch out of the rear side of the VersaWing 2.0, and the rear vertical holes in the VersaWing 2.0 and hitcharm must align with each other. The hitcharm is attached to the CTS Ready Chassis into the left “VersaWing 2.0” bracket. The hitcharm must always be attached into the left-hand side of the carrier (as seen in the direction of travel).
Attaching the Axle-Mount ezHitch The Axle-Mount ezHitch must always be attached to the left-hand side of the bicycle (as seen in the direction of travel). Bicycle with solid axle The quick-release skewer is not used in this case. Correctly installed hitcharm. DANGER Unscrew the rear wheels left-hand axle nut and the spacer or plane washer. Install the Axle-Mount ezHitch on the axle. The opening for the hitch ball and the vertical hole for the security pin must point forward.
Bicycle with quick-release axle Remove the existing quick-release. Loosen the nut of the Chariot quick-release. Push the quick-release axle through the hitch and then through the axle of the wheel. The opening for the hitch ball and the vertical hole for the security pin must point forward.
Push the security pin from the top through both holes of the Axle-Mount ezHitch. Finally, always attach the hitch’s back-up safety strap around the bicycle frame. To do this, from above, put the hitch back-up safety strap around the chain stay, and attach the hook of the hitch backup safety strap to the hitcharm D-ring located on the underside of the hitcharm. 6 3 Secure the pin by pulling the hole of the rubber tab over the protruding end of the pin.
Fixing the Weber hitch to the bicycle (tongue or nose weight), use a bathroom scale to help you: In this connection, please read carefully the comprehensive manufacturer’s instructions which are supplied by Weber both for the hitch with adjustable kickstand (Weber B) and for the Weber Axle-Mount Hitch (Weber E). 1. Put the bathroom scales next to the hitcharm of the loaded carrier. 2. Stand on the scales and note your own weight. 3.
DANGER Push the hitcharm in until the spring buttons, which is now on the outside side, come up against the VersaWing 2.0. When used as a Bicycle Trailer, the stroller wheels must never be installed in their use position (wheels down). They may only be carried in their out-of-use position (wheels up). For a description of the positions of the stroller wheels, see Section 7. Then press the smaller button in and slide the hitcharm into the VersaWing 2.0 until the large spring button audibly engages.
6. The Jogging Kit • When pushing the jogging stroller, always put the wrist safety strap around your wrist. • Inline skating is with the Jogging stroller is not permitted. • To get used to the specific handling characteristics, first carry out a practice run without children, but with maximum load, and away from road traffic. • The parking brake is not suitable for deceleration of a moving carrier.
Assembly The wheel arm should nowprotrude about 2 cm / 3/4 inch out of the rear side of the VersaWing 2.0. Push the wheel arms, with the bend toward the centre of the carrier and wheel dropouts pointing downwards, into each VersaWing 2.0. DAN G E R Make sure that the wheel arms are correctly attached to the carrier. Incorrect attachment may lead to loss of the front wheel during travel and this may lead to an accident. Press the small button in for each and push the wheel arms into the VersaWing 2.
DAN G E R Tip the carrier backwards and put it down on the handlebar. Insert the wheel in the axle dropouts. When using the carrier as a Jogging Stroller, always put the safety wrist strap, which is fastened securely on the left rear upper frame tube, around your wrist. This prevents the carrier from accidentally rolling away. Close the quickrelease lever.
7. The Strolling Kit Travelling Weight distribution DANGER So as to prevent it from tipping backwards, the storage compartment at the rear of the carrier may not be loaded with excessive weight. Carry out the following check: push downwards on the handlebar by about 150 mm. The carrier should return to its original standing position and should not tip backwards.
Performance characteristics Inline skating with the Stroller is not permitted. Assembly If you want to convert the carrier from Stroller to another CTS Conversion Kit, you can store the stroller wheels on the top of the VersaWing 2.0 . To attach them proceed as described above. The caster fork arms should point forwards. To attach the stroller wheel, press the plastic button on the side of the VersaWing 2.0 until it can go no further.
8. The Hiking Kit DANGER When using the carrier as a Jogging Stroller, always put the safety wrist strap, which is fastened securely on the left rear upper frame tube, around your wrist. This prevents the carrier from accidentally rolling away. Supplied as standard DANGER 2 hiking arms with shoulder harness and waist strap When used as a Bicycle Trailer, the stroller wheels must never be installed in their use position (wheels down). They may only be carried in their out-of-use position (wheels up).
Assembly Lay both the hiking arms with shoulder harness and waist strap as shown in the “Supplied as standard” illustration in front of the carrier. The waist strap must be attached to the insides of both arms. The shoulder strap, which is attached in a similar way to that of a backpack, can be adjusted in three positions: at the chest strap at the front, Insert each arms into the VersaWing 2.0 until the vertical holes in the arms and VersaWing 2.0 are aligned with each other.
9. The XC Skiing Kit (only Corsaire XL) DAN G E R It is not permitted to assemble the XC Skiing Kit to the Cabriolet and the Captain XL. The skis cannot be installed in the manner described. The assembled XC Skiing Carrier (CTS Ready Chassis + Skiing Kit) Supplied as standard Skis with frames, ski arms with waist belt, additional self-locking nuts Safety instructions for use as an XC Skiing Carrier • It is not permitted to assemble the XC Skiing Kit to the Cabriolet and the Captain XL.
Assembly Fitting the ski arms to the carrier Attaching the skis to the carrier Remove the wheels (for this, press the rubber cap in the centre of the wheel). Insert each arm into the VersaWing 2.0 until the vertical holes in the arms and VersaWing 2.0 are aligned with each other. The arms should now, at the back in the slot of the VersaWing 2.0, protrude about 2 cm / 3/4“ over the plastic edge.
Length adjustment of the ski arms The ski arms are adjustable for length. To do this, withdraw the security pin which connects the two ski arm tubes. If required, the waist belt can be adjusted for larger and smaller hips. To do this, undo both attachment screws and reinstall them into the appropriate grommets. When refitting the screws, always use the additional self-locking nuts supplied. Move both tubes towards each other until the desired holes in both tubes align with each other.
10. The Walking Kit The assembled Walker (Ready Chassis + Walking Kit) Supplied as standard Fitting the drawbars to the carrier Identical for all models. Insert each drawbar into the VersaWing 2.0 until the vertical holes in the arms and VersaWing 2.0 are aligned with each other. The drawbars should now, at the back in the slot of the VersaWing 2.0, protrude about 2 cm / 3/4“ over the plastic edge.
Now secure the drawbars by inserting the security pin from above through the vertical hole in the arm and VersaWing 2.0 until it stops. Lock the security pin by looping the spring clip over the pins end that protrudes underneath the VersaWing 2.0. Putting on the waist belt Always put the waist belt on so that the padded area is at the back and the strap with its side-release buckle is at the front.
11. Accessories Fabric Travel Bag Axle-Mount ez-Hitch for additional bike Storage Cover Rain Cover Infant Sling Baby Bivy Baby Supporter Bunting Bag Jogging Brake Kit Check the fabric regularly for signs of damage (e.g. tears). DAN G E R Tears in the fabric actually represent a high safety risk. Due to tears in the fabric, your child could come into contact with the wheels or the road surface. Contact your authorized Chariot retailer immediately if you find a tear in the fabric.
13. Specifications L x W x H, without hitcharm, Cabriolet L x W x H, without hitcharm, Corsaire XL L x W x H, without hitcharm, Captain XL L x W x H, folded up, Cabriolet L x W x H, folded up, Corsaire XL L x W x H, folded up, Captain XL Maintenance and care of bicycle trailers and jogging strollers: 100 x 82 x 92 cm 101 x 82 x 98 cm 101 x 85 x 100 cm 104 x 82 x 37 cm functional-related wear occurs in bicycle trailers or jogging strollers in the components and parts listed in the following table.
www.chariotcarriers.