X-COUNTRY SERIES CX OWNER’S MANUAL / GUIDE D’UTILISATION Revised 10/12/04 www.chariotcarriers.
CONGRATULATIONS AND THANK YOU FOR PURCHASING A CHARIOT CARRIER! Congratulations on choosing a X-Country series CTS Ready Chassis, the key component of the world’s premiere Child Transport System (CTS). Your new CTS carrier offers superior quality, safety features, and comfort. In addition, Chariot’s CTS Conversion Kits can provide you with the versatility to meet all of your child transportation needs. The CTS Conversion Kits available from your Chariot dealer are the following: 1. Jogging CTS Kit 2.
GENERAL WARNINGS This manual contains many WARNINGS and CAUTIONS. Read and understand all of the WARNINGS and CAUTIONS. Failure to assemble and use this carrier correctly may lead to serious personal injury or death to you or your passengers. • • • • • • • • • • • • • Do not install a car seat or any other seating device not approved by the manufacturer inside the carrier. Make no modifications to the carrier.
SAFETY GUIDELINES Sixteen important rules for the safe use of your Chariot Carrier. 1. Read all instructions before use! Failure to read, understand and follow these instructions may result in an otherwise avoidable accident in which you and/or your passengers could suffer serious injury or death. 2.
CHARIOT CARRIER CTS READY CHASSIS ASSEMBLY Your Chariot Carrier is shipped 99% assembled. Initial assembly takes a few minutes. After that, folding and unfolding can be done in seconds. 1.0 Folding and Unfolding the Carrier NOTE: Any reference to orientation (left or right) is from the passengers point of view while in the carrier. Stand at the back of the carrier body. Grab the upper frame and pull up until it stops.
1.2 Handlebar Instructions Insert both ends of the handlebar into the aluminum sleeves located at the upper rear section of the carrier. WARNING: Failure to properly install the handlebars or use the wrist safety strap could cause the carrier to become separated from you resulting in serious injury. Depress both spring buttons and insert the handlebars fully into the sleeves. Both spring buttons must “pop” out of the holes located on the inner side of the sleeves to secure the handlebar in place.
1.5 Weather Cover Features Note: Your Chariot Carrier has climate control features designed to regulate your child’s temperature. Periodically monitor your child to ensure that he/she is comfortable in terms of temperature. WARNING: Failure to use the weather cover could expose your child to flying rocks, insects, and other debris. Attach the loops from the back corner of the weather cover over the aluminum sleeves located at the upper rear section of the carrier.
1.8 Child Placement and Seatbelts WARNING: Failure to properly attach seatbelts could result in serious injury or death to occupants in the event of an accident. TWO CHILDREN (CX 2) Your CX carrier comes with a padded shoulder harness. Shoulder harness length can be adjusted by removing the shoulder harness straps from either one or both of the adjustment loops. The harness is adjusted to the middle position on the small child and the long position on the larger child as in the diagram.
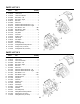
PARTS LIST CX 1 A/B C D E F G H I J K L M N O P Q R T U V W X Part # Part Quantity 40100146 41100225 41101290 40100425 40100426 40100722 40100626 40101514 40101515 40101281 40101282 40200304 50101734 50101305 31101003 30101003 41103032 40101340 40202011 40101730 33101002 41101929 Upper Frame . . . . . . . . . . . . . . . . . . . . . . . . .1 Lower Frame . . . . . . . . . . . . . . . . . . . . . . . . .2 Lower Frame Bracket . . . . . . . . . . . . . . . . . . .2 Back Frame – Left . . . . . . . . . . . .
STROLLING CTS KIT ( wheels only ) 2.0 Installation Remove the 5-star knob from the wheel assembly and insert the threaded tube upwards through the large hole in the wheel arm attachment bracket. 2.1. Storage Thread the 5 star knob onto the threaded tube and tighten securely. Repeat with the other wheel. CAUTION: Regularly check the knobs to ensure they are tightened securely.
JOGGING CTS KIT 3.0 Installation Remove any other conversion kits from the wheel wheel arm attachment bracket. Insert the wheel arms by pressing the small button and sliding the arm into the wheel arm attachment bracket. The large button should engage into the hole on the wheel arm attachment bracket. WHEEL ARM WHEEL BRACKET QUICK RELEASE LEVER Close the quick release lever by pushing it flat against the wheel bracket.
CYCLING CTS KIT 4.0 Reflectors and Flag Assembly PLASTIC CAP WARNING: Read and understand all of the warnings otherwise injury or death to you or to your passengers could result: – Always use safety flag. – Do not operate the bicycle trailer without reading and understanding this manual. LOCATION FOR FLASHING CLIP ON LIGHT Insert flag into hole located in the plastic cap on the upper left rear side of frame. Slide flag down into hole until flag touches the bottom of the tube.
4.1 Attaching Your New Quick Release (QR) Skewer & Axle Mounted Hitch Cup to Your Bicycle Remove your existing QR skewer from your bicycle rear wheel hub. Remove the QR nut and one Skewer Spring from the Hitch QR Skewer. Insert the Hitch QR Skewer making sure that the cup washer is next to the QR Lever and the Axle Mounted Hitch Cup is on the outside of the bicycle frame drop out.
X-COUNTRY SKIING CTS KIT 5.0 Installation Remove any other conversion kits from wheel arm attachment brackets. Insert XCountry skiing arms into the wheel arm attachment brackets and secure using safety snap pins. Insert the X-Country skiing axle into the hollow axle on the carrier. 5.1 Shoulder Harness Adjustments WARNING: Failure to properly attach XC skiing kit arms and axles could cause the carrier to separate from you, resulting in an accident and serious injury or death.
HIKING CTS KIT 6.0 Installation 6.1 Shoulder Harness Adjustments WARNING: Read and understand all of the warnings otherwise injury or death to you or to your passengers could result: - Never in-line skate or run with the hiking kit. - Use extreme caution on steep hills, aggressive trails, and when stopping! When descending, use the handles for additional support. Remove any other conversion kits from wheel arm attachment brackets.
ACCESSORIES The following high quality Chariot accessories are available for purchase at your local Chariot retailer. CHARIOT ACCESSORIES: Hydration Kit: Water bottles and brackets for Jogging/Strolling Kits. Jogging Brake Kit: Brake and attachments Travel Bag 1: Heavy duty travel bag with wheel covers for single child carriers. Travel Bag 2: Heavy duty travel bag with wheel covers for double child carriers. Chariot Backpack Set: A backpack/diaper bag for parent and a small backpack for junior.
LIMITED LIFETIME WARRANTY/GARANTIE À VIE LIMITÉE CHARIOT CARRIERS INC. warrants that the frame is free of defects for the lifetime of the product. The fabric and hitch are warranted for one year following the date of delivery to the original purchaser. This warranty does not include the wheels and tires. This warranty is valid only to the original purchaser and under normal use. Repairs must be made by CHARIOT CARRIERS INC. or an authorized dealer, otherwise this warranty is void. CHARIOT CARRIERS INC.