
Technical Specifications
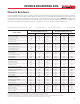


89
• Apply primer to
the pipe surface
to a point ½”
beyond the hub
depth. Aggres-
sively work the
primer into the
surface.
7. Coat Surface
with Cement
• Cement must be
applied while
primer is wet.
• Stir or shake the
cement prior to
use.
• Apply a full even
layer of cement to
the pipe surface
to a point ½” be-
7
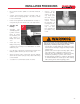
INSTALLATION PROCEDURES
• Apply a second
coat of primer to
the fitting sock-
et aggressively
working it into
the surface.
• More applications of primer may be required on hard
surfaces or cold weather conditions.
• Once the surface is primed remove all puddles of excess
primer from the fitting socket.
• Primer should conform to ASTM F 656.
• The use of primer for ABS is not recommended. Check
local code requirements.
the appropriate ASTM standard for the piping system as
shown in the accompanying table. All purpose cement is
not recommended
8. Join Pipe and
Fittings
• Assemble pipe
and fittings
quickly while ce-
ment is fluid. If
cement has hard-
ened, cut pipe,
dispose of fitting
and start over.
• Insert pipe into
the fitting hub
• Without re-dip-
ping the applica-
tor in the cement,
apply a medium
layer of cement to
the fitting sock-
et aggressively
working it into
the surface. On
bell end pipe do
not coat beyond
the socket depth.
• Apply a second
full coat of ce-
ment to the pipe
surface aggres-
sively working it
in.
• Do not allow ce-
ment to puddle or
accumulate inside
the system.
• Solvent cement
should conform to
giving a quarter turn as the pipe is being inserted, ensur-
ing an even distribution of the cement within the joint.
Do not quarter turn the pipe after contact with socket
bottom.
• Once the pipe contacts the socket bottom hold pipe and
fitting together until the pipe does not back out.
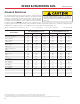
• See table for recommended set and cure times.
8
yond the hub depth. Aggressively work the cement into
the surface.