
How to Guide


93
INSTALLATION PROCEDURES
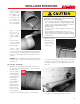
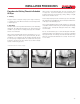
• It is very impor-
tant that the pipe
is fully inserted
to the fitting stop
at the bottom
of the fitting.
Large diameter
pipe is heavy
and can develop
significant resis-
tance during in-
sertion. The use
of a pulling tool
• To ensure joint integrity, once insertion is complete, the
pulling tool can be used to hold the joint in place dur-
ing set time and also to ensure that the pipe does not
back out.
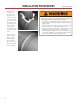
• Measure to verify
that the pipe has
been inserted to
within 2” of the
insertion line.
10
• See table for recommended set and cure times.
to the appropriate ASTM standard for the piping system
as shown in the accompanying table. Heavy bodied ce-
ment is recommended. All purpose cement is not recom-
mended
• NOTICE: CPVC Schedule 80 systems must be installed
using IPS 714 or Oatey CPVC Heavy Duty Orange sol-
vent cements.
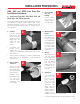
10. Join Pipe and Fittings
• Assemble pipe and fittings quickly while cement is flu-
id. If cement has hardened, cut pipe, dispose of fitting
and start over.
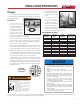
• Apply a medium
layer of cement to
the fitting sock-
et aggressively
working it into
the surface. On
bell end pipe do
not coat beyond
the socket depth.
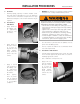
Failure to follow proper installation practices,
procedures, or techniques may result in personal injury,
system failure or property damage.
• Use a solvent cement / primer applicator that is 1/2 the
size of the pipe's diameter. Too large an applicator will
result in excess cement inside the fitting. Too small an
applicator will not apply sufficient cement.
• Cut pipe square.
• Do not use dull or broken cutting tool blades when
cutting pipe.
• Do not test until recommended cure times are met.
• Align all piping system components properly without
strain. Do not bend or pull pipe into position after being
solvent welded.
• Apply a second
full coat of ce-
ment to the pipe
surface aggres-
sively working it
in.
• Do not allow ce-
ment to puddle
or accumulate in-
side the system.
• Solvent cement
should conform
designed for plastic piping systems is recommended.