
How to Guide


93
INSTALLATION PROCEDURES
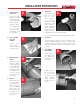
• Measuretoverify
that the pipe has
been inserted to
within2”ofthe
insertion line.
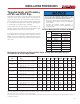
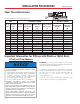
• Seetableforrecommendedsetandcuretimes.
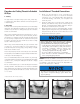
• Toensurejointintegrity,onceinsertioniscomplete,the
pulling tool can be used to hold the joint in place dur-
ing set time and also to ensure that the pipe does not
back out.
• Removeexcess
cement from
the exterior. A
properly made
joint will show a
continuous bead
of cement around
the perimeter. If
voids appear suf-
ficient, cement
may not have
been applied and
joint failure may
result.
• Alignallpiping
system compo-
nents properly
without strain.
Do not bend or
pull pipe into po-
sition after being
solvent welded.
Primers and cements are extremely flammable and may be
explosive. Do not store or use near open flame or elevated
temperatures, which may result in injury or death.
• Solvent fumes created during the joining process are
heavier than air and may be trapped in newly installed
piping systems.
• Ignition of the solvent vapors caused by spark or flame
may result in injury or death from explosion or fire.
• Read and obey all manufacturers' warnings and any
instructions pertaining to primers and cements.
• Provide adequate ventilation to reduce fire hazard and
to minimize inhalation of solvent vapors when working
with cements, primers and new piping systems.
Failure to follow proper installation practices,
procedures, or techniques may result in personal injury,
system failure or property damage.
• Use a solvent cement / primer applicator that is 1/2 the
size of the pipe's diameter. Too large an applicator will
result in excess cement inside the fitting. Too small an
applicator will not apply sufficient cement.
• Cut pipe square.
• Do not use dull or broken cutting tool blades when
cutting pipe.
• Do not test until recommended cure times are met.
• Align all piping system components properly without
strain. Do not bend or pull pipe into position after being
solvent welded.