
How to Guide

91
Joining larger diameter piping systems, particularly for pres-
sure applications, requires a higher degree of skill. Proper
installation technique is critical. Close attention to the steps
below will help professional mechanics to complete success-
ful installations.
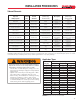
INSTALLATION PROCEDURES
ABS, PVC and CPVC Iron Pipe Size
Installation Procedures
6” and Larger Iron Pipe Size ABS, PVC and
CPVC Pipe and Fitting Systems
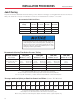
1
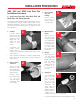
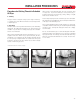
1. Cut Pipe
• Cut pipe square
with the axis. All
joints are sealed
at the base of the
fitting hub. An
angled cut may
result in joint
failure.
• Acceptable tools
include recipro-
cating saw, me-
chanical cut off saw with carbide tipped blade or other
appropriate tool.
• If any indication of damage or cracking is evident at the
(tube / pipe) end, cut off at least 2” of pipe beyond any
visible cracks.
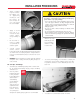
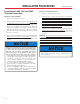
4. Mark Insertion
Depth
• Measure the fit-
ting hub depth.
Using a pipe wrap
as a straight edge
mark the inser-
tion depth plus 2”
in a heavy contin-
uous line around
the circumference
of the pipe.
mended. Rollers are not recommended.
4
6
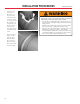
5. Dry Fit
• With light pres-
sure, pipe should
go one half to two
thirds of the way
into the fitting
hub. Pipe and
fittings that are
too tight or too
loose should not
be used.
6. Applicator
• Use an applicator
that is one half
the size of the
pipe’s diameter.
Use of an ap-
propriately sized
applicator will
ensure that ad-
equate cement is
applied. Natural
bristle brushes or
swabs are recom-
5
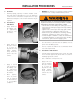
2
2. Remove Burrs
and Bevel
• Remove all pipe
burrs from inside
and outside diam-
eter of pipe with a
de-burring tool.
• Chamfer (bevel)
the end of the pipe
10° - 15°. Pow-
ered and manual
chamfering tools
are available.
3
3. Clean and Dry
Pipe and
Fittings
• Remove surface
dirt, grease or
moisture with a
clean dry cloth.
• Too small an applicator will not apply sufficient cement.