
Installation Guide


85
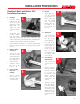
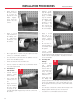
1. Cut Pipe
• Cut pipe square
with the axis. All
joints are sealed
at the base of the
fitting hub. An
angled cut may
result in joint
failure.
• Acceptable tools
include ratchet
type pipe cutter,
1/2” – 4” Iron Pipe Size ABS, PVC and CPVC
Pipe and Fitting Systems
1
miter saw, reciprocating saw, mechanical cut off saw
with carbide tipped blade or wheel type pipe cutter.
Wheeltypepipecutters must employ a blade designed
to cut plastic pipe. Ratchet cutters should be sharpened
regularly.
• Ifanyindicationofdamageorcrackingisevidentatthe
pipeend,cutoffatleast2”ofpipebeyondanyvisible
cracks.
3. Clean and Dry
Pipe and
Fittings
• Remove surface
dirt, grease or
moisture with a
clean dry cloth.
4. Dry Fit
• With light pres-
sure, pipe should
go one half to one
third of the way
into the fitting
hub. Pipe and
fittings that are
too tight or too
loose should not
be used.
2
3
4
INSTALLATION PROCEDURES
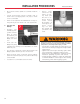
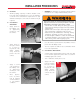
2. Remove Burrs
and Bevel
• Remove all pipe
burrs from inside
and outside diam-
eter of pipe with a
knife edge, file or
de-burring tool.
• Chamfer (bevel)
the end of the
pipe 10° - 15°.
5. Applicator
• Useanapplicatorthatisonehalfthesizeofthepipe’s
diameter. Daubers, natural bristle brushes or swabs are
recommended. Rollers are not recommended.
• Toolargeanapplicator willforceexcess primerorce-
ment into the inside of the fitting. Too small an applica-
tor will not apply sufficient cement.
ABS, PVC and CPVC Iron Pipe Size
Installation Procedures
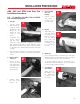
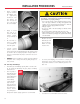
6. Coat Surface
with Primer
• Apply primer to
the fitting sock-
et aggressively
working it into
the surface.
6