
Installation Guide


83
1
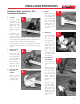
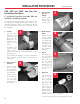
1. Cut Pipe
• Cut pipe square
with the axis. All
joints are sealed
at the base of the
fitting hub. An
angled cut may
result in joint fail-
ure.
• Acceptable tools
include ratchet
type pipe cutter,
miter saw or wheel type pipe cutter. Wheel type pipe
cutters must employ a blade designed to cut plastic pipe.
Ratchet cutters should be sharpened regularly.
• Ifanyindicationofdamageorcrackingisevidentatthe
tubeend,cutoffatleast2”ofpipebeyondanyvisible
cracks.
FlowGuard Gold
®
and ReUze
®
CTS
Installation Procedures
3
4
5
2
2. Remove Burrs
and Bevel
• Remove all pipe
burrs from inside
and outside diam-
eter of pipe with a
knife edge, file or
de-burring tool.
• Chamfer (bevel)
the end of the
pipe 10° - 15°.
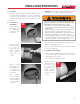
3. Clean and Dry
Pipe and
Fittings
• Remove surface
dirt, grease or
moisture with a
clean dry cloth.
INSTALLATION PROCEDURES
4. Dry Fit
• With light pres-
sure, pipe should
go one half to one
third of the way
into the fitting
hub. Pipe and
fittings that are
too tight or too
loose should not
be used.
5. Applicator
• Useanapplicator
that is one half
the size of the
pipe’sdiameter.
• Too large an ap-
plicator will force
excess primer or
cement into the
inside of the fit-
ting. Too small
an applicator will
not apply suffi-
cient cement.
6. Coat Surface
with Cement
• Stir or shake the
cement prior to
use.
• Apply a full even
layer of cement to
the pipe surface
to a point ½”
beyond the hub
depth. Aggres-
sively work the
cement into the
surface.
• Without re-dip-
ping the applica-
tor in the cement,
apply a thin layer
of cement to the
fitting socket ag-
gressively work-
ing it into the sur-
face.
6