
How to Guide


91
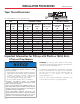
INSTALLATION PROCEDURES
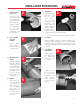
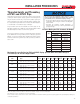
4. Mark Insertion
Depth
• Measure the t-
ting hub depth.
Usingapipewrap
as a straight edge
mark the inser-
tiondepthplus2”
in a heavy contin-
uous line around
the circumference
of the pipe.
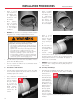
mended. Rollers are not recommended.
• Toosmallanapplicatorwillnotapplysufcientcement.
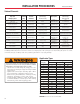
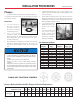
7. Crew Size
• Working rapidly, especially in adverse weather condi-
tions,willimproveinstallations.For6”to8”diameters
acrewsizeof2to3mechanicsisrequired.For10”pipe
diameters and larger a crew of 3 to 4 mechanics may be
required.
4
6
5. Dry Fit
• With light pres-
sure, pipe should
go one half to one
third of the way
into the fitting
hub. Pipe and
fittings that are
too tight or too
loose should not
be used.
6. Applicator
• Useanapplicator
that is one half
the size of the
pipe’s diameter.
Use of an ap-
propriately sized
applicator will
ensure that ad-
equate cement is
applied. Natural
bristle brushes or
swabs are recom-
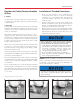
8. Coat Surface
with Primer
• Apply primer to
the fitting sock-
et aggressively
working it into
the surface.
8
• Apply primer to
the pipe surface
to a point ½”
beyond the hub
depth. Aggres-
sively work the
primer into the
surface.
5
2
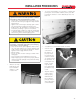
2. Remove Burrs
and Bevel
• Remove all pipe
burrs from inside
and outside diam-
eter of pipe with a
de-burring tool.
• Chamfer (bevel)
the end of the pipe
10° - 15°. Pow-
ered and manual
chamfering tools
are available.
3
3. Clean and Dry
Pipe and
Fittings
• Remove surface
dirt, grease or
moisture with a
clean dry cloth.