
How to Guide


87
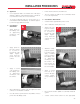
sively work the
cement into the
surface.
• Without re-dip-
ping the applica-
tor in the cement,
apply a thin layer
of cement to the
fitting socket ag-
gressively work-
ing it into the
surface.
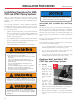
INSTALLATION PROCEDURES
3. Clean and Dry
Pipe and
Fittings
• Remove surface
dirt, grease or
moisture with a
clean dry cloth.
3
4
5
• Donotallowcementtopuddleoraccumulateinsidethe
system.
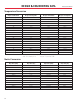
• Solvent cement should conform to ASTM F 493 as
shown in the accompanying table. All purpose cement
is not recommended.
• PrimerisnotrequiredforFlowGuardGold
®
one-step ce-
ment, but may be used. Check local code requirements.
6
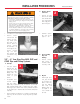
4. Dry Fit
• With light pres-
sure, pipe should
go one half to one
third of the way
into the fitting
hub. Pipe and
fittings that are
too tight or too
loose should not
be used.
5. Applicator
• Useanapplicator
that is one half
the size of the
pipe’sdiameter.
• Too large an ap-
plicator will force
excess primer or
cement into the
inside of the fit-
ting. Too small
an applicator will
7
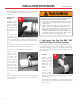
7. Join Pipe and
Fittings
• Assemble pipe
and fittings quick-
ly while cement is
fluid. If cement
has hardened, cut
pipe, dispose of
fitting and start
over.
• Insertpipeintottinghubgivingaquarterturnensur-
ing an even distribution of cement within the joint.
• Oncethepipecontactsthesocketbottomholdpipeand
fitting together until the pipe does not back out.
• Align all piping system components properly without
strain. Do not bend or pull pipe into position after being
solvent welded.
2
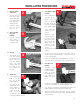
2. Remove Burrs
and Bevel
• Remove all pipe
burrs from inside
and outside diam-
eter of pipe with a
knife edge, file or
de-burring tool.
• Chamfer (bevel)
the end of the
pipe 10° - 15°.
6. Coat Surface with
Cement
• Stirorshakethece-
ment prior to use.
• Apply a full even
layer of cement to
the pipe surface to a
point½”beyondthe
hub depth. Aggres-
not apply sufficient cement.