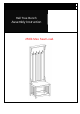
Hall Tree Bench Assembly Instruction 250lb Max Seat Load.
A Quantity Of 1 Top Panel Quantity Of 1 Seat Panel Quantity Of 1 Back Top Stretcher 5/8”x1/2” 5 Washer 1/4” Quantity Quantity Of Of22 Quantity Of 8 1/8”x1/2” H Quantity Of 2 3 Quantity Of 1 Quantity 1 Of 21 Cam Bolt Quantity Of 12 3/16” x1 1/4”x1-1/2” 4 Quantity Of 3 Bolts 1/4”x 1-1/2” 6 Quantity Quantity Of 4 7 Of 1 Hanger 9 Quantity Of 2 Dowel 1/4 x1-1/4” Quantity 12 Of 8 Adhesive Pad F Front Top Stretcher Wrench 8 11 Wooden Support Panel E Bolt Quantity Of 3 Quanti
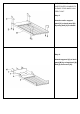
PLEASE DO NOT OVERTIGHTEN CAMBOLTS. PLEASE STOP WHEN YOU FEEL TIGHT. Step 1: Attach wooden support panel (C) to back panel (B) by using bolt (3) as shown. Step 2: Attach top panel (A) to back panel (B) by using dowel (9), bolt (3) and screw (10).
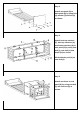
Step 3: Attach seat panel (D) to back panel (B) by using bolt (4), washer (5) and bolt (3) as shown. Step 4: Attach front top stretcher (F), back top stretcher (G) and bottom stretcher (H) to side panel (E) by using cam bolt (1), cam lock (2) and dowel (12) as shown. Stick adhesive pad (11) on cam lock (2). Step 5: Attach seat frame to seat panel (D) by using cam bolt (1) and cam lock (2) as shown.
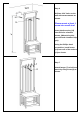
Step 6: Drill two 3/16" holes on the wall with measurements as shown. Please mount at least 1 screw into a wall stud. Insert plastic anchor (13) into the holes of wall as shown. (When doing this, you will need a hammer help you). Using the Phillips head screwdriver, install screw (14) into each of the anchors (13) as shown. Step 7: Attach hanger (7) to hall tree bench by using screw (8) as shown.
Parts Replacement Form Customer Information Name Address City/State/Zip Code Phone Number Please indicate where you purchased this item: Store/ Website/ Catalog Please indicate color/size/style number: Style No Parts Letter Parts Description Quantity Needed