
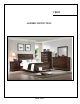
Assembly Instructions
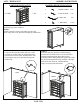

This tip restraint must be attached to a wall
stud using long screw enclosed.
STEP 1
Attach a bracket securely to the back top rail of the
chest using short screw provided, through the smaller hole.
PAGE 3 OF 3
STEP 2
Locate the other bracket on the wall over a wall
stud and two inches below the mounting bracket
secured to the back of chest. Attached to the wall
stud using the long screw provided, through the
smaller hole.
4
2
A
W LL
ANTI - TIPPING KIT
STEP 3
Place the chest into position so both mounting
brackets are vertically in line. Lace the end of the
restraint strap through the larger hole in each
mounting bracket. Bring both ends together and slide
the flat end through the locking end draw it through
until all slack is removed. Confirm that the
strap is securely laced and locked.
4
4
WAL L
3
A
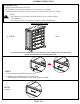
PARTS IDENTIFICATION
A. CHEST
1 SET
HARDWARE IDENTIFICATION
SHORT SCREW 1 PC.
LONG SCREW 1 PC.
L BRACKET 2 PCS.
CABLE TIE 1 PC.
1.
2.
3.
4.
4
1
ASSEMBLY INSTRUCTIONS