Rocker Assembly Instructions Thank you for purchasing our rocking chair. Please be aware that this product requires assembly and it is important to complete all the following steps in the assembly process. Failure to follow these instructions could result in injury and must be completed prior to sitting in the rocker. Please make sure that all parts and hardware are available prior to assembly, We would recommend that you familiarize yourself with these instructions prior to assembly.
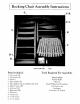
Rocking Chair Assembly Instructions E Screws and Nails Parts Included: 1 Chair back (A) 1 Chair front (B) 1 Seat (C) 2 Side spindles (D) 2 Side spindles with prevailed holes (0-1) 2 Rocker runners (E} 1 Left arm (F-L} 1 Right arm (F-R} 1 Glue tube 4~ Small nails 413/4" screws 4-1 1/2" screws F-R F-L Glue Tools Required For Assembly: (Not Included) Rubber Mailer Hammer Power Phillips head Screwdriver Soft cloth or rag Sandpaper Drill with 1/8” drill bit .
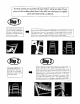
For best results per-assemble all parts before using any glue, If any piece of the rocking chair doesn’t fit well, use sand paper to lightly sand until desired fit is achieved. Lay rocking chair back (A) flat on floor with 6 prevailed holes Insert 2 side spindles (9) without per-drilled holes in the Lowest holes on the base facing up. Apply sue to 4 bor m of rocking chair. Insert the 2 side spindles {D-1) with prevailed holes in the dime tom holes. Swirl glue around in dic holes on the back.
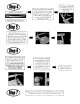
Establish Front of Runners. Helen closest to the end is the front. Turn chair assembly on side. Apply glue to holes in the tops of tacker runners (EY. Place 1 rocker runner unto chair drone (B) first then chair back (A). Use rubber mallet to adjust distance be tween legs, if needed. Repeat with other rocker runner (E). Use a hammer to drive nail into inside of tanner at cache leg until flush with runner surface. Se Rocking Chair up on runners.