
User's Manual


equipped with well-positioned buttons to ensure your game play comfort. Moreover it is built
with innovative 27MHz RF (Radio Frequency) technology for wireless control while playing
games. This user’s guide and the accompanying game devices are intended for use under
Microsoft Windows/ OS.
2 Package Contents
Your Rockfire Cyber Voyager Twin Pro package comes with the following items:
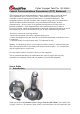
Rockfire USB Cyber Voyager Twin Pro (gamepad+ joystick)*
Rockfire USB Cyber Voyager Twin Pro Receiver (USB interface) x 1 *
User’s Guide x 1 *
3 System Requirement
1) IBM PC (586/Pentium II compatibles or higher)
2) Available USB port or extension USB hub
3) Microsoft
W
W
i
i
n
n
d
d
o
o
w
w
s
s
®
®
9
9
8
8
/
/
2
2
0
0
0
0
0
0
/
/
M
M
E
E
/
/
X
X
P
P
4 Easy Installation
1. Turn on your PC.
2. Install batteries in your Cyber Voyager Twin Pro gamepad and joystick
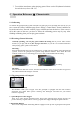
3. Plug-in your Cyber Voyager Twin Pro USB connector (receiver) to the USB Port of
your PC and make sure it is firmly connected. Then the LED indicator of the receiver
is always "ON" when it have been connected.
USB non-connecting USB connecting
4. After your Cyber Voyager Twin Pro is connected, the monitor will shows “Find a
new hardware”, and the OS Standard USB driver will be located for you to finish the
installation step by step immediately.
5. The game device provides two separate channels (CH.1 and CH.2). To avoid the interference
when playing games. Please set the ID for the gamepad & joystick and make sure they are
using different channels.
6. In the end, you may start to calibrate (refer to CH 5-1) this device, and then
customize your gamepad through the game controller to access directly into the game
software for game play.