Stainless Steel Natural Gas Drop-In Sear Burner Hornilla para Dorar a Gas Natural Empotrable de Acero Inoxidable Outdoor Gas Sear Burner / Hornilla para dorar a gas para uso al aire libre OWNER’S MANUAL / MANUAL DEL PROPIETARIO ASSEMBLY AND OPERATING INSTRUCTIONS / INSTRUCCIONES DE ARMADO Y OPERACIÓN SAVE THIS MANUAL FOR FUTURE REFERENCE GUARDE ESTE MANUAL PARA REFERENCIA FUTURA WARNING / ADVERTENCIA HAZARDOUS EXPLOSION MAY RESULT IF THESE WARNINGS AND INSTRUCTIONS ARE IGNORED.
IMPORTANT SAFETY WARNINGS WE WANT YOU TO ASSEMBLE AND USE YOUR SEAR BURNER AS SAFELY AS POSSIBLE. THE PURPOSE OF THIS SAFETY ALERT SYMBOL IS TO ATTRACT YOUR ATTENTION TO POSSIBLE HAZARDS AS YOU ASSEMBLE AND USE YOUR SEAR BURNER. WHEN YOU SEE THE SAFETY ALERT SYMBOL PAY CLOSE ATTENTION TO THE INFORMATION WHICH FOLLOWS! READ ALL SAFETY WARNINGS AND INSTRUCTIONS CAREFULLY BEFORE ASSEMBLING AND OPERATING YOUR SEAR BURNER. DANGER IF YOU SMELL GAS: 1. Shut off gas to the appliance. 2. Extinguish any open flame.
TABLE OF CONTENTS General Warnings. . . . . . . . . . . . . . . . . . . . . . . . . . . . . . . . . . . . . . . . . . . . . . . . . . . . . . . . . 3 Attachment and Safe Use . . . . . . . . . . . . . . . . . . . . . . . . . . . . . . . . . . . . . . . . . . . . . . . . . . 4 Leak Testing . . . . . . . . . . . . . . . . . . . . . . . . . . . . . . . . . . . . . . . . . . . . . . . . . . . . . . . . . . . 4–5 Pre-start Check List . . . . . . . . . . . . . . . . . . . . . . . . . . . . . . . . . . . . . . . .
GENERAL WARNINGS WARNING • Never use liquid propane gas (LP) in a unit designed for natural gas. • Never use charcoal briquets or lighter fluid in a gas sear burner. • Leak test all connections before first use, even if sear burner was purchased fully assembled and after each time the hose is connected to natural gas supply. • Never check for leaks using a match or open flame. CAUTION! Strong odors, colds, sinus congestion, etc. may prevent the detection of natural gas.
WARNING • FOR OUTDOOR USE ONLY. DO NOT operate indoors or in an enclosed area such as a garage, shed or breezeway. • Use your sear burner OUTDOORS in a well ventilated space away from dwellings or other buildings to prevent dangers associated with gas accumulation and toxic vapors. We recommend your grill be situated at least 10 feet (3.1 m) from buildings. • Maintain a minimum clearance of 36 inches (91 cm) between all sides of sear burner and walls or other combustible material.
WARNING WHEN TO PERFORM A LEAK TEST: • After assembling your sear burner and before lighting for the first time, even if purchased fully assembled. • Every time the gas hose is connected to the natural gas supply or if any of the gas components are replaced. • Any time your sear burner has been moved. • At least once per year or if your sear burner has not been used for more than 60 days. CHECKING FOR LEAKS: 1. 2. 3. 4. 5. Create a mixture of 50% water and 50% liquid dishwashing soap. Open the lid.
WARNING PRE-START CHECK LIST: Property damage, bodily harm, severe burns, and death could result from failure to follow these safety steps. These steps should be performed after the sear burner has been assembled, stored, moved, cleaned, or repaired. DO NOT operate this sear burner until you have read and understand ALL of the warnings and instructions in this manual. PRE-START CHECK LIST: • Ensure that the sear burner is properly assembled.
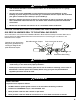
MATCH LIGHTING THE SEAR BURNER: 1. Open the lid to the sear burner before lighting. Match 2. Make sure control knob is in the "OFF" position. 3. Strike and carefully place a match approximately 1/2" (1 to 2 cm) from the sear burner element. 4. Turn the sear burner control knob to the "HIGH" position. The burner should light within 5 seconds. 5. If the burner does not light, turn the control knob to "OFF" and wait 5 minutes for gas to dissipate and repeat lighting procedure. 6.
TO MINIMIZE FLARE-UPS: • • • Trim excess fat from meats prior to cooking. Cook meats with high fat contents (chicken or pork) on Low settings or indirectly. Ensure that your sear burner is on level ground and the grease is allowed to evacuate the sear burner into the grease tray. COOKING TIPS CLEANLINESS • Always wash hands thoroughly with soap and hot water prior to handling food and after handling raw meat, uncooked poultry or seafood.
WARNING TRANSPORTING AND STORAGE: • Never move a grill when it is hot or when objects are on the cooking surfaces. • Make sure that the natural gas supply is shut off. After moving the grill check that all gas connections are free of leaks. Refer to instructions for Leak Testing. • DO NOT store a spare LP gas cylinder (filled or empty) under or near the grill. • Never store flammable liquids or spray canisters under or near the grill. • DO NOT extinguish grease fires using water.
FREQUENTLY ASKED QUESTIONS Your grill's serial number and model number, and the contact information for Brinkmann Customer Service, are listed on a silver label found on the back of the grill or on the grill body side, under the side shelf. These questions and answers are for your general knowledge, and may not be applicable to your model grill. Question: Why does my grill not light properly? Answer: Always follow lighting instructions as listed on the control panel or in this manual.
ASSEMBLY INSTRUCTIONS READ ALL SAFETY WARNINGS & ASSEMBLY INSTRUCTIONS CAREFULLY BEFORE ASSEMBLING OR OPERATING YOUR SEAR BURNER. No tools are required to assemble this Natural Gas Drop-In Sear Burner: 1 PARTS LIST: 1 1 Cooking Grill 2 1 Sear Burner Assembly 3 1 Battery 4 1 Grease Tray 2 FOR MISSING PARTS, PLEASE CALL CUSTOMER SERVICE AT 800-527-0717. (Proof of purchase will be required.) Inspect contents of the box to ensure all parts are included and undamaged.
WARNING: Do not install this unit into combustible enclosures. Maintain a minimum clearance of 36 inches (91 cm) between all sides of grill and walls or other combustible material. DO NOT use grill under overhead unprotected combustible construction. 2 18 12 ” 12 w ” ” 6” 12 ” ” 36” - 38” 92 5” Drop-in cutout dimensions for the Stainless Steel Natural Gas Drop-In Sear Burner: Length: 18 1/2” (47 cm) Width: 12 3/4” (32.4 cm) 1” Height: 9 1/2” (24.
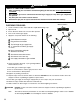
Hose Connection After dropping in the sear burner, run the sear burner hose fitting through the side hole and pull hose through as far as possible. Then connect it to the quickdisconnect coupler. Quick-Disconnect Coupler Side Hole Push sleeve back to attach Quick-Disconnect Coupler Sear Burner Hose Fitting Sleeve Sear Burner Hose Fitting Battery Installation Remove burner igniter cap and insert battery with positive end of battery toward igniter cap.
IMPORTANTES ADVERTENCIAS DE SEGURIDAD ES NUESTRO DESEO QUE ARME Y UTILICE SU HORNILLA PARA DORAR EN LA FORMA MÁS SEGURA POSIBLE. EL PROPÓSITO DE ESTE SÍMBOLO DE ALERTA DE SEGURIDAD ES QUE USTED PRESTE ATENCIÓN A LOS POSIBLES PELIGROS CUANDO ARME Y UTILICE SU HORNILLA PARA DORAR. ¡CUANDO VEA ESTE SÍMBOLO DE ALERTA DE SEGURIDAD PRESTE ESPECIAL ATENCIÓN A LA INFORMACIÓN A CONTINUACIÓN! LEA DETENIDAMENTE TODAS LAS ADVERTENCIAS DE SEGURIDAD E INSTRUCCIONES ANTES DE ARMAR Y USAR LA HORNILLA PARA DORAR.
ÍNDICE Advertencias generales . . . . . . . . . . . . . . . . . . . . . . . . . . . . . . . . . . . . . . . . . . . . . . . . . . . 16 Conexión y uso seguro. . . . . . . . . . . . . . . . . . . . . . . . . . . . . . . . . . . . . . . . . . . . . . . . . . . . 17 Pruebas de detección de fugas . . . . . . . . . . . . . . . . . . . . . . . . . . . . . . . . . . . . . . . . . . 17–18 Lista de verificación preliminar al encendido . . . . . . . . . . . . . . . . . . . . . . . . . . . . . . . . . . .
ADVERTENCIAS GENERALES ADVERTENCIA • Nunca use gas de propano líquido (LP) en una unidad diseñada para gas natural. • Nunca use briquetas de carbón o fluido de encendedor en una hornilla para dorar de gas. • Realice una prueba de detección de fugas en todas las conexiones antes de usar la hornilla para dorar por primera vez, aún si la compró armada, y luego cada vez que conecte la manguera a la fuente de gas natural. • Nunca use un cerillo o llama expuesta para detectar fugas.
ADVERTENCIA • PARA USO EXTERIOR ÚNICAMENTE. NO opere la parrilla en áreas interiores o en un área cerrada como un garaje, cobertizo o pasadizo. • Use la hornilla para dorar AL AIRE LIBRE en un espacio bien ventilado alejado de viviendas u otros edificios para prevenir los peligros asociados con la acumulación de gas y los vapores tóxicos. Recomendamos que la parrilla se sitúe a una distancia mínima de 10 pies (3,1 m) de los edificios.
ADVERTENCIA CUÁNDO REALIZAR UNA PRUEBA DE DETECCIÓN DE FUGAS: • Después de haber armado la hornilla para dorar y antes de encenderla por primera vez, aún cuando la haya comprado totalmente armada. • Cada vez que conecte la manguera a la fuente de gas natural o si se reemplaza un componente de gas. • Cada vez que haya movido la hornilla para dorar. • Por lo menos una vez al año si no ha usado la hornilla para dorar durante más de 60 días. VERIFICACIÓN DE AUSENCIA DE FUGAS: 1.
ADVERTENCIA LISTA DE VERIFICACIÓN PRELIMINAR AL ENCENDIDO: Si hace caso omiso a estos pasos de seguridad, se pueden causar daños materiales, lesiones corporales, quemaduras graves o hasta la muerte. Estos pasos deben seguirse después de haber armado, almacenado, movido, limpiado o reparado la hornilla para dorar. NO opere esta hornilla para dorar hasta que haya leído y entendido TODAS las advertencias e instrucciones en este manual.
ENCENDIDO DE LA HORNILLA PARA DORAR CON UN CERILLO: 1. Abra la tapa de la hornilla para dorar antes de encenderla. Cerillo 2. Verifique que la perilla de control esté en la posición “OFF” (de apagado). 3. Prenda y coloque con cuidado un cerillo aproximadamente a Ω pulgada (1 a 2 cm) de la hornilla para dorar. 4. Gire la perilla de control de la hornilla para dorar a la posición HIGH (llama fuerte). La hornilla debe encenderse en 5 segundos. 5.
PARA REDUCIR AL MÍNIMO LAS LLAMARADAS: • • • Recorte el exceso de grasa de la carne antes de cocinarla. Cocine la carne con alto contenido de grasa (pollo o puerco) con llama suave o indirecta. Verifique que la hornilla para dorar está en una superficie nivelada y que la grasa puede salir de la hornilla y acumularse en la bandeja para grasa.
ADVERTENCIA TRANSPORTE Y ALMACENAJE: • • • • • • • Nunca mueva una parrilla cuando está caliente o con objetos sobre las superficies de cocción. Asegúrese de que el suministro de gas natural esté cerrado. Después de mover la parrilla, verifique que no haya fugas en ninguna de las conexiones de gas. Consulte las instrucciones para las Pruebas de detección de fugas. NO guarde un cilindro de gas de propano líquido de reserva (lleno o vacío) debajo o cerca de la parrilla.
PREGUNTAS FRECUENTES El número de modelo y número de serie de la parrilla y la información para contactarse con el Servicio de atención al cliente de Brinkmann se incluyen en una etiqueta plateada en la parte posterior de la parrilla o en el costado de la caja de la misma, debajo del estante lateral. Estas preguntas y respuestas son para su conocimiento general y podrían no ser aplicables a su modelo de parrilla.
INSTRUCCIONES DE ARMADO LEA DETENIDAMENTE TODAS LAS ADVERTENCIAS DE SEGURIDAD E INSTRUCCIONES ANTES DE ARMAR Y USAR LA HORNILLA PARA DORAR. No se necesitan herramientas para armar esta hornilla para dorar a gas natural empotrable: 1 LISTA DE PARTES: 1 1 Rejilla para cocinar 2 1 Conjunto de hornilla para dorar 3 1 Pila 4 1 Bandeja para grasa 2 SI FALTAN PARTES, LLAME A SERVICIO AL CLIENTE AL 800-527-0717. (Se requerirá el comprobante de compra.
ADVERTENCIA: 2 18 12 ” No instale esta unidad en un gabinete combustible. Mantenga un espacio mínimo de 36 pulgadas (91 cm) entre todos los costados de la parrilla y las paredes u otros materiales combustibles. NO use la parrilla debajo de construcciones combustibles elevadas desprotegidas. 12 w ” ” 6” 12 ” ” 36” - 38” 92 5” Dimensiones de corte del área de instalación de la hornilla para dorar a gas natural empotrable de acero inoxidable: Largo: 18 1/2” (47 cm) Anchura: 12 3/4” (32.
Conexión de la manguera Después de empotrar la hornilla para dorar, pase el conector de la manguera por el agujero lateral y hale la mayor cantidad de manguera posible. Luego conecte el acoplamiento de desconexión rápida.
©2006 The Brinkmann Corporation Dallas, Texas 75244 U.S.A. www.brinkmann.