
Operation Manual


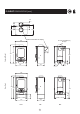

CONNECTIONSTOFLUES
Thestovemustbeconnectedtotheflueusingfluepipeofthe
followingsizes:
Iftheoptionalverticalrearflueconnectorisusedthenthechimney
maybesweptthroughtheappliance.
Horizontallengthsoffluemustbekepttoaminimumandshouldnot
bemoreinlengththanthefluediameter.
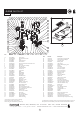
Thestovecomeswiththeblankingplatefittedtothetopflueoutlet.
Thesealforthe outletisa180mmdiaringofropeseal.Theseal
forthe outletisalengthofadhesivebackedfibrewebbing
suppliedwithinstructions.Thisisappliedtothefluecollarorthe
VerticalRearFlueadapterforrearoutletinstallations.Fortopoutlet
installations,theblankingplatemustberemoved,havethewebbing
fittedto itssealingface,andfittedtotherearflueoutlet.
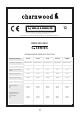
StoveModelC-Four&C-Five.....................125mm(5")i/dpipe.
StoveModelC-Six,C-Seven&C-Eight........150mm(6")i/dpipe.
top
rear
Thismaybestainlesssteel,castiron,orthickwallsteelpipe.Straight
lengthsofCharnwoodPipetomatchthestoveareavailableif
required.
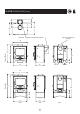
Thereareseveralwaysofconnectingthestovetotheflue.Theseare
illustratedinFigs.4to7.
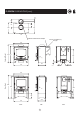
Ensurethat
thefoldontheclampingplateisinlinewiththelugsonthefireboxas
showninFig8.Ensurethattheclampingplatedoesnotpreventthe
throatplatefromseatingcorrectly.Allflueconnectionsmustbewell
sealed.
Fortopoutletinstallationsonthe thefluecollar
deflectormustbefittedatthesametimeasthefluecollarbecauseit
usesthesameboltstosecureittothestove.Thelongestlengthofthe
fluecollardeflectormustbealignedwiththefrontofthestoveas
showninFig9.
CFive,Six&Seven
SOOTDOORS
Itispossibletopassa16inchdiametersweepsbrushthroughthe
appliancebutinmostbackoutletinstallationsitwillbenecessaryto
haveasootdoortoenablethechimneytobeswept.Theoptional
verticalrearflueconnectordoesallowthechimneytobeswept
throughthestove.
Sootdoorsmayeitherbeintheactualbrickwork
ofthechimneyorintheregisterplate.Variouspositionsofsoot
doorsareshowninFigs.4to7.
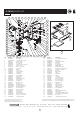
UNPACKINGTHESTOVE
Thestovearrivesboltedandshrink-wrappedtoitspallet.Theremust
beadequatefacilitiesforunloadingandmanoeuvringintoposition
Thewrappingisfirstremoved,thenthestovereleasedfromthepallet
byeitherremovingthesinglebolt(C-4)or4palletbolts(C-5toC-8)
11
®
INSTALLATIONINSTRUCTIONS
RegisterPlate
WithSootDoor
Alternative
SootDoorPositions
Fig.7.HorizontalRegisterPlateWithOptional
VerticalRearFlueConnector
Fig.8.FlueBlankingPlate.
BlankingPlate
Clampingplatefinishes
flushwithinsidefaceof
fireboxtopandbottom.
withGlassFibreWebbing
SealBlankingPlate
GlassFibreWebbing
BlankingPlate
BackofStove
ClampingPlate
M8Nut
FlueCollar
Ropeseal
FlueCollar
Front of Stove
Deflector
Fig.9.FlueCollarDeflectorfitting.