
Owner`s manual


Knife Removal and Replacement
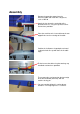
Out-feed table
In-feed table
Locking bar bolts
Locking bar
Knife
Cutter block
Using the 8mm spanner provided, turn the bolts
clockwise so that you screw them into the locking
bar. When you have done this with all 6 of them,
you may lift out the locking bar and knife.
Be aware that there are two small springs
underneath the knife. Remove it slowly so that
you do not lose these.
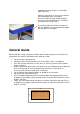
Locking bar
There are two pins in the back of the locking bar
which engage with the slots in the blade.
Blade slot
The springs are used to lift the knife as part of
the knife setting process.
Fit the replacement knife, by locating it onto the
pins on the back of the locking bar. Ensure the
two springs are in place.
Place the blade setting gauge on the out-feed
table with the curved section sitting over the
blade and cutter block. Press down until the
setting gauge sits flat on the table. In this way the
blade will be set at the correct height, being
pushed up against the gauge by the springs.
Tighten the locking bar, starting with the two
outer bolts, then the inner bolts. Ensure it is
firmly locked in place.
Repeat these steps for the second knife. Check
that the blades do not foul the edge of the table.