LASER LIGHT AVOID DIRECT EYE EXPOSURE CLASS 3R LASER PRODUCT CLASSIFIED PER EN/IEC 60825-1:2007 Complies with FDA performance standards for laser products except for deviations pursuant to Laser Notice No. 50, dated June 24, 2007.
TABLE OF CONTENTS 1. BEFORE YOU BEGIN ............................................................................................................................................... 3 WHAT IS INCLUDED ................................................................................................................................................................................................. 3 UNPACKING INSTRUCTIONS ............................................................................................
1. BEFORE YOU BEGIN What Is Included 1 x Eclipse™ RGB 1 x Power cable 1 x Warranty Card 1 x User Manual Unpacking Instructions Immediately upon receipt, carefully unpack this product and check the container to make sure you have received all the parts indicated above in good condition.
Safety Instructions Please read the following notes carefully because they include important safety information about the installation, usage, and maintenance of this product. Keep this User Manual for future consultation. If you sell this product to another user, be sure that they also receive this document. Always make sure that the voltage of the outlet to which you are connecting this product is within the range stated on the decal or rear panel of the product.
Non Interlocked Housing Warning This unit contains high power laser devices internally. Do not open the laser housing, due to potential exposure to unsafe levels of laser radiation. The laser power levels, accessible if the unit is opened, can cause instant blindness, skin burns, and fires. Laser Safety Notes STOP AND READ ALL THE LASER SAFETY NOTES BELOW Laser Light is different from any other light sources with which you may be familiar.
Laser Safety Label Reproduction EXPLANATORY, MANUFACTURER’S ID & CERTIFICATION LABEL LASER HAZARD WARNING LABEL LASER APERTURE LABEL Eclipse™ RGB User Manual 6 NON INTERLOCKED HOUSING LABEL 12/20/2011
LASER EXPOSURE WARNING Laser light - Avoid direct eye contact! Further guidelines and safety programs for safe use of lasers can be found in the ANSI Z136.1 Standard “For Safe Use of Lasers”, available from the Laser Institute of America: www.laserinstitute.org. Many local governments, corporations, agencies, military and others, require all lasers to be used under the guidelines of ANSI Z136.1. Laser Display guidance can be obtained via the International Laser Display Association: www.laserist.org.
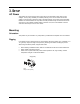
2.
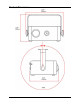
Product Dimensions Eclipse™ RGB User Manual 9 12/20/2011
3. SETUP AC Power This product has an auto-ranging power supply that can accommodate a wide range of input voltages. The only thing necessary to do before powering on the unit is to make sure the line voltage you are applying is within the range of accepted voltages. This product will accommodate between 100~240V AC 50/60 Hz.
Proper Usage This product is for overhead mounting only. For safety purposes, CHAUVET® recommends mounting your lighting effect products on steady elevated platforms or sturdy overhead supports using suitable hanging clamps. In all cases, you must use safety cables. You can obtain appropriate mounting hardware from your lighting vendor. International laser safety regulations require that laser products must be operated in the fashion illustrated below, with a minimum of 3 meters (9.
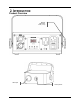
4. OPERATING INSTRUCTIONS Control Panel Operation To access the control panel functions, use the four buttons located underneath the display. Please refer to the Product Overview to see the button locations on the control panel.
Configuration (DMX) Starting Address Set the product in DMX mode to control with a DMX controller. 1. Connect the product to a suitable power outlet. 2. Turn the product on. 3. Connect a DMX cable from the DMX output of the DMX controller to the DMX input socket on the product. When selecting a starting DMX address, always consider the number of DMX channels the selected DMX mode uses. If you choose a starting address that is too high, you could restrict the access to some of the product’s channels.
DMX Channel Assignments and Values 12-CH Channel Function 1 Auto Mode 2 Color 3 Strobe (laser) 4 Rotation (laser) 5 Vibration 6 Flash 7 Red 8 Green 9 Blue 10 Dimmer 11 Strobe (LED) 12 Rotation (LED) Eclipse™ RGB User Manual Value 000 049 050 099 100 149 150 199 200 255 000 004 005 028 029 056 057 084 085 112 113 140 141 168 169 197 198 224 225 255 000 004 005 249 250 255 000 004 005 127 128 133 134 255 000 004 005 255 000 004 005
Configuration (Standalone) Set the product in one of the standalone modes to control without a DMX controller. 1. Connect the product to a suitable power outlet. 2. Turn the product on. Never connect a product that is operating in any standalone mode (either Static, Automatic, or Sound) to a DMX string connected to a DMX controller. Products in standalone mode may transmit DMX signals that could interfere with the DMX signals from the controller.
Master/Slave Mode The Master/Slave mode allows a single Eclipse™ RGB unit (the “master”) to control the actions of one or more Eclipse™ RGB units (the “slaves”) without the need of a DMX controller. The master unit will be set to operate in either Automatic or Sound Active mode, while the slave units will be set to operate in Slave Mode. Once set and connected, the slave units will operate in unison with the master unit. Configure the units as indicated below. Slave units: 1.
General Troubleshooting Applies to Symptom Solution(s) Lights Foggers & Snow Controllers Dimmers & Chaser Breaker/Fuse keeps blowing Check total load placed on device Chase is too slow Check users manual for speed adjustment Device has no power Check for power on Mains. Check device’s fuse. (internal and/or external) Loss of signal Use only DMX cables Install terminator Note: Keep DMX cables separated from power cables or black lights.
Technical Specifications WEIGHT & DIMENSIONS Length.......................................................................................................................... 7.7 in (196 mm) Width ........................................................................................................................... 9.5 in (241 mm) Height .......................................................................................................................... 6.4 in (162 mm) Weight .......................