
User manual


Page 20 of 23 CORE™ 3x3 User Manual Rev. 1
Two-by-Two
(2 x 2)
Master/Slave
Mode
The Two-by-Two (2 x 2)
Master/Slave mode allows a single CORE™ 3x3 unit (the
“master”) to control the actions of 3 other CORE™ 3x3 units (the “slaves”) as
if they
were one unit, when positioned 2 units across by 2 units down. The master
unit will be
set to operate in Master mode 4 (and in either an Auto program or Sound-Active mode),
while the slave units will be set to operate in Slave modes 2 through 4
. Once set and
connected, the four units will operate as one.
Configure the units as indicated below.
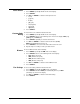
Slave units:
1. Press <MENU> on the slave units until SLA shows on the display.
2. Press <ENTER> and SLA1–SLA4 shows on the display.
3. Use <UP> or <DOWN> to select SLA2 for the slave next to the master, SLA3 for
the slave diagonal to the master, and SLA4 for the slave underneath the master.
4. Press <ENTER> on the slave units.
5. Connect the DMX input of the subsequent slave units to the DMX output of the
previous slave unit.
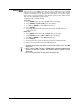
Master unit:
1. Press <MENU> on the master unit until SEnd shows on the display.
2. Press <ENTER> and either SEd1 or SEd4 shows on the display.
3. Use <UP> or <DOWN> to select SEd4 (Master mode 4).
4. Press <ENTER>.
5. Set the master unit to operate in either Auto program or Sound-Active mode.
6. Make the master unit the first unit in the DMX daisy chain.
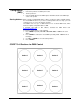
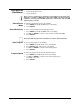
Placement of Units
for Two-by-Two
Master/Slave Mode
The SEd4 setting in the master unit is for the two-by-two grid layout only. With
this two-by-two configuration, be sure to place the slave units in the positions
shown to ensure all 4 units generate a properly coordinated show.
Additional
Two-by-Two
Configurations
Master Unit
SEd4 Mode
Slave Unit
SLA4 Mode
Slave Unit
SLA2 Mode
Slave Unit
SLA3 Mode
Back Panel View
First 2x2 Setup
(as shown above)
Additional 2x2 Setups
Slave Unit
SLA1 Mode
Slave Unit
SLA2 Mode
Slave Unit
SLA3 Mode
Slave Unit
SLA4 Mode