DMX-500 Intimidator Color™ USER MANUAL th Chauvet, 3000 N 29 Ct, Hollywood, FL 33020 U.S.A (800) 762-1084 – (954) 929-1115 FAX (954) 929-5560 www.chauvetlighting.
TABLE OF CONTENT BEFORE YOU BEGIN........................................................................................................................................................... 3 WHAT IS INCLUDED ................................................................................................................................................................................ 3 UNPACKING INSTRUCTIONS .....................................................................................................
BEFORE YOU BEGIN What is included ¾ ¾ ¾ ¾ Intimidator Color™ (DMX-500) Power cord with plug ELC 24V 250W MR-16 lamp Manual with Warranty Card Unpacking Instructions Immediately upon receiving a fixture, carefully unpack the carton, check the contents to ensure that all parts are present, and have been received in good condition. Notify the shipper immediately and retain packing material for inspection if any parts appear damaged from shipping or the carton itself shows signs of mishandling.
INTRODUCTION The Intimidator Color™ DMX-500 brings the latest automated intelligent lighting technology to a super compact and affordable fixture. The Intimidator Color™ features a super bright 250 watt halogen bulb encased in a highly optimized dichroic reflector ensuring optimum lamp performance. DMX-512 control means total control of your light show and an internal microphone enables sound activated programs to perform seamlessly. The Intimidator Color(tm) is best suited for small clubs and mobile DJs.
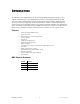
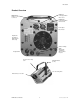
Introduction Product Overview DMX Input Locking 3-pin XLR male socket Lamp Cover Remove screw to slide out DMX Output Locking 3-pin XLR female socket Power Input Fuse Holder Dipswitches Provided for DMX channel addressing Audio Sensitivity (POT) Adjust audio sensitivity to improve fixture response Integrated Mic Top Cover also Lamp cover Hanging Bracket (Yoke) Yoke tensioning knob Manual Focus Lens Gun DMX-500 User Manual 5 Revision: 10/11/2006 1:11 PM
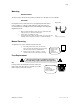
SETUP Lamp You will need to install a lamp prior to the initial operation of the fixture. An ELC 250W halogen lamp is included. Warning! When replacing the lamp, please wait 15 minutes after powering down to allow the unit to cool down! Always disconnect from main power prior to lamp replacement. Do not touch the envelope (glass area) of the bulb with bare hands. If this happens, clean the lamp with alcohol and wipe it with a lint free cloth before installation.
Setup Mounting ORIENTATION This fixture may be mounted in any position provided there is adequate room for ventilation. R IG G IN G It is important never to obstruct the fan or vents pathway. Mount the fixture using, a suitable “C” or “O” type clamp. Adjust the angle of the fixture by loosening both knobs and tilting the fixture. After finding the desired position, retighten both knobs. • • • When selecting installation location, take into consideration lamp replacement access and routine maintenance.
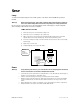
OPERATING INSTRUCTIONS Operating Modes The Intimidator Color™ DMX-500 can be operated in three ways. • • • A stand-alone mode will listen to sound and run through its diverse range of built in programs. Master/Slave mode will allow the command of up to as many units you want in a synchronized light show to the sound. DMX control mode will provide the greatest flexibility and creativity. Each fixture trait can be controlled individually using any universal DMX-512 controller.
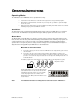
Operating Instructions M AST ER /SLA VE SHOW CU ST OM IZAT ION You can manually assign a slave device number to the fixtures by adjusting the dip-switches as illustrated below. This provides a way for you to customize the playback such as creating unison movement across selections or counter movements. MANUAL SLAVE SETTINGS FIXTURE 1 FIXTURE 2 FIXTURE 3 FIXTURE 4 DMX Mode Operating in a DMX Control mode environment gives the user the greatest flexibility when it comes to customizing or creating a show.
Operating Instructions following manner. By subtracting the largest switch value possible from the selected start address which does not cause a negative number. EXAMPLE STARTING ADDRESS THE CHANNEL ADDRESSES WERE SELECTED AT RANDOM. IT IS RECOMMENDED TO SEQUENCE YOUR FIXTURES FOLLOWING A NUMERICAL ORDER. Address 10 Pin # 4 = 8 Pin # 2 = 2 Total = 10 DMX Values Address 24 Pin # 5 = 16 Pin # 4 = 8 Total = 24 Resolving address using simple math.
APPENDIX DMX Primer There are 512 channels in a DMX-512 connection. Channels may be assigned in any manner. A fixture capable of receiving DMX 512 will require one or a number of sequential channels. The user must assign a starting address on the fixture that indicates the first channel reserved in the controller. There are many different types of DMX controllable fixtures and they all may vary in the total number of channels required. Choosing a start address should be planned in advance.
Appendix DMX Channel Values Channel Value Function 1 000 Ù 219 220 Ù 239 240 Ù 255 Speed Fast > Slow Sound activated mode; Slow Sound activated mode; Fast 2 000 Ù 009 010 Ù 019 020 Ù 029 030 Ù 039 040 Ù 049 050 Ù 059 060 Ù 069 070 Ù 079 080 Ù 089 090 Ù 099 100 Ù 109 110 Ù 119 120 Ù 129 130 Ù 139 140 Ù 149 150 Ù 159 160 Ù 255 Color Closed White/Open Magenta Amber Cyan Dark Green Pink Blue Red Yellow Green Dark Red Dark Pink UV-Purple Light Blue Orange Color Scroll: Speed set by channel (1) 3 000 Ù
Appendix Maintenance To maintain optimum performance and minimize wear fixtures should be cleaned frequently. Usage and environment are contributing factors in determining frequency. As a general rule, fixtures should be cleaned at least twice a month. Dust build up reduces light output performance and can cause overheating. This can lead to reduced lamp life and increased mechanical wear. Be sure to power off fixture before conducting maintenance. Unplug fixture from power.
Appendix General Troubleshooting Applies to Symptom Solution(s) Light s Auto shut off Check fan thermal switch reset 9 Beam is very dim or not bright Clean optical system or replace lamp Controlle rs Dimme rs& Chaser 9 Check 220/110v switch for proper setting Breaker/Fuse keeps blowing Check total load placed on device Chase is too slow Check users manual for speed adjustment Device has no power Fogge rs & Snow Check for power on Mains.
Appendix Technical Specifications WEIGHT & DIMENSIONS Length...................................................................................................................... 279.4 mm (11.00 in) Width ......................................................................................................................... 196.9 mm (7.75 in) Height ........................................................................................................................ 247.7 mm (9.75 in) Weight ...........