Snapshot LX5™ OK on Dimmer Outdoor OK Sound Activated DMX512 Master/Slave 115V/230V Switch Replaceable Fuse User Serviceable Duty Cycle USER MANUAL Chauvet, 3000 N 29th Ct, Hollywood, FL 33020 U.S.A. (800) 762-1084 – (954) 929-1115 FAX (954) 929-5560 www.chauvetlighting.
TABLE OF CONTENTS 1. BEFORE YOU BEGIN....................................................................................................................................................... 3 WHAT IS INCLUDED ................................................................................................................................................................................ 3 UNPACKING INSTRUCTIONS .....................................................................................................
1. BEFORE YOU BEGIN What is included ¾ ¾ ¾ ¾ 1 x LX5™ Power Cord Warranty Card User Manual Unpacking Instructions Immediately upon receiving a fixture, carefully unpack the carton, check the contents to ensure that all parts are present, and have been received in good condition. Notify the shipper immediately and retain packing material for inspection if any parts appear damaged from shipping or the carton itself shows signs of mishandling. Save the carton and all packing materials.
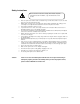
Safety Instructions Please read these instructions carefully, which includes important information about the installation, usage and maintenance of this product. x x x x x x x x x x x x x x Caution! LX5 Please keep this User Guide for future consultation. If you sell the unit to another user, be sure that they also receive this instruction booklet.
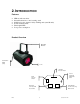
2.
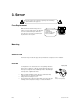
3. SETUP Disconnect the power cord before replacing a fuse and always replace with the same type fuse. Fuse Replacement With a flat head screwdriver wedge the fuse holder out of its housing. Remove the damaged fuse from its holder and replace with exact same type fuse. Insert the fuse holder back in its place and reconnect power. The fuse is located inside this compartment. Remove using a flat head screwdriver.
4. OPERATING INSTRUCTIONS The LX5 can operate in Sound-Active or Auto mode, which is determined by the position of the switch located on the rear of the unit. The mode of the unit refers to the reaction of the LEDs only as there are no moving parts in the unit. To switch between the two modes, place the switch in either the “I” or “O” position. In the “I” position, the fixture operates in Sound-Active mode, the sensitivity of which can be adjusted by the knob also located on the rear of the unit.
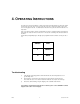
General Troubleshooting Applies to Symptom Solution(s) Lights Foggers & Snow Controllers Dimmers & Chaser Auto shut off Check fan thermal switch reset 9 Beam is very dim or not bright Clean optical system or replace lamp Check 220/110v switch for proper setting 9 Breaker/Fuse keeps blowing Check total load placed on device Chase is too slow Check users manual for speed adjustment 9 9 9 Device has no power Check for power on Mains. Check device’s fuse.
General Maintenance To maintain optimum performance and minimize wear fixtures should be cleaned frequently. Usage and environment are contributing factors in determining frequency. As a general rule, fixtures should be cleaned at least twice a month. Dust build up reduces light output performance and can cause overheating. This can lead to reduced lamp life and increased mechanical wear. Be sure to power off fixture before conducting maintenance. Unplug fixture from power.
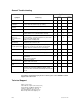
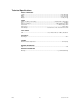
Technical Specifications WEIGHT & DIMENSIONS Length............................................................................................................................. 8.8 in (224 mm) Width .............................................................................................................................. 5.3 in (135 mm) Height ............................................................................................................................. 8.5 in (216 mm) Weight ..............