STAGE DESIGNER TFX-24C User Guide Please read these instructions carefully before use World-wide Headquarters: 3000 North 29th Ct., Hollywood, Florida, USA, FL 33020 Tel: +1-954-929-1115 Fax: +1-954-929-5560 www.ChauvetLighting.
SCENE SETTER USER MANUAL INTRODUCTION: Congratulations on purchasing your new scene setter. It is a microprocessor controlled system that is fully DMX-512 and MIDI compatible. The scene setter is a 24 channel DMX-512 and standard MIDI controller.48 sets of program can be programmed in 4 pages and the total steps can not more than 4500. We strongly recommend that you take time to read this manual fully before you attempt to use the controller.
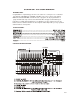
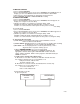
REAR PANEL DC INPUT MIDI DMX OUT 1 1=Ground 2=Data3=Data+ + THRU OUT IN 2 3 4 1/4"stereo jack LINE IN 1 3 5 REMOTE 8 1=Ground 2=Data+ 3=Data- 100mV 1Vp-p 500 mA min 2 AUDIO DMX polarity select 6 Full on Black out GND 7 PAGE 2
OPERATING INSTRUCTION: RECORDING: 1. RECORD ENABLE 1) Press and hold RECORD KEY. 2) Press FLASH 1 FLASH 5 FLASH 6 FLASH 8 keys in sequence. 3) Release RECORD, the led is lighting, recording is ready. 2. ERASE ALL PROGRAMS 1) Press and hold RECORD KEY. 2) Press FLASH 1 FLASH 3 FLASH 2 FLASH 3 in sequence. 3) Release RECORD 3. CLEAR MEMORY 1) Press RECORD key, and then press REC CLEAR KEY. 2) Release RECORD and REC CLEAR at a time. 4. RECORD PROGRAM 1) Set desired channel and record it.
9. ADD STEP 1) In EDIT mode .record the step to be inserted. 2) Press STEP to execute the program till the step you want to insert before. 10. MODIFY STEP 1) In EDIT mode. Press STEP to execute the program till the step to be modify. 2) press UP or DOWN and desired FLASH ,the output will show on display ,you feel it is ok ,release FLASH. 11. CHANGE SHOWING MODE OF DIMMER Press and hold RECORD, then press 0%or0-255 KEY. 12. SELECT AND RUN PROGRAM 1) Press MODE SELECT to light CHASE led.
17.MIDI OUT SETTING 1)Press and hold RECORD 2)Press 2th FLASH KEY 3 times, then release RECORD, when CHO appears on display, you can select MIDI IN channel from 1th FLASH to 16th FLASH. 3)After you press desired FLASH, the appropriate channel led is lit. 4)Press RECORD and EXIT to withdraw MIDI OUT setting. 18.RECEIVE FILE DUMP 1)Press and hold RECORD 2)Press 3th FLASH KEY 3 times, then release RECORD, when IN appears on display, it is ready to receive file dump.
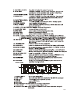
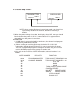
B: closed loop mode: TRANSMITTER MIDI OUT MIDI IN RECEIVER MIDI OUT MIDI IN NOTE: when sending file dump in open loop mode, you should set up receiving mode for the receiver, otherwise receiving is disable 7) When the power voltage is too low ,the display show LOP, now you should check whether the power is OK. It is normal that LOP is appeared for a short while just after power is turned on. 20.
Replacing Fuses If the unit does not function when plugged in ie. items plugged into unit do not operate, then it is likely that a fuse has blown. Unplug unit before attempting to replace fuses. In order to replace the fuse, unscrew the “Fuseholder Cover” to reveal the fuse. The unit has a label attached which indicates the correct fuse rating or you may refer to the Technical Specifications section of this guide. It is most important that replacement fuses are of the correct rating.