
User manual


Operation
WELL™ Quad-M User Manual -15-
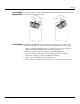
Master/Slave
The Master/Slave mode allows a group of WELL™ Quad-Ms (slave products) to
simultaneously duplicate the output of another WELL™ Quad-M (master product)
without a DMX controller.
1. Set each of the slave products:
a. Go to RUN.
b. Select SLAVE.
2. Set the master product:
a. Set the running mode to DMX (see DMX Control
).
b. Select an auto or custom program as explained in Auto Programs above, or a
static mix of colors.
• The master product is the one that runs a program whether in Auto, Custom or
Static Color mode.
• Do not connect a DMX controller to the products configured for Master/Slave
operation. The DMX controller may interfere with signals from the master
product.
• The master product should be the first product in the daisy chain.
Color Settings
The Color setting determines how the product generates the white color based on
various RGB settings.
1. Go to the SET main level.
2. Select COLR.
3. Select
OFF
,
RGBW
, or
UC
.
OFF:
When all the RGB faders are set to 255, the output is maximum, although
the resulting white color may not be balanced.
RGBW:
When all the RGB faders are set to 255, the resulting output is defined by
the configured White color (see White Calibration).
UC:
When all the RGB faders are set to 255, the output matches that of less
efficient products (Universal Color).
Effect Key
Programming
This setting allows you to program the effect keys on the IRC remote.
1. Go to EDIT > EKY level.
2. Select the desired key on the IRC remote to program (EKY 1~6).
3. Enter the desired program (AT. 01~10 or PR. 01~10).
4. Repeat the steps to program additional effect keys.
5. Press the corresponding effect key to confirm programming.
Color Key
Programming
This setting allows you to program the color keys on the IRC remote.
1. Go to EDIT > CKY level.
2. Select the desired key to program (CKY 1~6).
3. Select the desired color or effect (RED, GREEN, BLUE, or STROBE).
4. Select the desired value (000~255 for colors or 00~20 for strobe).
5. Repeat the steps to program additional color keys.
6. Press the corresponding color key to confirm programming.